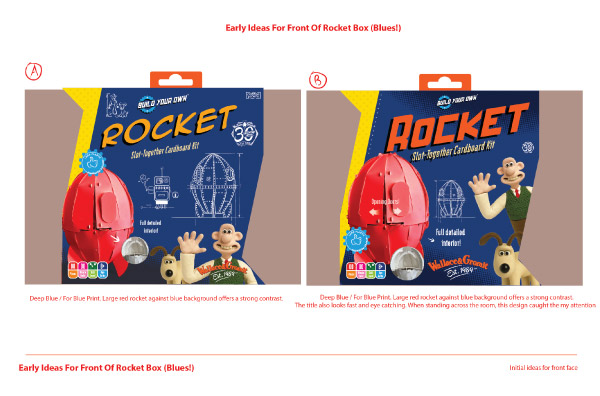
Aardman Wallace & Gromit Project – flex those Adobe Illustrator muscles. I have a new post to share… kindly, the team over at Paper Engine has now said that I can share and discuss my part in creating some of the packaging concepts for a new range of Wallace & Gromit themed products.
The artwork shown in this post was used to pitch to Aardman for a new range of British designed card products, otherwise known as – Build Your Own, For Paper Engine.
Aardman Project | The Brief
The Brief | I was commissioned by Paper Engine to help create the core design for the packaging concepts for a new range of of Wallace and Gromit themed paper products.
Aardman had set up an agreement with Paper Engine for them to come up with a range of products, themed around Wallace & Gromit.
If you don’t know Aardman, they are the animation studio behind Wallace & Gromit, Chicken Run, Arthur Christmas, and Shaun the Sheep to name a few.
Paper Engine got in touch with me and asked for assistance in coming up with the core packaging concept to pitch to Aardman.
I won’t lie, I was excited and honoured.
Under a strict NDA, I was called in to help come up with some of the core concepts for the new eye-catching packaging.
The NDA has been relaxed now, as the products have been released onto the market. So don’t worry. And I asked the crew over at Paper Engine and they were happy to allow me to show my my part!
(All artwork on this page is the intellectual property of Aardman and Paper Engine. Do not copy, save, or download any of this content for commercial use ).
Packaging For Paper Engine… Which was actually for Aardman
To spill the beans on the projects.
Here is a bit of extra information on the project process. Once Paper Engine had sent the brief across to me, and we did all the admin, the project was set in motion!
Aardman Wallace & Gromit Project | The design process involved…
Coming up with some very early ideas for speech bubbles, titles, typography, backgrounds, and other accents and parts for the project.
It should also be said that this project was quite particular and that there were 2 companies involved in the approval process. Nonetheless, it still allowed room for design creativity.
Aardman Wallace & Gromit Project | Developing The Design
While I was allowed to work conceptually and creatively, I also had to adhere to 2 sets brand guidelines! One set was supplied by Paper Engine for Paper Engine and, the other was for Aardman!
Aardman Wallace & Gromit Project | The Delivery
After working on the polished designs, Paper Engine pitched the artwork to Aardman. I was told on the grapevine that they were pleased with the project – with very few changes to the pitch!
Thank you Paper Engine, it was an honour! From there the look and feel for the range was set. It was an awesome project.
How I approached the project
When creating the packaging, I tried to create artwork that was exciting and matched the tone of Wallace & Gromit. I also tried to create packaging concepts that would excite both children and adults if they saw them on the shelf!
‘wow look at that!’
type of thinking with the hopes somebody would pick the product up and purchase it. The product did most of the selling in all fairness, these are very cool products.
Aardman Wallace & Gromit Project | Paper Engine Testimonial
‘We worked with Jimm on some early packaging concepts for our collaboration with Aardman on three Build Your Own kits. He delivered some superb designs which enabled us to get ahead of the curve by keeping the client on board with approvals and saved us some valuable in-house studio hours. We would definitely work with Jimm again in the future when the occasion arises. Top marks. 5 stars.’
Geff – Creative Director, Paper Engine Ltd.
Aardman Wallace & Gromit Project | You may be interested in some of the following
Working with beta testers… creating board games isn’t easy! A crucial and oftentimes overlooked stage for creating a commercial board game is the beta and alpha testing.
I was commissioned to create a board game prototype to teach children about youth homelessness. My primary role was – mostly – visual design and gameplay, and illustration. And… consulting and guidance on creating a game.
When working with Beta testers, I tried to create an environment that was open and invited constructive feedback.
While I took notes, I allowed the Beta testers to play how it suited them to play. Down to opening up the initial black packaging box to reading the rules, in whichever order they chose.
Setting up the Playtests for a board game prototype
This was my first playtest in quite a while. In the past, I have been involved in both helping to set up alpha testing and the follow-up stages of a Beta test. Beta testing on behalf of a 3rd party client was a new experience for me. And there was a lot involved.
Before preparing 2 different environments for beta testing. I had to get the testers to sign NDAs on behalf of the client.
It should also be noted that a large amount of effort was involved to find both beta testers, and finding a space to carry out the beta testing. Money also needed to be paid to the venue for lunch.
Alpha Testing vs Beta Testing
There are some key differences in the alpha and beta testing stages. With alpha testing, this is often a case of a game or game prototype being experimented with and developed internally. In my case, I was the first tester of the rules. I created the rough rules to see how the game mechanics may work and wrote these down as I went along. This is typically the very early stages of creating a working board or card game. The more alpha testing you can do before going to external beta testing, the better.
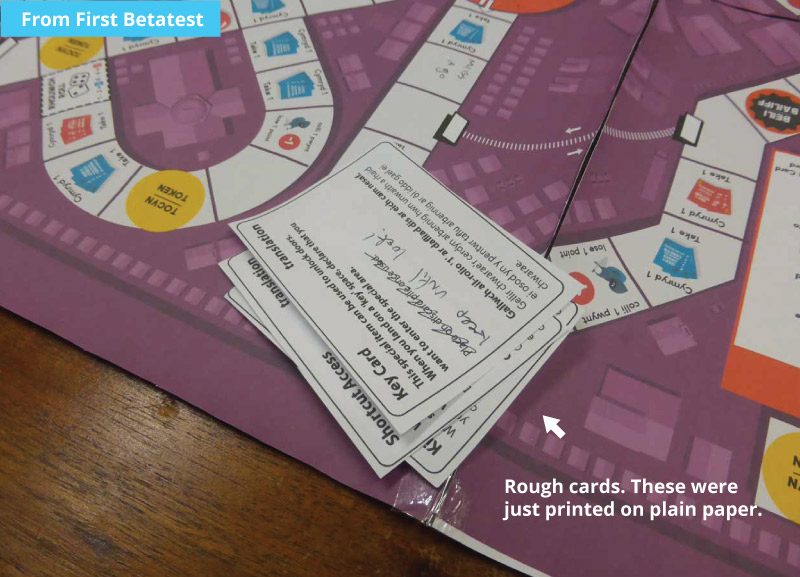
This is a photo of some of the first game components and alpha
Beta testing the game involved finding other parties to look at and play the game. These people had never read the rules or knew what the game was or anything. Once I sourced the beta testers, found spaces to play the game – this then set about into motion the gameplay.
The beta stage is the more developed stage of creating the game prototype.
Creating the gameplay | My experience of working with beta testers
I was involved in creating the initial gameplay as well as working on all the visual design for game. This was part and parcel of the commission of the game project – from top to bottom. Finding board game testers can be tricky ( external website on finding beta testers ) , but I feel that these beta testers offered tremendous value to creating the board game prototype.
Here are some initial screen grabs from the playtest. An important stage when creating a board game prototype.
The first draft low-fidelity prototype
The later stages of the playtest | working with ‘other’ beta testers
I would advise when doing a playtest of your game, to try the game on people you don’t know. ( although I do know Paul here – thanks Paul, Paul is also a drummer I’ll have you know! ) The wider the pool of people… the better. Below are some visuals of the playtesters in action doing their thing!
And me… taking notes on how the game is being played.
Doing these live tests is not always easy on the ears. But they can be essential for making a better and more rounded board game.
A special thank you to the playtesters for this game
This lot should be proud – although the Conwy Council may not know the names of the playtesters I would like to announce who helped make the prototype a more rounded and playable experience.
( me, I was the first tester ) Faye Willets + Family, Helen Edmonds, Jake Joung, Paul Whibley, Steve – and a Special thank you to Liz Chadwick for introducing me to some fellow playtesters!
If you would like any advice or a design service to design your board game you can read more here – freelance board game designer
Are you a playtester?
If you are a playtester for board or card games? Feel free to drop a message across with a bit about you, what you do, where you are based, age, your demographic, and the types of games you like to play. ( please note that many of my playtesters are currently based in the South East – UK )
Are you looking for playtesters?
Playtesters or beta testers can be tricky to find if you are just starting out. This article here on Dragon Bone games About finding playtesters may be helpful – ( Alpha ). Or if in the later stages of development – where to find Beta Testers. ( external website )
Notes – On Prototype
It was a fun project to work on. I would like to say I have no idea what the mass production or future edition of the game will look like but either way – I was happy to be part of the pre-first edition of the gameplay.
Are you looking to create a board game? I was involved in the visual look and feel of the game along with the vector character illustration. Feel free to get in touch if you want to discuss your game project!
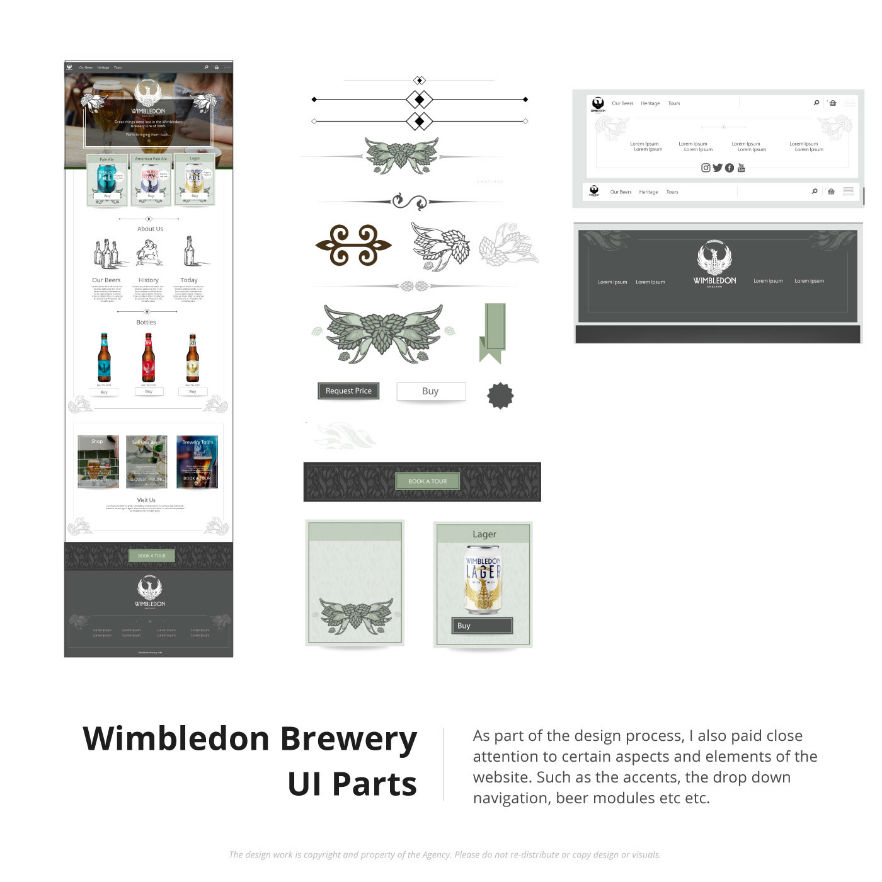
Wimbledon Brewery UI – This project was carried out through a local agency based in Wimbledon. After some initial meetings and discussions with the agency Director, I was commissioned to come up with an early proof of concept for a new website idea for Wimbledon Brewery. It was to pitch a new idea.
I was commissioned for only the ideas and visualisation stages of the project. My part was to come up with a new UI ( user interface ).
In this post, I wanted to share both my involvement, and some of the processes to create for this project.
Gathering Research | Working With The Brief
At first, I went over the brief with my client and discussed the limitations or any important criteria that would affect the project.
After collecting together all of the information for the project, I then set about gathering some additional research and ideas. This could range anything from looking at recommended drinks companies, looking at competitor websites to seeing what we could learn. And browsing Pinterest to name a few.
What was important – was that the brand image of the company was sustained. The UI design needs to stand on its own two feet with the brand being seamlessly integrated.
Roughing Out Ideas
Once some of the initial research was collected together, I then set about putting together the low-fidelity visuals and ideas to share and discuss.
Initial Design & UI Kit Pieces
Bit by bit, I started to put together some initial designs for the various components on the page. For example boilerplates, brand accents, information cards, and the main navigation amongst other important pieces of content.
The design process and the idea generation were created modularly. Key components were examined in close detail before committing them to a polished design and compiled into pages in their entirety.
Proof Of Concept | ( POC )
After the various stages of discussion and mutual brainstorming with the client. I then started to put together some complete and polished visuals for the early proof of concept for a new website.
*This was put together for illustration purposes only
How to edit text on your card artwork in Adobe Indesign! This short tutorial shows you how to make some quick and easy edits to the text in your card artwork in Indesign. This post also covers some general text frame editing.
Editing your playing cards should not be difficult if you know how, and have the right tools.
It should be noted that this article focuses purely on the card editing stages, and not the whole card creation process.
This is a general help article to edit text on your card artwork in Adobe Indesign. You don’t need to be an Indesign guru or know your way around data merge to follow this.
This tutorial is ideal for those that just want to jump and edit the text quickly and hit save. It’s short and sweet, quick and dirty – no fuss. Or however else you want to describe quick text edits for game cards. The same applies to editing text too.
Common Question | Ways of editing the card text in Adobe Indesign
It is quite common for me to hear “how do I edit text on the cards” after I have created the initial prototype for a client.
With the card artwork, it is often in my client’s interest to know how to edit the text themselves or assign somebody else to edit the text. This is especially true in the late stages of production or mass production for various reasons.
One being, I’m not a copywriter profession!
How to edit text in Indesign on your card artwork – put simply
In order to edit the text easily, open the document in Indesign ( if you’ve not done so already). Select the card face you want to edit, ( use the pages panel ) and change the text. You will then need to save your work or export it if you are intending on sending the work to print.
That is the simplified and short answer to editing the game card text in Indesign.
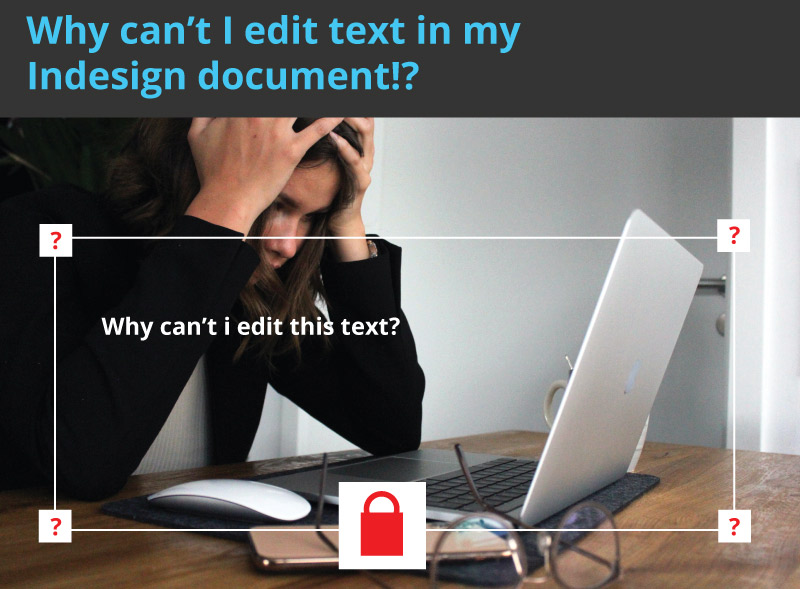
I cannot edit text in Indesign!
If you are finding that you cannot edit text in Indesign or you cannot edit the text on the cards. A few of the reasons could be either the text frame is locked, the layer is locked, or you need to override the master page template.
You can read more on editing your text frames in Indesign at the bottom of this post.
6 Steps to editing text in your card artwork In Adobe Indesign
1 ) Open up Indesign
Assuming that you already have Adobe Indesign installed, in order to edit the text you will need to have Adobe Indesign open.
If you don’t already have Adobe Indesign, you can download it. ( make sure to download from Adobe – DO NOT BUY OR DOWNLOAD from an unknown source )
Make sure that you have permission to install the software and that your computer has the technical requirements to run Adobe Indesign.
*Friendly Disclaimer | Adobe Indesign is not run or owned by myself. Indesign is part of the Adobe Creative Suite. I cannot take any responsibility for any loss or damage incurred should you download any 3rd party software or Adobe Indesign.Please take precautions!
Please check all the requirements from their official website before downloading. ( Adobe Creative Suite ) And make sure that you download the software from a safe source. Do not use any unauthorized 3rd party platforms when downloading InDesign. ( also based on past experience )
2 ) Open up the card artwork
You can either ‘Open’ the artwork from the ‘File’ drop-down menu in Indesign ( File, Open – Select artwork ) or you can open the artwork by ‘dragging and dropping’ the artwork onto the application icon from your desktop.
Or if you have your recent items window on view when you start up Indesign, open your document this way.
Tip – Don’t overwrite your original card artwork!
As a tip, I would strongly advise that you create 2 versions of your artwork and leave the original intact. If you edit the text, change something and save over the original artwork ( ruin it by accident ) you won’t have a way of back-stepping from this mistake.
Create another version! And avoid editing the original version. A piece of advice from past experience.
3 ) Navigating the card artwork for your game
Theoretically, you now have your card document open in Adobe Indesign. It will look something like this.
If you have used a template or a file such as the one shown in this article, then you should be able to scroll up and down through the cards. As you scroll up and down, you should see the back and front of your cards.
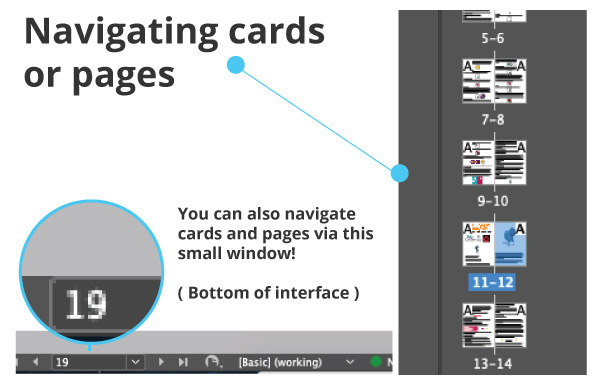
Or, as an alternative way of finding the card you need, go to window > pages. If this tool panel is not already open.
You can either scroll up and down to go through the cards, which is okay for smaller decks, but not as efficient if you have a larger deck. Or if you have your ‘pages’ window open, you can double-click on these to jump to the card you want to edit. This is a faster and more effective method of navigating through your cards.
( Handy tip! Did you know you can see which page you are on at in the bottom of InDesign interface when you are editing the card you want to edit? The illustration above has a close-up of ’19’ to show this. )
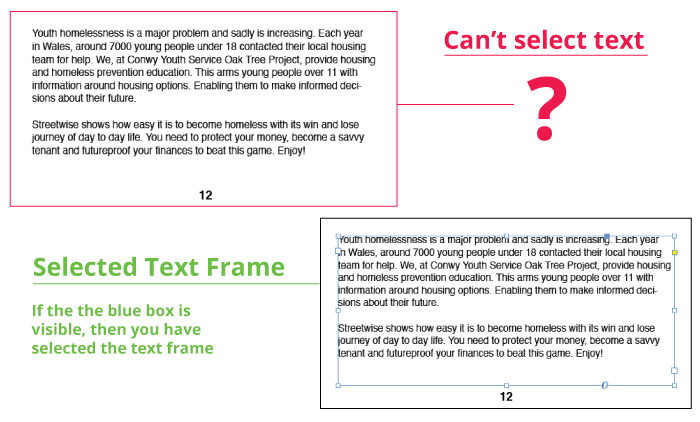
5 ) Find the text box ( interacting with an Indesign text frame )
Assuming that you have now selected the card you wish to edit. Go to the text box ( as shown below ) click on it, and edit your text!
Tools you should only need!
If something has gone awry, here are some simple steps to follow.
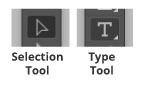
) Make sure that you have the ‘selection tool’ active.
) Go to the box or area you wish to edit.
) Double-click the text box.
) Find the word or sentence you wish to edit.
If you are having trouble being able to edit the text or some of the text, this bit of troubleshooting may help. Cannot edit text in indesign – help!
6 ) After you have edited the text
Now that you know how to edit one text box and all has gone smoothly, you can edit any basic text box in these card files.
Once you are happy with your work and your edits just make sure to save your work. You can save your work by going to file ‘Save’ or ‘Save As’. Or by pressing CTRL+S ( Apple + S ).
7 Bonus Step ) Exporting your file for print
It should be noted that this process is a bit more nuanced and may require more experience and skill in saving your work correctly. It can be easy for somebody inexperienced ( or with experience! ) to run into difficulties when setting files up for print.
Remember, when doing this that you are shouldering the responsibility for all the print production for your cards. If you would like somebody to share the burden feel free to get in touch or read more here. Card game design.
‘Export’ your file as a PDF’
Remember to Select all pages if you wish to save/export all pages for print.
Double-check that the images are above 300 DPI when exporting ( otherwise you will get a low-res file )
Check that it is in CMYK
Hit ‘Export’ and select a location
This is a simplified version of how to edit text on your card artwork in Adobe Indesign. The added end step also instructs how to save your work and export it for print.
Troubleshooting Game Card Editing in Indesign – cannot edit text in indesign!
When looking at how to edit text on your card artwork in Adobe Indesign, sometimes it is not as straightforward. There can be issues such as locked layers, master pages being selected, or even limitations with hardware.
Here are some troubleshooting steps for editing the text on your cards.
Why can’t I select the text box? I can’t edit my text frame!
This could be down to a couple of reasons as to why you can’t edit the text box in your file. Here are some of the potentially straightforward and obscure reasons as to why you may not be able to edit your text :-
You don’t have enough ram/processing power on your computer
If your computer is struggling to run Indesign properly, an odd quirk that can show up is an inability to edit or select text boxes.
Possible solutions:
1 ) Turn off other programs such as Outlook, Your Web Browser, and other non-essential applications to see if this loosens up some grunt for Indesign. Remember to only close nonessential programs
2 ) Change the view to low-res draft mode. This can also make InDesign less taxing on your computer.
3 ) If you have tried all of the above. With a minimal amount of applications still running to allow more resources to go to indesign, close Indesign and re-open it to see if this does the trick.
The object is accidentally locked
There could be a couple of reasons as to why you can’t edit the text in your Indesign document. And, fortunately, the fix for this can be as simple as unlocking your text frame to get it working again.
Here are a couple of ways to check if you have a locked object. Unlocking text frame solutions in Indesign:
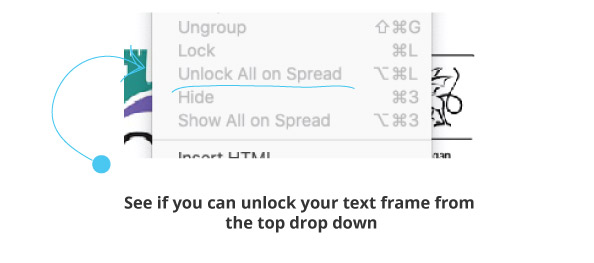
– The Object has been manually locked! This is a simple case of unlocking the object. To make sure the object isn’t locked go to > top menu > and check the drop-down for the Object – Unlock all on spread. Here is an image showing the menu option.
( Here is some more accurate information from Adobe on where to find this exactly – unlocking objects )
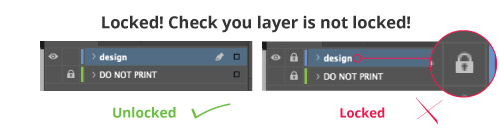
– Your text frame is on a locked layer. Alternatively, your text frame could be on a ‘Locked Layer’. On your ‘layers tab’ in the interface window, check to make sure the editable text layer ‘is not locked’. ( With a padlock on )
You want it ‘unlocked’ – you may also need to open the ‘layers’ window open.
– You are editing the wrong layer. If you cannot edit your text, it can be as easy as having the wrong layer selected. And, having the layer you want edit locked. Make sure you have your correct layer selected and that you are unlocking the correct layer!
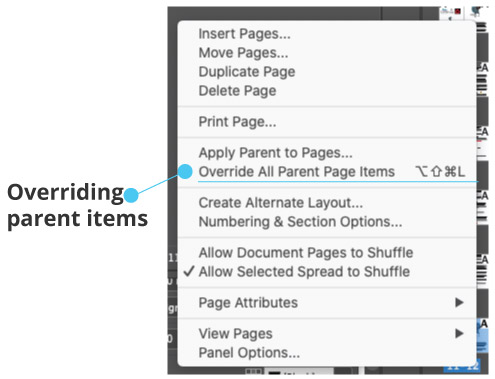
You are trying to edit a master template
Another potential reason that you may not be able to edit the text is that you are trying edit from A, or the Master Page. A way to check is to:-
Select the card ( page )
Right click
And “Override Master Page Properties”
*Just remember not to override and edit the Actual Master template. This may otherwise change the text or design on ‘all of the cards’ or pages. ( remember what I said about keeping a backup? Always, keep a back up file!)
Thank you for reading and editing the text on your card artwork in Adobe Indesign
That is a share of my experience on how to both easily edit the text on any card artwork or card artwork template for your board game. And, how to edit the text in Indesign – when you cannot edit text in Indesign.
Hopefully, this post has saved some time, money, and headache. Feel free to share this post if you feel it is helpful.
If you would like help in designing a card game or creating some illustrations for your game please get in touch.
Final bit of advice on how to edit text on your card artwork in Adobe Indesign
My final bit of advice on editing your text on your card artwork would be to hire a professional if you are doing this as a DIY thing for your business. Or at least find somebody that knows their way around Adobe Indesign, how to save it etc.
Although I appreciate that budgets can’t always make this a viable option it is still potentially the better option.
Getting somebody that is experienced can save headaches later on.
This is an example of a User Interface and website revamp project for a large community centre based in King’s Cross London.
My role in the project involved brainstorming ideas, drawing the new content and banners, considering the user experience and seeking ways in which to make the website design more user friendly, functional and useful for users of the Living Centre.
The brief
After a couple of conversations and a Zoom call with the team at the Living Centre, I was commissioned to design and revamp the website to ‘look less boring’, represent the institution and add some more practical functionality.
I took this a step further. Although digital design is a faucet of my skills like many designers of 2020’s. I wanted to add more than just a simple “yes man” approach to this project. With my commercial experience and creative direction skills. I didn’t want to just say ‘bam’ take their money and go. There is a website and leave. I wanted this website to work not only as part of the brand but as a website and tool for their business.
Without barraging my client saying ‘do this better, because I think so.’ I wanted to know what needed to work. What questions do customers ask – I wanted to do my homework.
These were the starting blocks, and – it should be noted that these were not all of the questions and rounds of discussions.
The home page needed a lot of TLC
After communicating and carrying out research, I had both inspiration and the key criteria in order to create a new look and feel for the website.
I started exploring the ideas with the homepage first.
The home page, as is the case with most websites, was one of the busiest pages in regards to content and information. The Living Centre’s page was loaded with information but in no particular order and without many calls to action either. I tried to turn the home page into a lobby with well-labelled doors and opportunities to funnel users into either making contact or leading to a making money lead enquiry.
I tried my best to capitalize on this page while trying to keep it to the client’s brief. Very accessible, on-brand, interesting, informative and structured. Some of these changes and updates would appear subtle to the outside reader. But many, even the smallest changes were generally very deliberate and considered.
When recreating this page, I tried to break it down into structured manageable and relevant chunks for the web user.
Design The Hire Page
This page actually was a follow-up project after I have revamped the core look of the website and rebuilt it with Divi. Their website and this page had a lot of untapped value.
Upon spotting the hire section needed some more content and juice, and I got to it.
This page covered both coming up with additional UI designs ( although the guides were now already set due to the first project ) and creating more content too.
Website Design mock ups
Some examples of this are illustrating a top-down view of a floorplan for all the rooms to hire, prices, 3D drawings / oblique drawings of the areas, bolder use of area photography amount other various things.
I tried to make this page a silent ‘Hire Space!’ salesman for the Living Centre.
The illustration I created was used on the website
Experimentation & Design
The brief from Living Centre was nothing quite like what I have worked on before. Creating websites and UI’s, I have worked on plenty of these. Creating plan drawings and landing pages. I have worked on these too. But having all these combined into one single project was an interesting challenge.
Below are some samples of the design, such as the banners and some f the early works in progress.
Website Design | Putting the website together
The website was already made using WordPress and Divi. After working on the design stage for the project I was also commissioned put it all together based on my visuals.
Being an existing licence holder of Divi it was not too much of a stretch for me to build these new pages and add the content I had illustrated and designed. I worked in a non-destructive way for the home page. Behind the scenes, I created a ‘master template’ which I switched with the existing home page when it was ready to go!
Testimonial From the Living Centre
“We worked with Jimm to redesign our website. The brief was simple to bring our website, which was static, had little character and was boring alive, fun and informative. We were not disappointed with the outcome.
From start to finish, my interaction with Jimm was professional, stress-free and I had complete trust in his ability to deliver. Jimm took the time to listen to what I wanted but also brought his own ideas, experience and creativity so that the end design was more rounded. He understood that I needed to see things in a visual context and have some flexibility to ‘play’ around with a few ideas. The challenge was we had to do all this via zoom but Jimm made it very easy; being patient when I had technical difficulties making the whole process enjoyable, stress-free and highly personal. “
This website uses cookies to improve your experience. We'll assume you're ok with this, but you can opt-out if you wish. Cookie settingsACCEPT
Privacy & Cookies Policy
Privacy Overview
This website uses cookies to improve your experience while you navigate through the website. Out of these cookies, the cookies that are categorized as necessary are stored on your browser as they are essential for the working of basic functionalities of the website. We also use third-party cookies that help us analyze and understand how you use this website. These cookies will be stored in your browser only with your consent. You also have the option to opt-out of these cookies. But opting out of some of these cookies may have an effect on your browsing experience.
Necessary cookies are absolutely essential for the website to function properly. This category only includes cookies that ensures basic functionalities and security features of the website. These cookies do not store any personal information.
Any cookies that may not be particularly necessary for the website to function and is used specifically to collect user personal data via analytics, ads, other embedded contents are termed as non-necessary cookies. It is mandatory to procure user consent prior to running these cookies on your website.