How to make a retail-ready card game! Simplified stages for creating the game. The stages used to make a retail-ready card game could be assumed to be universal. However, I feel that could be do broad and ‘assuming…’ Also, to those who are interested, here is some information on my new game consultation service. “We didn’t want to leave it to chance“ It was not an accident that Mouth Trap was created and sold to 1000’s of copies in shops across the globe. I was unconvinced… He proceeded to open a tab in his browser and play a clip of the television program. Without paying too much attention to the idea, I dismissed it at first. Thinking it was a game, only people like me and him would play. But he persisted with the idea. I was half right, but
little did I or the company realise how popular it would be.
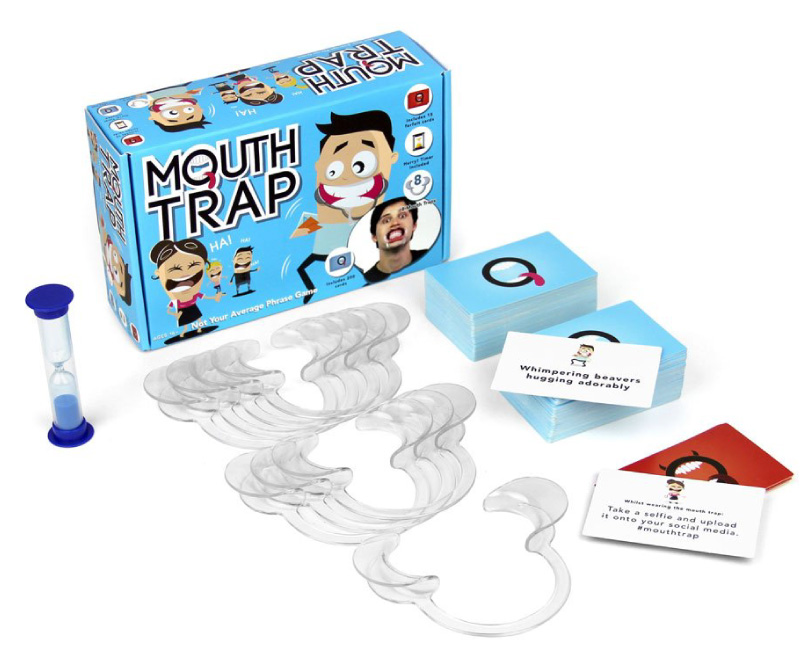
After seeing James Corden trying to speak with one of these dental mouth restraints in his mouth, we came to the conclusion it could be funny if it were boxed and ‘gamified’ for a consumer market in the UK. We created something that followed a trend but was different enough to stand out from what would become a busier crowd. My part in the project involved the visual design, collaborating to create the cards and their contents, the box cover, and playtesting the game. Here is another example playtest for another project. You need to do homework. Without it, you are making something blind. Ever distancing your chances of hitting your retail success, whether you base this on popularity or consumer sales. I have come to learn that there are different demographics in the board game community. These 2 demographics can also be extreme opposites in tastes within tabletop gaming. These are just some of the questions to ask when creating a retail-ready card game for the masses! Learn to appreciate your group! The game we created wasn’t revolutionary, but it took some lessons from other successes. Something you can take away – you don’t need to reinvent the wheel. Creating a game is a BIG decision. The volume of eager, fresh-eyed enquires I receive, thinking ‘it’s all fun and games’, is high. It is not long before I see bleary eyes and jaded tones trudging the midstages of a very big project, even when I try to keep clients motivated. Observe the greats, watch the audience, and plan your actions. We wanted to know who would buy this product and how we could be different. Retailers won’t care about your product as much as you do. Proving that your product follows a trend can put you in good standing, but be prepared to fight in a market that will saturate quickly. Trend chasing can be very advantageous in the short term, but challenging to sustain and fight in the long term. Stand on the shoulders of giants! See what they see. See what they do and consider what you can do from this great vantage point. The greats can offer a brilliant blueprint. But a downside to this is that it can hamper originality. Assuming you have gone with an existing product that has an established community and marketing buzz, creating an out-and-out copy won’t get you very far or last for the long-term. We brainstormed various ideas on how we could have different modes of gameplay. Alterations to rules, extra dynamics of the game, and remember to keep it low-cost. If you want to create a game that is successful in the retail market, you will need to have access to companies that can sell your game on your behalf. Or you may prefer to sell your product directly to the customer, but this is much harder to scale as a business. Some companies also adopt a hybrid approach of a wholesale business model and selling directly to customers. As a case study on how to make a retail-ready card game, or at least a successful one as illustrated throughout this post, I will focus on how this card game was sold. You may already have access to shops and stores that can sell your game, or you may aspire to sell the game yourself. But if you want to scale quickly, you will need to ‘wholesale’ your game. This game was sold via Hasbro, Robert Dyas, to name a couple of large high-street shops in the UK. Finding retail channels for new business can be tricky. Consider going to Expos and events. Look at Kickstarter campaigns to raise funds and awareness of your game. For those who are interested. I run a website dedicated to making tabletop gaming and the niche of making games. OR if you need help with your game design, take a look here : In order to make a good game, your product needs to be good. It is short-sighted to make a pretty but unplayable game. A crap game will prove it is crap once it is available to the market. The general public can also be ruthless with their opinions. Make sure to run playtests on your game first. As illustrated in this article. Our card game had become popular. We needed to create more content and quickly! Surfing the wave of this success, we created more content and more products. We created additional expansion packs, card decks, and different editions of the game to serve a hungry market for the game. The project was intense, but it was both a blast to make and the party game market liked it too. The game started to gain popularity and traction online from social media, to Amazon, to other forums, comments, and outlets. We looked at the reviews to see what we were doing well and what we weren’t. Some comments can be stinging to read! Others were throwaway opinions. Design by data. “Hilarious !! We had a great laugh looking at this when it arrived and can’t wait for Boxing Day with friends to have a game. One thing though, I had a cold when I first tried it and my lips were dry so they got sore, it may be worth putting a bit of Vaseline on before putting the trap in your mouth if you have dry lips” “Xmas pressie so not yet looked at” Create something people will enjoy. You want them to take away a good user-experience and feel happy with their purchase. No one wants to pay money for a game that is clearly a rip off and landfill. When I say keep it affordable, I mean keep it ‘accessible‘. Keep it affordable, does it need spot UV printing? No. By all means, keep the cost low, without compromising on the quality of the game. Use a ‘Minimum Viable Product’ – remembering not to insult the customer with your finished game by going too… ‘Minimum Viable Product’ Want to help ensure the longevity of your game for longer-term success? Please play test it. I have played a couple of board games over the years, which looked fancy but were either unplayable, unenjoyable, or and with poorly written or ill-considered rules. Even as an indie board game creator, you should aspire to make something that can at least be played and enjoyed. You are not selling art first. You are selling a board game. However, the art can be very important; it shouldn’t be a compensation for gameplay or game mechanics. If we were to make this game again. I would still try to make it enjoyable again. Although, do consider that what is fun for one person can be misery for another. Mouthtrap was initially tested on some peers and colleagues. This is better than no testing at all, but leaves plenty of room for improvement. Play tests allow you to develop core game mechanics in a safe environment. Don’t leave it to the general public to discover broken game rules and mechanics. Testing the game ‘only on you’ is the first port of call. But you will play your game as you expect to play it. People often play games in unexpected ways and interpret rules in a certain manner. You can read more on this article of working with Beta testers when playing a game. Need a hand with designing your game? When asking how to create a retail-ready card game, the end product matters if you want to strive towards success. The appearance matters if you want to be taken seriously. Want your product to resonate with target board game players and it matters in the marketing of your game. In certain scenarios, the appearance of your game matters more or less depending on the nature of your game. Retailers like a ‘professional-looking game‘. They want a game that they feel they can sell to their customers. They want an appealing product to place on the shelf and help sell a product. The retailer may also seek to find a product that is a brand or culture fit with their existing ranges. Likewise. Players want to look at the game. It needs to look better than something they could do themselves. Nothing too homebrew. Design can be a great thing for a product. Not just in appearance, but also in marketing and telling a part of a collective narrative in the game. Graphic design; I will say controversially, can also be used as a dark art. If you want longer-term success with your game. Don’t do this. I have played games that looked great but are unplayable. Don’t rely on graphic design as a gimmick to sell a weak product. A good example of a popular game is Chess. It has come in many guises over time, ranging from drinking editions to Harry Potter, but it still has the solid foundations of being a good game (open to opinion), which can be played over and over again. It needs no introduction. IF you were to design a piece of packaging for a chess game. It would only help to sell an already great game. It doesn’t need design to be used to disguise its shortcomings. Graphic design should be used to help sell an already strong product, not carry it. Fortunately for this game, we felt that it was fun for most before moving to the graphic design stages. This step covers some of the journey involved in creating the product. Creating cards, the logo, the box, the concept, the marketing material for the game… writing! The first box (edition
1) was created using a pizza box type Dieline. The later editions
came as a top and bottom box with a lid.
This was one of my favourite aspects of the game. Creating the cards. Later editions of the cards were changed so that phrases were on both sides. Visually, a little less appealing but offered better value to the customer and extended the length of game play. All design work on this post is copyright owned. Please do not take or use without prior permission. Okay, you got me. I am the owner of Dragon Bone Games.co.uk. A website all about making games, a niche gaming that you may find interesting to know a bit more about. Here are some links.
If you’re looking at how to create a retail-ready card game that you can sell to large retailers, this article covers the stages and strategies we used ( in my former role) to design and create a successful game.
This article is both a ‘how-to’ and a case study for those who are interested.
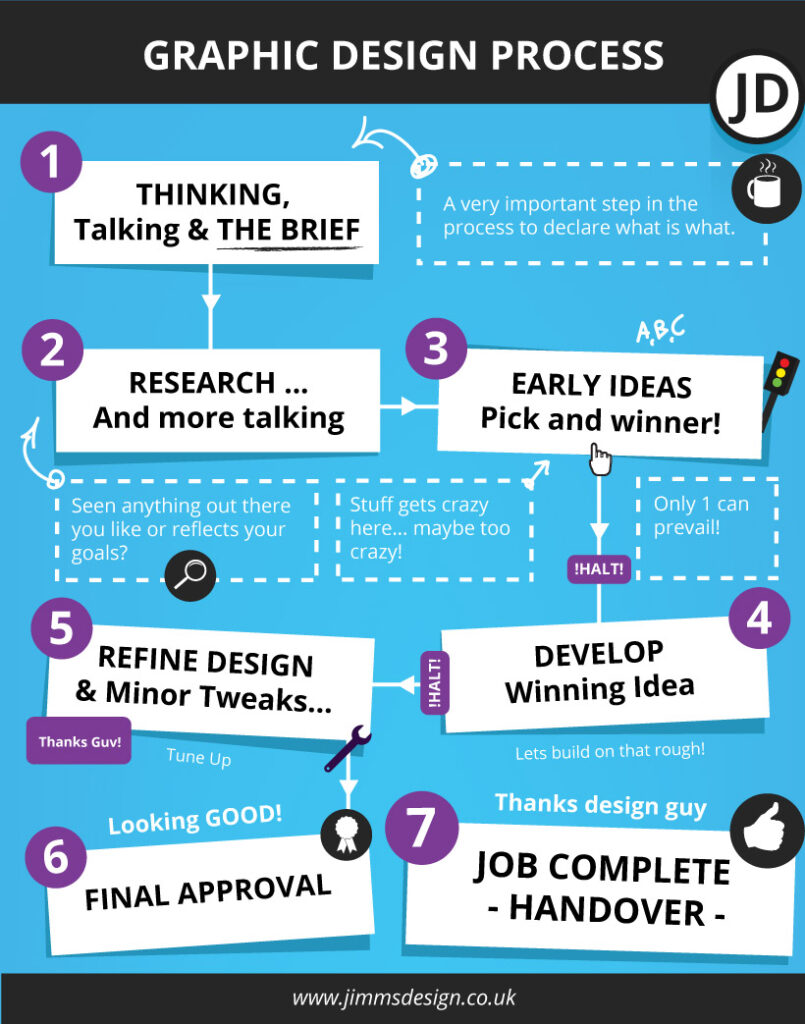
How we made a successful retail-ready card game … in steps
Steps Used To Create a Successful Game
This here is the process used to make THIS retail-ready card game. One that garnered excitement and earned my former employer a decent sum of money.

How to make a retail-ready card game – Why this game was made
After undertaking initial research into new product ideas, a colleague mentioned to me that he had seen a game where players had to say silly, tongue-twisting phrases whilst wearing a dental mouth restraint.
We went forward to create a successful card game! And what a blast we had creating it! Big Tip 1 ) How to make a retail-ready card game | Research, Research, Research
When creating a game you intend to sell in ‘big-retail’ make sure to undertake as much research as possible at the beginning.
For example, we wanted to know if there was an audience ready for the game, we didn’t want to to go the trouble of making the game – spending £ 1000s in company budget and time only to discover nobody wanted it, or that we had no way of selling it.
We didn’t want to leave it to chance.
Don’t just research aimlessly. Your research must carry an aim and purpose.Considerations for research when trying to make a card game for retail
When considering how to make a retail-ready card game, ensure you have a target demographic in mind, now design your game specifically for that group. It can be hard to please everybody.
Creating a ‘trend’ game with a difference
How you frame your project matters both emotionally and financially.
Board game development is a very costly commitment. You will want to see the fruits of your labour, even if you do have fun along the way!
A difference: When working with the team, we studied competitor websites, products, and online reviews. We collected our data and based our design and content decisions around the information we had collected.
This often fell in line with a process the company called NPD – (New Product Development)
We added our own style, created rude cards, included some playful forfeits, and developed add-on packs. It even went so far as to create an early proof-of-concept app, but that was shelved, sadly!Know This: Retailers won’t take stupid risks | Surfing a trend proved to be a wise move!
They don’t want headaches. They don’t want problems. How can they gain? Retailers want to know what supplying your product will do for them.
That is a blunt way of putting it, but largely true.Tip 2 ) Making A Game A Retail Ready Success | Learning from the greats ( stand on the shoulders of giants )
Setting aside legal issues, market saturation and being a grubby business practice, you will want to create something good and call it your own. Even if you take some inspiration elsewhere. 
Tip 3 ) Get access to gaming retail channels
You may find the post about: List of UK game expos useful. Or board game fulfillment companies. Need a hand with your board game design project?
Tip 4 ) How to Make a Retail-Ready Card Game | Customer Validation
Observing what the audience said
End-users (customers on the street) were enjoying the game and sharing their joy and comments. This gave us a great sense of pride, we had created something that the world enjoyed.
Our product was making people happy! ( felt good about that!)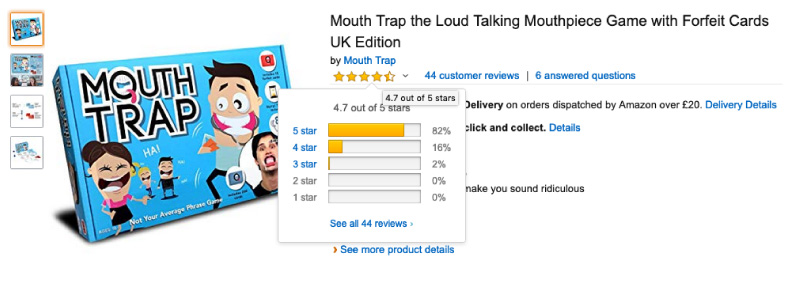
Tip 5 ) Keep it affordable
When we created this game, we wanted to create something that was good value for money. Adding more to production costs has a knock-on effect. When it comes to selling your game, and whether the end user can afford to buy your game, consider the final cost. This can have an enormous effect on the success of your game. The price point!
Will your cost reduction impact the gameplay? If no, then consider removing it.
The more you add to your game, the higher price you will have either pass on to the customer.
This game was between £15 – £20 for the minified edition of the game. Lower prices can also keep it affordable to a wider audience. IF you want to keep a premium version of your game, consider a travel version or a minified version also. Tip 6 ) We Play-Tested This Game! Again, and again…
Once the initial prototype of this card game was created. We tested the product and its phrases to see what worked and what needed improvement. You would be surprised by what you can discover in a play-test. Don’t do this – A hot t*rd wrapped in a shiny ribbon
The aesthetics of a board game are like putting the “cart before the horse” when it comes to making a card game or board game. You shouldn’t create a game that looks good but is terrible to play – people will feel duped!Example playtest for this successful card game
Game Consultation: Share your thoughts!

Tip 7 ) The appearance of the game is important to its success
Disguising a poorly constructed card or board game in ‘great graphic design’
Chess is a classic game. It can stand on its own two feet without being wrapped in a gimmick, as the foundations are already there. You can play it!How to make a retail-ready card game | The Design Process –

Box net design for drinking edition game

Mini version of game

(Card Art

Piddle Pants Monk – Game Illustration


Why not start building your successful retail-ready card game!
Need a hand with your board game design project?

How to make a retail-ready card game – Other helpful links
Other websites you may find interesting for making games
*All links lead to the 3rd party website.
20 killer tips to land your first Junior Graphic Design role
Your first Junior Graphic Design role…. that was many moons ago.
This post offers useful, honest, and actionable tips to help you land your first Junior Graphic design role or internship. Much of this experience comes from hiring design interns and from myself hiring interns for more traditional design roles.
Although I would like to add… the design profession has changed dramatically. There will still be some helpful little tips for me to share.
Now, go get your first Junior Graphic Design role of dreams ( maybe ).
This post is here to help
“If you have no idea what type of design you want to do, don’t be too hard on yourself – I didn’t know either.”
– My older to younger self
Getting your first Junior Graphic Design role: overview
Finding work as a fresh-faced young ‘Graphic Designer’ can be a challenge! More so in this day and age.
In order to land that perfect design role, you need to really sell your skills and passion in a very competitive and crowded market. Saying ‘give me a job’ won’t cut it. Companies don’t want to do you a favour, they haven’t the time. By offering your assistance in the role, you can help in a design position, which may shift your mindset.
What can you bring to the role? Does your portfolio align with what the company wants and needs? Does your style suit the job and the company?
This post has been written to offer assistance in your journey to landing that desired role. Hopefully, following these 20 graduate designer tips will bring you closer to achieving your goal of becoming an intern or a graduate designer. But, I shall promise and guarantee nothing – the creative world is too turbulent for that, I am afraid!
As for my credentials, I have both been a design graduate and a manager in charge of hiring interns and graduate designers. This post will cover what the company looked for (my previous role), what ‘I’ looked for, and what I wasted my time doing in the beginning when looking for work.
My Career Credentials in Design
1) I’m not Neville Brody or Saul Bass.
2) A lot of this experience comes from nearly 20 years working in-house and freelance
3) The rest is self-taught
4) The rest of it is from first-hand experience hiring
Your first Junior Graphic Design role: 20 detailed tips for landing that ideal creative role :
Part 1.

Part 1 – Getting Into Mindset –Job hunting is a job in itself.
1 ) Be positive, and stay positive
There may come a time in your search for work where you will feel down in the dumps, the worst thing you can do if you really want to be a Graphic Designer is throw in the towel too early on.
Some graduates manage to find jobs as a designer straight out of University, they are lucky or super gifted or both… or know somebody.
Others will land roles off the back of work experience
Other graduates will land a job after 4 months of applying for design work ( mine was 11 )
After 400 applications and rejections.
Or moving closer to where you are likely to find design work ( that was my story )
Keep going and push forward. No two people are the same and your journey could be different. Do what you need to do – it’s tough. Think adapt and learn.
2 ) Don’t waste (too much) time with recruiters
I put too strong an emphasis on talking to recruiters en masse when looking for work in London! This was at the start of my career, believing they would be the gatekeepers to my dreams! I can recall a few being pretty blunt, some downright rude, and very few kind or helpful.
Generally speaking, recruiters don’t manifest results if you are a graduate. This may not be the case for all, but this was certainly the case for me.
I will assume they are more preoccupied with chasing bigger commissions. Or speaking with cooler non-country bumkin designers. Who knows!
The few that were useful gave some interesting advice – remember these people. All in all, don’t wait for recruiters. Go search yourself.
Try this website: –
– Creative Opportunities
3 ) Keep bettering yourself
This follows on from “wasting time”. Sitting on your computer watching Youtube videos about cute cats jumping off of furniture isn’t going to land you a job!
Make use of your time by researching companies, learning the nuances of your desired design specialisation. The more skills and worthwhile projects you have in your portfolio, the closer you will come to landing your first ideal role.
You may find things like this interesting while you are tinkering with software :
- Common text box headaches in Indesign
- Reducing banding in Photoshop
- What is a design process
- Why is my black coming out dull in print?
4 ) Imagine your ideal role
Landing your first Junior Graphic Design role is hard enough, so is trying to imagine it.
For me, this was the trickiest part of finding a role, and I feel that my portfolio, although diverse, could have been considered convoluted. This was at a time when graphic designers and multimedia designers did not wear the same badge at all. You were one of the other.
I didn’t have a clue what sort of design job I wanted – I just wanted a lucky break. However, reflecting on it, a more focused approach to my portfolio may have helped me land a role. A scattergun approach can have its advantages, but being too broad can also be a disadvantage.
If you have no idea what type of design you want to do, don’t be too hard on yourself – I didn’t know either.
You want your portfolio and visual language to be in tune with your first full-time job. If you can.
In hindsight, I had no idea about what type of job I wanted! I just wanted a creative job. If you don’t know, consider working backwards – what jobs don’t you want?
With this in mind, this could help you in shortlisting the types of design roles you make like. Now take the time to look at what these types of jobs are looking for and align yourself with these expectations. Hopefully, this may help align you with your first Junior Graphic Design role.
5 ) Your portfolio and CV are not speaking to each other
Not as crackers as it sounds!
When trying to land your first Junior Graphic Design role, make sure your CV and portfolio reflect each other. At least, to a lesser or greater degree.
I don’t think I’m God’s gift to recruiting, design or jobs, but I was involved heavily in hiring my own intern designers. I wanted to see who could assist and help a little while also giving them with their journey.
CVs … CVs everywhere!
I have read great CVs, useless CVs, silly CVs, random CVs, and just obscure and irrelevant CVs. And CVs that looked like they didn’t belong to the same person or portfolio – that is my point here.
Your CV needs to be relevant to the role for which you are trying to win, as does the portfolio. The contents of your portfolio should reflect some or most of the information in your CV as a designer, they should link or marry up.
Spelling and typos are only the beginning. A CV and portfolio that relate to each other will in land a role.
Make sure they relate and match.
6 ) Right place at the right time | luck and availability
Sounds like a cliché? It is!
You can be a ridiculously talented designer with a great portfolio, but if you’re not in the right place at the right time, then you won’t get the job.
Roles can become available due to an employee leaving, maternity cover, looking for contractors for specific tasks, or the company is expanding!
Be on the job boards, be ready, and be available. You need to be watching the job market all the time to give yourself the best chances of finding that desired design role. In other words, you need to make your own luck.
7 ) Businesses aren’t charitable
Your first Junior Graphic Design role probably won’t come out of generosity. When I first started trying to get my first job, my CV and covering letter didn’t hardly brought anything to the job. This is the power of hindsight.
Unconsciously, I expected the role would just land in my lap as I was a shiny new graduate with all the paperwork. Don’t buy into that illusion, I will tell you now.
Graduating or passing your course is just the beginning, and employers smell your un-jaded optimism and inexperience from a mile away.
Here is how I first started applying for design work, so you can avoid the mistakes I made.
How I presented myself ( badly ) when I tried to land my first junior design role
With my begging letter (covering letter) at the ready, it said far more than what was written on the paper. Between the lines it said :
“Please give me a job, I have nothing to offer, and you will be doing me a favour by hiring me… please do me a favour! I need experience.” Of between-the-lines wording to that effect.
Companies will already know how much experience you don’t have if they take a close look at your CV. They’d only need to take a look at when I graduated to guess my experience level! Avoid pleading and sounding desperate if you can. Even if you are!
Word your CV to sound as if you have something to offer them, not ask for them to offer something to you. Even if this is the reality of your situation.
Draw attention to how you are bristling with energy and ideas, or your design strengths, or how you are a passionate designer who works on plenty of side projects in a similar industry.
Instead of please give me, consider ‘eager to learn and become part of a team.’ Getting a graphic design job – a true ‘Graphic Design’ job is harder than ever to find.
Some kind souls took the time to answer my queries and offer advice, but most of the time, they ignored my queries. I sent hundreds of applications to land my first full-time role.
Aside from drawing attention to my blemish of inexperience, employers will know you are a graduate just by looking at the graduation dates. Focus on what you can do and do well.
Companies won’t hire you out of pity
Section 2 | Getting your first Junior Graphic Design role – Preparation
Preparation is key.

Looking at the points before, have you picked your ideal employer or type of job?
Are you considering how your portfolio will align with your ideal role?
8 ) Physical design portfolio
Trying to land your first Graphic Design role as a junior? You will need a portfolio.
As a hiring manager for my own little department ( it was small ), I have had “designers” apply for roles without a portfolio.
You need a portfolio.
This shouldn’t even need to be pointed out, but I have run interviews where ‘Graphic Design Graduates’ came to a creative design interview without a portfolio… or anything to show for that matter. And before applicants got as far as being short-listed, so didn’t have a portfolio with their application, none whatsoever!
Suggestion 1 – A portfolio to win the job.
To win that dream job, you need to show what you can do, not just tell everyone what you can do. A portfolio is proof.
Suggestion 2 – Have a portfolio to hand…. just in case.
For example, I can recall a few applicants coming to an interview without any form of portfolio. To begin with, that applicant was relying on my memory (my poor memory) and hoping that I could recall everything in their portfolio. Don’t leave it to the person hiring to remember; remind them of your awesome designer.
The case for the ‘on-day’ portfolio – your first Junior Graphic Design role
You want to use anything in your arsenal to win that job as a graduate designer, whether through the passage of an internship or via a direct application.
Having a portfolio on the day of an interview can be very advantageous as a graduate designer. Here is a short list of reasons why having a portfolio can be a great idea.
- (Something I used to ask myself) Did their college or institution not require the designer to create a portfolio? Where did they study!!!
- A design portfolio will allow you as a designer to put your best foot forward.
- Your portfolio can be a chance to discuss your best pieces of work and describe your part in a project.
- Dozens of other applicants will turn up with a portfolio, and it is a very competitive market. You will want to do everything you can in a competitive market.
- Your portfolio can be a terrific reminder of your skills… if asked!
In my opinion, having a physical portfolio is important if you are attempting to get a print design role. Which brings me to the next point in preparing you for applying to the right role.
9 ) Compile a digital portfolio
Before an employer looks at your ‘physical portfolio,’ you should have a digital portfolio.
A digital portfolio, a website, or an online presence will be used to make that initial first impression.
Whether it is a compressed PDF, a Behance link, or a website, this will be one of the first things an employer will look at when gauging whether to give you the job for a junior design position.
*Remember! When creating your digital PDF portfolio, keep the file size small. Anything above 10 MB may be blocked by the recipient’s firewall.
Bonus tip – Don’t be afraid to include a little bit of process as well in your portfolio or as a supplement. But all-in-all, your portfolio should focus on final product solutions.
10 ) Your graphic design CV
You NEED a CV.
In the same way, a designer needs to be given a brief for a project.
A portfolio alone is not enough as employers will want to see where you have studied, what you have studied, dates, and so on. Employers and HR are looking for relevant information; they are looking for pieces of information and that will help recruit the ideal candidate for the role.
If your CV is irrelevant, thin, sloppy – you are lowering your chances of being selected.
Handy print design CV notes :
- Don’t publish your CV straight from Word. You are a designer, put some style and class in it to show you design things through and through – including your design CV.
- Remove irrelevant job experience. Art Directors, Senior Designers etc, are not interested in your paper round from when you were 15. You won’t be delivering papers in your internship or graduate design role, well… at least you are not likely too!
- Make it easy to read and skim. Hiring managers are in a rush, and they are also human… make your information snappy and easy to navigate. They might be reading a lot of CV’s and by the 70th applicant, the focus can start to go out of the window.
- Use your CV to sell yourself and reinforce your absolutely killer portfolio!
11 ) Write a covering letter worthy of landing your first Junior Graphic Design role
I don’t proclaim to be god’s gift to writing covering letters. But, covering letters are where I have seen some of the biggest mistakes in an application for a junior design position.
Keep it polite and acknowledge the job listing.
You can sniff a ‘copy and paste’ email from a mile away, as it seems to ignore all of the points in the job listing. But if you do ‘copy and paste’ make sure to add the name and don’t leave sentences like this. eg, the spaces are still there.
“Dear _____
I would like to apply for the position of ____ as I believe I could bring something new to the team.
“
I have seen letters with the “___”still left in. Remember to fill the blanks at least.
Speak to the reader, show your passion. Say what it is you want to do. And try to add the most compelling information in the opening paragraph for jaded eyes.
12 ) Your CV is full of sh*t ( Don’t talk crap! )
Sorry, was that blunt? Please take it with a small dash of humour. We can all over egg a CV. But a CV that talks rubbish is easy to spot in the design sphere. Especially when you should have a graphic design portfolio show.
I’m going to let you in on a secret.
After reading many CVs applying for the creative intern roles at my former company, I stopped reading the CVs first. This is why :
- Some CVs lie
- A portfolio can say more about the designer
- It saved time
- I value a relevant portfolio over a well-written CV telling me what I want to hear
For me, it became a portfolio first and then a CV.
Here is a small design story.
Your first Junior Graphic Design role – A Dull CV Story
Many moons ago, many applicants would apply for a design role. And I mean many! On their CV they would proclaim : “I’m a graphic designer,” ” I own Photoshop!” or that they studied an irrelevant field, so it entitles them to that title – Graphic Designer!
If they are allowed that badge… where does that leave those who studied it?
Or the self-taught one who toiled for years?
I have read CVs that say they have worked on many projects, yet there was but a single A4 page with a poorly designed classified ad in the top left corner.
Some, state they are the next best thing to come into the design world. etc etc. I’ve read their hyperbole, been hyped and somewhat entertained by their prose, and then looked at the portfolio….
Practically nothing. Hot air.
With the one particular applicant in my mind, that isn’t me bashing a graduate designer, not at all. I don’t blame them for trying to find work. But there is selling yourself, then there is the proverbial talking out of it. CV’s can say one thing, but a portfolio can say another.
I wasn’t convinced they studied design, unless it was at the school MS Publisher 1995.
It was these little scenarios that led me to adopt a ‘portfolio first’ approach to the recruiting process. Let me see what you can do, now tell me!
Part 3 – Getting your first Junior Graphic Design role | Uncomfortable & unspoken realities
I’m going to spill the beans on things outside of your skills, CV, and portfolio that may or may not impact you getting a junior design role, and it is not just down to a lack of experience.
Some of these are opinions, first-hand experiences as a design jobseeker myself, and from quiet conversations behind closed doors.
Hopefully, the points in this section will be both helpful to you and make me hated by recruiters and companies. So be it!
13 ) Your university, school, and background can influence your selection
Ouch…
I would like to add that I was sympathetic to those who were not ‘in the club‘ – I was never in the club either. I think graphic design is not immune to this method of selecting who does and doesn’t get the job.
After a conversation with another Senior Designer, I was surprised by a couple of things about their selection process at their company.
According to the designer, at a certain establishment, they checked the following:-
- Where applicants had studied ( they chose from elite universities )
- Grades – fair enough
- Secondary school and GCSEs – ‘secondary school and GCSEs?’ –
( Record skips and scratches, tea is spluttered everywhere! )
Honestly.
And… ‘Secondary School’
This one got my goat a bit. Most graduates did not choose where they studied in secondary school, so how is it fair for this basis to be an influencing factor?
You cannot choose your past or where you went to school as a teenager. Back in school, I didn’t know what I was going to study afterwards, nor did I know that being at that school could have an influence. Believe it or not, I think there is a certain level of elitism in certain establishments that goes beyond your accomplishments and attainment, sadly…
The monocle club is selecting!
14 ) Geography – Where you live can impact your chances of getting a design role
This is both from personal experience as an applicant and as an employer.
Recruiters and employers can sometimes see ‘where’ you have applied from. So if you are looking for a Job in London, for argument’s sake, and you are based in North Scotland, certain job websites tell the recruiters and prospective employers where the application came from.
How do they know, and why does it matter where you are based?
It shouldn’t, but it will be counted against you regardless. Recruiters and employers like you to already live near the location where the job is situated, unless it is a purely remote position! I will come to what I believe to be the case shortly.
Geographical pains of getting a junior design job in London
My location: I have experimented with this by accident. I the past. On my CV, I wrote that I was currently living in London, I was staying in London on and off, but of a fixed address there.
On my CV it stated that I lived in London. I applied for a role through a website, and a recruiter rang me the following day.
“So your CV says, you live in London, but your application came from Cornwall?” That is a paraphrased version of the conversation. Some of the remarks after that – don’t worry, you live too far away, I need you this afternoon, or based on a recent conversation I asked – “Does it matter where I live now?”
“OF course it does!” they replied!
It matters. This was more of a gulf than a hurdle, as I found the design industry to be quite concentrated in London, as many things seem to be so London-centric. Despite the fact that I was up and down to London frequently, they wanted somebody who lived their all the time. there
It was mostly from recruiters who would bin my application after finding out that my permanent address was in Cornwall at the time.
The why! Recruiters want to make money quickly, and sadly, if they find another eligible graduate for the position who lives in or around London, they will get the first pick; it can be as simple as that.
When recruiting for an in-house junior design role
When hiring for internships, my previous MD favoured local applicants as it was convenient, among other reasons. As a designer myself, I tried my best when possible to favour passion, talent, work ethic, and a cracking portfolio when selecting a candidate!
Geography was irrelevant to me, as I wanted to hire based on merit and suitability of the candidate.
However, pay heed to what was mentioned above and note the bigger picture. Recruiters, bosses, companies etc, will often favour those who are near to those who are far. And in terms of supply, there is a glut of graduate designers trying to find work, especially in and around London.
It could be a stark realisation, but if you are a match for a match candidate who can start immediately, this will put you in good standing compared to those who can’t.

What if you live too far away from landing your first Junior Graphic Design role?
It can be easy to become despondent when applying for design work. I spent 11 months applying for my first full-time role in London. Adopt the following mantra to overcome the geographical bias:
- Persist and keep applying
- Be patient
- Find a friend or relative to stay with whilst you look
- Look for more creative jobs that bypass recruiters
- Move nearer to a big city and find alternative work while building your career
- Consider remote positions
15 ) Your first design role | You might be working on boring tasks at first
As a graduate, you may be given some repetitive or smaller jobs.
But you should use these to your advantage, do a great job, do it quickly, and use these tasks to make an impression!
You might also get a great reference from your employer at the end. Onwards and upwards!
Part 4 | Getting your first Junior Graphic Design role | Employer’s Perspective
Here is a short glance through an employer’s lens when recruiting for a junior design role.
16 ) Let your character shine!
A great portfolio, an active mind, somebody who will do the tasks when asked! These were all traits and signals we were looking for when hiring. We wanted to recruit a graduate designer who was buzzing with flair and ideas. We wanted a graduate who would be able to apply their skills to the brand and be part of a team.
In a highly sociable office / studio, I would have to gauge how the applicant may interact with me and the rest of the team. Do take note of how I mentioned ‘the rest of the team’.
It was not enough to only get along with me. I needed to gauge how the applicant would get along with the others in the company. I could be away, in a meeting, or really busy.
If I left leaving the junior designer alone with the sales manager, it would cause the office to combust; it was a risk I could ill afford to take.
How you bond, think, act and speak has a bearing on your application.
There is more to an interview than just a Portfolio and CV. As is winning the junior design role.
17 ) Ask questions, show interest
When applying for a junior design role, take an active interest in the job and company. It is not enough to say you have taken an interest in the role. Make sure to do your homework and come prepared for the role. An interviewer may not ask you anything about what you will bring to the table in terms of ideas, on the other hand – they might!
18 ) Sharing your ‘Interests’ on your CV
Why did this matter to me and the company?
Varying from industry and role to role, sharing your relevant interests may have been utilised for the role advertised. For example, are you passionate about football? Are you applying for a design job that is all about football? This could be helpful to know!
It’s not a huge point, but as strange as it sounds, if I were interested in the candidate’s CV, I would look at their hobbies and interests to see if I could find any relevance.
If the candidate mentioned that they were interested in ‘tech’ games, gifting, arts and crafts, etc it, it could have been a tipping factor for taking more interest in their application.
Not all companies will care about your interests, but I paid attention to them as a footnote on CV.
Consider adding some interests if you think they could be applicable to the role, or whether it will help your bond with the team.
19 ) Commercial experience will put you at an advantage
Relevant experience will put you at a distinct advantage when applying for your first Junior Graphic Design role. Although I do appreciate that this can be very chicken and egg when applying for a role to gain experience.
Any commercial design experience is still transferable experience.
Whether you gain this experience through family & friends, internships, college, university, freelance, or by any other means – this will place you in better standing for a design role in the future.
It can be extremely frustrating to gain experience, and I would highly recommend trying to get as much as you can while in your study years instead of when you are kicked out of education and into the job market. Getting experience can be tough.
I tried to be sympathetic towards graduate designers having no commercial experience when hiring for internships. Speaking in broad strokes, design agencies like you to have experience when you walk through the door.
I collected my experience together via my HND in design, Work placements, and starting with freelance work.
20 ) TAKE NOTICE | Watch the job market around you
Since I first wrote this post years ago, a lot has changed. Even the Graphic Design industry has changed considerably. This point originally said to ‘stay positive’ but I felt this needed a dire change since that point was written!
When trying to get your first Junior Graphic Design role, please pay attention to the design job market. The design industry and design jobs market are ever-changing, and what is true of today may not be true of tomorrow.
Graphic design is at a challenging time – make sure to check your skills and portfolio. Be desirable to help you land your design role.
I think it is okay to consider whether higher education is relevant or will help you land a job. IF you feel it isn’t, consider ways in which you can make yourself ‘more relevant’ and desirable when that job finally comes up.
Don’t bury your head, don’t be passive, don’t wear blinkers. LOOK.
Takeaway to getting your first Junior Graphic Design role
There is a lot to getting a design job, and I am not 100% certain the same rules will apply in the future. But from the more human basics of landing a job, much of what is written will carry.
- Make good use of your time.
- Be prepared, have your portfolio and CV ready
- Remove irrelevant information from your CV
- Create a portfolio that is applicable to your ideal role
- Get as much experience as possible!
- Work on personal projects and keep bettering yourself
- Try to network with companies, directors, charities, etc – focus much less on recruiters
- Keep checking job boards
- Show interest in the role if you get the interview
- Keep a close eye on the industry and try to align yourself
Stay positive, I’ve had a couple of cringey interviews!
While seeking your first Junior Graphic Design role, these may be interesting
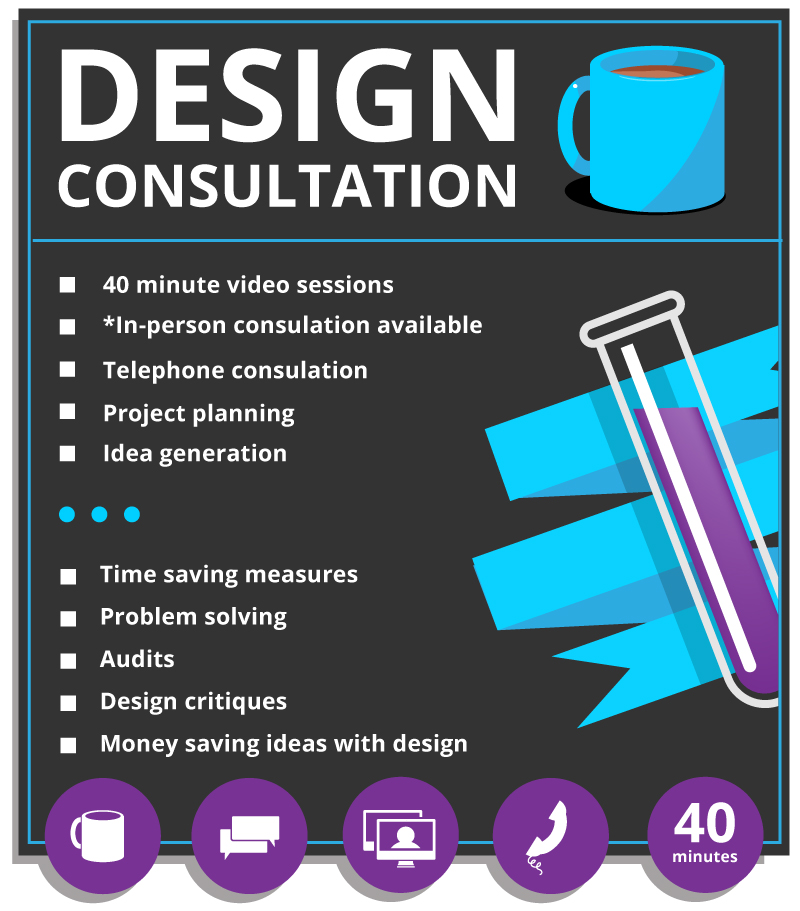
Design Consultations: Why They Matter and What You’ll Actually Get!
Design consultations shouldn’t be reserved for ‘professional’ people or seen as an extravagant waste of money! On the contrary, they can actually save you time, money, and headaches, especially if carried out at the beginning of a project.
Talking matters, ideas matter, and so does the execution of these ideas.
Design consultations matter if you wish to have an experienced designer cast their professional eye over a piece of branding, a website, a product, or any other form of media that has been ‘designed’. Their experienced opinion can offer that missed opportunity, avoid a costly mistake waiting to happen, or remedy that bit of stray design work in dire need of design attention.
A design consultation can give impetus to a shy thought or want. It can create ideas and turn these ideas into something tangible, too. A product you can sell. A service you can offer, a concept yet to be made.
Design consultations can seed an idea and help lay that ‘golden egg’. Imagine that successful product that never happened, or that service you didn’t quite know how to get off the ground? Or that project you have been itching to start, but haven’t known where to begin.
Graphic Design is all about communication, as is a design consultation.
“Let me listen… Yes, yes, I see the problem here. It is called Comic Sans on a funeral parlour sign board!”
Graphic Design Consultations: Why They Matter
A graphic design consultation can be all or part of a grand plan. An analysis or consideration before you take action. It can be light-touch or heavy-duty, depending on what is required for the project.
Design consultations can be used to ideate and communicate thoughts. They can be used to reflect upon branding, packaging, and even website design.
A design consultation can offer tremendous benefits to a business in the early or latter stages of a design project, without necessarily being expensive!
Design consultations can encourage collaboration, discussion, and even constructive debate.
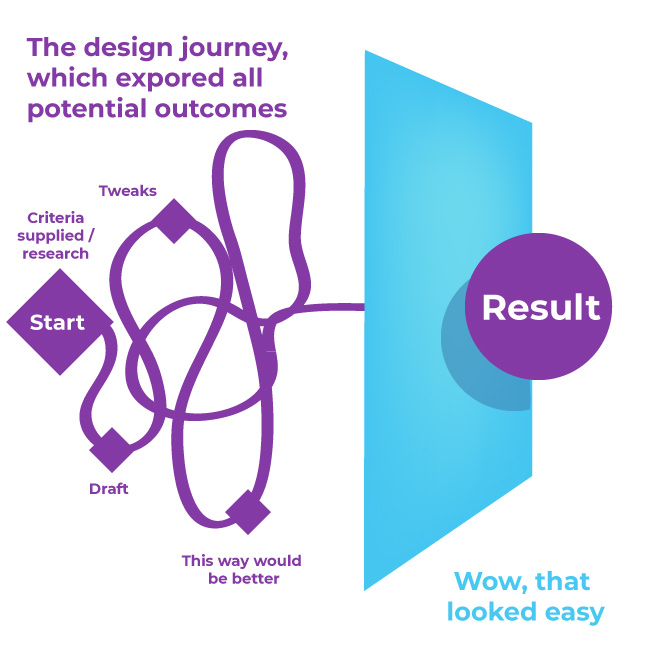
Consultations should work toward a main goal … making something great! Design is a journey after all.
Design Consultation: What you actually might get!
With a design consultation, you might uncover a branding inconsistency, ideas for stronger calls to action, or how to approach a project as a whole to get the most from your budget.
Sometimes, we design types confirm you’re on the right track.
Other times, we help you reroute completely. Either way, you gain clarity, confidence, and a plan! Sometimes, with actionable steps, which can either be carried out by you or the designer. You could see us as design doctors who only offer their skills by appointment only!
“Let me listen… Yes, yes, I see the problem here. It is called Comic Sans on a funeral parlour sign board!”
Pointing out problems is one thing, offering solutions to these problems is even better!
I have found more and more that businesses, start-ups, and individuals value the opinions of somebody who has been there, done that, and got a T-shirt.
This is why I launched this service. Because my clients, in essence, asked for it. ( In a roundabout way )
Here is a bit more on what a design consultant actually does!
What does a design consultant do? ( And no, it’s not all fluff! )
A design consultant is a seasoned creative professional who can share their knowledge, skill, and expertise either by appointment, contract, or on a ‘rolling basis’. Their time is sold in exchange for money.
A design consultant is part creative visionary, part strategic problem solver and all-round creative diamond! ( And in my case, an idea generator, who runs on sugarless tea and biscuits )
We’re brought in to evaluate, guide, and improve design-related projects with fresh, professional insight. From branding to packaging, digital experiences to print campaigns, we help businesses bridge the gap between style, substance, and function. We spot inconsistencies, suggest improvements, and propose new directions that align with your brand’s goals.
As an example, much of my experience comes from retail design, before moving ever more towards ‘web’. Believe it or not, your brand doesn’t end with a box or just a website.
To itemise further, a design consultant can do the following :
- Review brand goals and styles
- Investigate whether the communication and marketing tie-in together
- Offer specialised industry knowledge in dedicated design fields such as branding, online, UI design, or print.
- Offer sector-specific design solutions
- Visual problem solving
- Contrive ways of getting customers and clients to engage with your product or brand
- Suggest tips and methods to the creative process
- Advise on approaches to avoid and approaches to take
- Offer ideas
- Give opinions
- Suggestion methods for saving money in design
- Check semiotics, typography, layout, and styling
Design consultants can do this and much more . They can bring their design-specific skills and specialisms to the table. Share experiences, ideas…
In my case, I don’t just like to tell what I know. I like to ask the client what they need!
What does a ‘graphic’ design consultant do?
A graphic design consultant concentrates on the visual stuff: branding, logos, retail packaging, colour palettes, layouts, and much, much more.
We’re the ones who see five shades of orange ( so much orange… ) and know exactly which one says “trustworthy tech startup” versus “Board game cafe!” Our job is not just to make things look pretty, but to make them communicate clearly and effectively. We help translate your brand’s personality into design that speaks to your audience.
In my case, Graphic Design is but one faucet of my current skills. Graphic design ties in with my website experiences and board game products, too.
Fundamentally – deep down, I am a creative and enterprising spirit with a designer’s hand.
What to expect with a design consultation
Design consultations are not all just about tea and biscuits and Zoom with me.
Expect honesty (the kind that’s helpful), fresh ideas, and clear recommendations.
Design consultations can offer practical and actionable steps, visual suggestions, and perhaps even a stronger sense of your brand’s personality.
And, possibly… a few “EUREKA!” moments sprinkled in for good measure. But I will leave the Eureka badge to the client. I can’t self-appoint a eureka badge!
Areas covered by a graphic design consultant
Graphic design is such a broad, ever-growing, and ambiguous term now! In 2006, it was more straightforward.
I often see roles looking for a designer when in fact, they want a videographer, a graphic designer who is actually a website designer, a graphic designer who has many strings – I could talk more about that, but that is a conversation for another day.
For the sake of clarity and purity.
Design Consultations: why they matter and the areas they cover
Designers! We’re multi-tasking creative computer people, or… as I have been endearingly referred to – ‘Artguy’.
These are some of the areas that are covered by a design consultant :
- Branding and identity
- Print and digital design
- Web and UI layout
- Packaging design
- Typography
- Visual messaging
- Content design
- Visual storytelling
Is a graphic design consultation a waste of time and money!?
A graphic design consultation is not a waste of money. A great consultation saves you from costly mistakes, amateur design choices, and hours of second-guessing.
A graphic design consultation can streamline your branding process, align your visuals with your message, and elevate your branding presence—online and off. I don’t think a design consultation is a waste of money. It comes down to the nuanced skills and knowledge of a designer and what the client is trying to gain from the consultation.
I will say this, however, bad design – not just the finished product, but in how it is approached, can be a waste of money.
Although the design industry has changed significantly in recent years, and it is not just down to AI. I feel there has always been an itch to remove a designer from the design process, and to decentralise design as a whole.
However, this paves the way for amateurish, lacklustre, and poor design decisions in many cases. And, not to forget soulless design.
Honestly, there can be so much to Graphic Design than just “style”. Consider the marketing, packaging, product development and so much more.
Based on those points alone, graphic designers or ‘graphic design’ in general still matters. But the Earth will continue to spin without us design types if we vanished tomorrow.
It can be a waste of money if some of the fundamentals have been ignored.
Graphic design consultation | What inspired this service?
A whisper.., a murmur from a dark corner of somebody’s office! I was summoned through ritual and sacrifice, the devotees offered their newest member of staff to the design gods above. In a crack of thunder, I, their creative messenger, was sent to the mortal realm to fulfil the design need.
That was a joke and hyperbole; I feel I should put that disclaimer out there.
No, in all seriousness. It was more mundane.
It was because of my knowledge, skills, and experience across a range of sectors that people were seemingly craving that I created this service.
Is that an assumption? Somewhat, but not entirely. It was also born more out of frustration!
Clients were asking for my opinions, my guidance, and ‘how-tos’. Only, not all would value my time, as I didn’t value my time enough!
Design Consultation – how I got an idea ( brace yourself )
The case of making lemonade from lemons. As the saying goes.
Although I would like to add that not all those who sought my knowledge and skills were time-wasters. There were those who were sincere in placing value on my time. I’d like to thank those who did. But for every one of these who did value my time – there were probably 2 for every 1 who didn’t. I enabled them.
The idea for this service was born out of ‘the cheeky’ and me seeking a solution; I needed to learn.
Time-wasting video calls from those who sought my knowledge and experience and had no intention of paying for it in the first place. Emails, in-person meetings, creating plans, helping to write a brief, actually booking areas to meet in person, paying, and travelling to places for the person not to turn up or even give a reason! These were some of the painful real-life experiences.
Education on the graphic design process, reviewing briefs – or in particular offering thoughts on game projects- these all cost my time.
Imagine working for somebody for half a day or a full day and not being paid? Ouch indeed.
Or giving up half a day of your time for free with clients promising work only to vanish once they’ve got what they wanted?
Enough was enough. But, these lessons gave me an idea which was a long time coming. Gradually, I started to offer video consults ( link to brochure site ), and now I have turned into an organised boxed service.
From lemons, you can make lemonade
I wanted to share my knowledge and skills via an insightful design session that delivers value in an easy-to-digest format. This service was built to empower, teach, and help those with a genuine interest and value for my time.
What do I charge for my Design Consultations?
Each project is treated on a case-by-case basis. You can read more about my services here for more information.
What next, Design Consultation maybe?
If you’re feeling curious or even a little stuck, booking a consultation could be your next best move! ( couldn’t resist ) No pressure, just an open door to design clarity. You bring the questions, I bring my buzzing design brain brimming with ideas, suggestions, and opinions! Fuelled by tea!

How does my design consultation work?
Like so:
- A 15 minute free telephone or discovery call – to check if I can help
- I send an invoice for the booking, which covers preparation also.
- I do some homework for you, where applicable – if applicable
- We chat, review, critique, and ideate.
That is about it, there is more on my design consultation page on my services page if interested.
Design Consultations: Why They Matter | Credentials
With nearly 2 decades of design experience in both online and offline design, a portfolio spanning both creative, gifting, gaming, retail, and charity, and an innovation and making things, I’ve got the design stories to share.
I’ve worked with startups, brands-in-rebirth, and everything in between. From strategy to execution. Let’s see what we can make work for you!
Design Consultations: Why They Matter – Related posts
- What is a design process
- What is my design process
- A design journey
- Case study : Board game London pub crawl
- Case study : Game design around youth homelessness
- Case study : Designing a Snakes and Ladders game
- Retail packaging examples
- Website Design – The Living Centre
Copyright Jimmsdesign 2025 – Subject : Design Consultations: Why They Matter and What You’ll Actually Get – Illustrations – Jimmsdesign.co.uk.
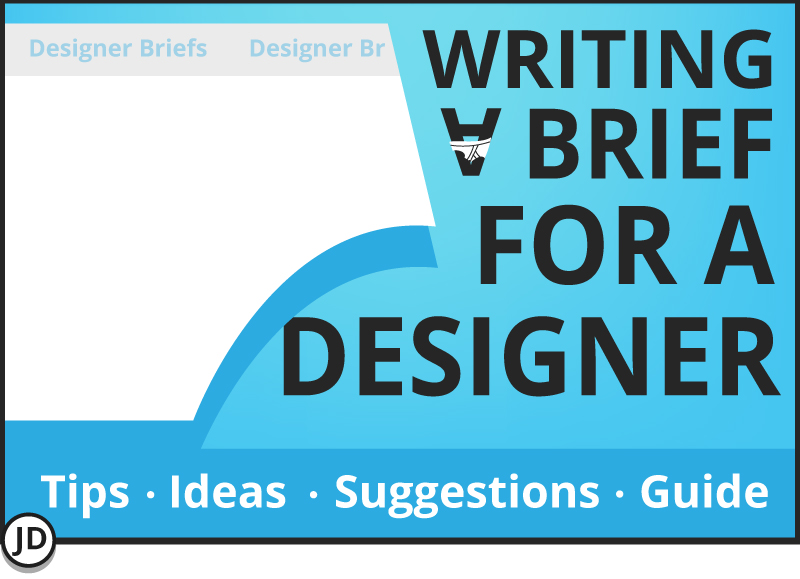
How to write a brief for a Graphic Designer: explained by a designer
How to write a brief for a graphic designer… let me explain.
Briefs, and not the kind of underpants, are an essential part of the design process.
A design brief enables a client to outline what is required and needed from a project. It is a guide and plan so that all parties involved know what needs to be done and carried out. A well-written and detailed brief will not only help with pricing and estimates but also with the project goals and describe what needs to be done to meet these goals.
You could also pretend that a brief is an open-ended recipe for designers to refer to. Some designers may even help you with writing the recipe in the first place. If you ask nicely.
This post has been written for a couple of reasons:-
1 ) To offer a straightforward example of how to write a brief for a graphic designer. What to include, what not to include, etc, etc.
2 ) This is also a rewrite of the previous post on writing a brief. This is an updated version of how to write a design brief for me … and potentially other designers.
Also, read on to find out about the 7 P’s

How to write a brief for a graphic designer – Short Answer
When writing a brief for a graphic designer, make sure to include what you need, what you want, format, and potential budgets as a bare minimum so that a designer can respond and fulfil your project’s needs based on these criteria. The designer, such as myself, will establish how to meet those goals based on a well-planned process.
A basic design brief enables a designer to work to a professional standard and adhere to some kind of plan, or ‘scope’. A brief acts as a set of guidelines that both parties, specifically the designer, will adhere to.
A design brief does not need to be a novel, or strictly speaking, complete. But detail and some thought is key. ( I can help with completing a brief if you are struggling.)
As a tip, it is sometimes best for both the client and the designer to follow a set of clear and concise bullet points for a design project. I am a fan of bullet points as they allow me to mark off some key stages and milestones in a project.
An experienced designer who communicates verbally or in writing will most likely ask questions about you and your project. This is to pick up on those smaller details and to potentially help you answer questions you have not yet considered.
The more detail you include in the beginning, the faster the design process can begin.

I’m a client, do I need to write a brief for a Graphic Designer?
You do, sorry. Or at least a brief needs to be written by somebody! A brief can be regarded as a boring but crucial step in the design process, whether it be my design process or somebody else’s.
I love a client who has seriously considered a brief, even if they are somewhat unsure of what may be involved. It shows some thought needs to be made, even if they are unsure of what is involved with the journey.
If you are stuck, I am more than happy to help in this stage as a consultant in a ‘pre-design’ phase of your project.
This is a list of key points and stages to consider when constructing a design brief for a graphic designer. Great for beginners and… seasoned brief makers!
- Purpose of the project
- The plan ( if you have one )
- Budgeting
- Timeframes
- Target audience
- Any brand or brand guidelines
- Format for deployment
- Any limitations
What is the project’s purpose?
What is the purpose of the project? This can be incredibly beneficial to share when considering how to write a brief for a graphic designer.
The what:
- Is it to expand the business?
- Launch a new product range?
- Promote the service that you are already offering?
- Is it a create a logo to do ‘X’?
- Design a Kickstarter page to excite potential backers?
- Create a piece of box art for a board game?
- Content graphics for a blog?
Establishing a basic ‘want’ or what, rather than just spouting, you need some chaotic creativity in your day. This is important for budgets, sanity, and all else.
PLAN – Even a loose one is important for a graphic design project
You will need to have some sort of a plan and end goal in mind for the project. Otherwise, where will the project start and end, and what are the terms?
Unless it is a day rate or a fixed-term project, working on a series of smaller projects. Even still, it is likely that this too will have an end goal even if not s solid plan.
If you don’t know what it is that your business needs from a designer, that’s OK! Some designers could help. I have worked as a design manager, for bigger projects, I would never work without a plan.
Even a small one.
Without a plan or an end goal, even a loose one, you will end up going around in more circles than is necessary. Leading to frustration, costing time, money, and making a surprisingly challenging job – even more challenging.
How to ask yourself questions when creating a brief for a graphic designer
People don’t always understand designers, designers don’t always understand people for that matter!
I remember asking a former colleague questions for a project, only for that person to start accusing me of ‘asking too many questions’ in tone that suggested I was picking on them. Or to be more specific, they are accusing me of only asking them all these questions. Yes, a lose-lose scenario sadly. Strange how this stuff stays!
Designers should ask questions – that is that. Unless they are managerial or business owners or something similar, they will need to know what you are trying to achieve. Intelligent design requires questions most of the time.
There is a way of marrying project requirements with ‘how to write a brief’ for a graphic designer. Here is a pair of graphic design shoes for you to wear.
The Designer’s Shoes (Designer’s Brain )
- What is the aim of this project?
- Is this part of a bigger picture?
- Has a budget been written, and can what needs to be done be done within budget?
- What are the client’s expectations? ( Whether realistic or not )
- How can I do what needs to be done?
- Will they give me resources, logos, photos, fonts etc?
- Can I make this look awesome?
- What is the overarching tone and vibe?
- Has this person worked with other designers before?
- Is the person great to work with?
To name a few.
These are some of the examples I will ask myself, on how I can help a client achieve what it is they want to achieve.
To translate to the client, you may wish to consider the following when creating a brief for a graphic designer
Types of things to consider as the client – (Client’s Shoes )
- What is the purpose of this project?
- Does this tie in with a bigger project?
- What do I need?
- What do I want? ( or better still, what does my ‘customer’ want or need )
- Have I considered the competition?
- Have I checked any legal pitfalls or copyright issues?
- Will the designer ask for things like logos, photos?
- Have I done my homework?
- When will…
- Will my budget and expectations align with the designer’s expectations?
- Have I picked the right designer for me?
Writing a brief for a graphic designer | The Dreaded Budget
Dum dum dum! The budget… the deal maker and deal breaker!
The budget is important.
The design budget will affect the amount of time, resources, and other expenses that will be allocated to your project. When considering a budget, you may hear words and phrases such as ‘fees, deposit, rates, when will payments occur’, and so on.
One of the most common questions I get asked, sometimes before I have been supplied with a brief, is…
“How much?”
Before settling and agreeing on a project with a designer, you need to talk with your designer about how much you can afford to spend and what they are willing to do. And, what is it they need to help with! The more information you can offer, the easier it may be for a designer to estimate their quotations.
Below are 2 methods of payment types and methods to further illustrate how a designer may expect to be paid.
Rolling day rates – what are they?
Charging by the day is just that. A designer bills for their time on a day-by-day basis. A client and designer may prefer this method for larger, more experimental projects. In certain circumstances, this may be more mutually beneficial for both parties.
The pay by the day is far more open-ended financially and allows more room for creative freedom and development. A drawback with this free-flowing approach is that money can keep on going into a project; regular checks on the amount of money spent on a project is wise.
It is also a good idea to see if you can get a ballpark figure in the beginning, especially with smaller businesses with tighter purse strings.
*As a tip, whatever the ball park is or was, it can be wise to allow room for plenty of financial padding, but that is a topic for another time. Especially when considering how much it costs to design a board game. Money can keep going in more and more.
Design project fixed price – what is it?
A ‘fixed price’ means pretty much what it says, the budget is ‘fixed’ – it has a spending limit! This method means there is a roof or cap on the amount of money that can be spent on a design project. A certain amount of funds may be allocated to a campaign or project which is controlled either by the company’s directors, owners, or accounts department, or by a 3rd party.
Companies that are given grants may prefer to work this way and pay in larger lump sums as opposed to smaller, more time-consuming milestones.
Fixed price budgets can be great if it suits both parties. But there are realities that come with this that may be alarming.
Why can this happen?
It is not uncommon for contracts and prices to need to be re-evaluated mid-way through a project, however disruptive this can be.
There can be a variety of reasons for these changes, such as new ideas coming into play, not enough information being given at the start, a change of information, more decision makers getting involved, a change in project scope, and generally, more time and work needed to complete a project. Typically, it comes down to more being heaped onto the designers to play to do what needs to be done!
There are many variables.
Substantial changes to a project specification can significantly alter fees and budgets. There is most likely a term for clients who intentionally omit key information, but this evades me for this post.
I work with the term fixed ‘estimate’. And there is a valid reason why I now address it as so.
Consider the timeframe when writing a brief for a designer!
The when!
I need ‘x’ by…
How long will it take?…
Can I have it by?…
How long will this take!…
And other phrases to that effect.
Take into account when you need a project to be completed. Even seemingly smaller projects can take time to finish. This can be due to the designer working on several projects at once, and other life and work commitments coming into play. And… the process is just taking the time that it takes!
When writing the brief, consider dates and deadlines – if applicable.
- Don’t leave everything to the last minute
- Don’t supply key information such as text, photos, and assets at the 11th hour for the designer. ( Do it at the start! )
- Don’t vanish without a trace ( designers need communication )
- Don’t set unfair time goals and expect not to be disappointed
Make sure to get everything ready from the start, or at least as much as possible! If you are unsure of what you need, how long it will take!
Let the graphic designer know your target market
When writing a brief for a graphic designer, you should consider your target audience. It can also be prudent to place some of your target audience’s wants and tastes above your own.
Stipulating who your target audience is… is an important stage when considering your design brief and how to write it.
Here are some criteria based on your target audience:-
- Children
- Teens
- Adults
- Professionals
- Tourists
- Trade
- Age
- Sex
- Religion
And so on.
When submitting your brief to a designer, consider who the end product is for.
Are there any existing logos or brand guidelines?
Do you already have existing brand guidelines for your company?
If you have any existing logos, style guides, fonts, dos and don’ts for your logo and branding, remember to include this in a brief or submit this as a separate document to your designer. This is especially important if you are forming a new client and graphic designer relationship.
Any relevant brand guidelines can be incredibly beneficial to the designer.
How do you want your design project formatted for deployment?
How do you intend to ‘deploy’ the project?
Will this be a small web banner? A flyer? Will you be using a printer? Will this be for the screen? Or will it be for print?
Having some idea of where, when, and how you intend to use your design can be important for a designer.
You may need your artwork supplied as a PDF, a JPG, or… as an AI file, or something else entirely! When considering how to write a brief for a graphic designer, consider how the artwork could be used in the future so that the designer can offer the best solution going forward.
Include any potential limitations in the brief
When establishing your brief for a graphic designer, is there anything that a designer aught to know about you, your business, or the intent of your project?
- Is there anything that the designer can’t do? Or should I do?
- Will it be for a certain target demographic?
- Politically sensitive?
- Colours that should be avoided?
- Themes best avoided?
Writing a brief for a Graphic Designer | Basic Free Checklist Summary
A checklist and summary of what you may wish to include with your brief, plus any other useful details. See this as a raw recipe and ingredients of what the designer needs to include!
I can smell the tasty design dish now!
In short, consider the following when writing your brief for a designer:
- 1 Purpose of the project
- 2 The plan ( if you have one )
- 3 Budgeting
- 4 Timeframes
- 5 Target audience
- 6 Any brand or brand guidelines
- 7 Format for deployment
- 8 Any limitations
Considered adding the list above to open the discussion with a designer – such as myself, to see what needs to be done from there.
All in all, if you have made it this far, don’t overthink it too much. Write something down and see if a designer can help you somewhere.
You may find this post interesting –
Other subjects around graphic design and processes
- An illustrated design journey
- What is a graphic design process?
- What is my graphic design process?
- Project example : Retail Packaging
- Project example : Wallace & Gromit Packaging project
- Project example : How to design a kiosk
- Project example : Wimbledon Brewery Website UI
There is a saying that I have heard from varying jobs – it is an army saying that I think is great. I would like you to remember it…
7 P’s – ( Even applicable when writing a brief for a graphic designer )
Piss Poor Planning Promotes Piss Poor Performance.
And it is too true. If you can’t remember anything of what I have said about how to write a brief for a graphic designer, try to remember the saying at least.
Source : 7 P’s
Information and content copyright www.jimmsdesign.co.uk – 2025 and property of this blog.
Why is my black colour coming out dull when printed? Tips & tricks from a designer
Why is my black colour coming out dull when printed? ( amended and updated )
As somebody who has worked in print for years, I know black can be a troublesome colour to work with when it comes to professional printing! From dull colours, noticeable banding, to the colour being milky and muted. There is a wide variety of headaches when it comes to working with black.
As a former in-house designer at a gifting company, black was a core brand colour I had to wrestle with weekly. I could have burst a blood vessel.
Black can be a royal pain to print, I feel you! In light of a recent project where I had to work with black once again, it reminded me of this post.
This post has just been given a refresh to further help and aid any budding designers or those looking to troubleshoot their problematic black print.
Why is my black colour coming out dull when printed?
As to why your colour black is coming out dull and muted. Dull black in print can be caused by mismatched colour profiles, paper types, poorly calibrated screens, working on dated screen types, wrong settings in your application, variation in printers, and professional printers using professional print equipment compared to your domestic-grade equipment. It can also be due to a lack of colour checks before sending professional artwork to print.
There can be a variety of reasons, all working in conjunction to produce a lacklustre and milky print. These reasons can be a mixture of both software and hardware-related.
To avoid dull black colours, employ a variety of techniques to remedy the issue. Such as running test prints, checking settings in your applications, and working with a printer.
If printing on a domestic printer from your home or office, remember to check that you are not running low on black ink! This can also cause dull or streaky prints.
Investigate the points mentioned above. You may need to take it a step further of look for additional help to resolve the issue.
Working with the colour black in Graphic Design for print
Black can be a trouble to work with when it comes to print, especially with all of the varying print processes, paper finishes and general variations with commercial printing machines. Ink types, screen calibrations, applications and so on – can impact your dull black when printed.
Being empathetic to how black can be problematic to print as a designer myself, both you and I want to put our best foot forward and try to reduce dull blacks and greys. Below is a list of tips and tricks to beating a dull black when printed, which just may fix the problem.
A list of tips and tricks to get the colour black you desire!
Black can be one of the most problematic colours to handle when it comes to design.
Here are some tried and tested solutions I have used to remedy why your black colour is coming out dull when printed.
Tip 1 ) Fixing Black – Consider whether your black is ‘black’
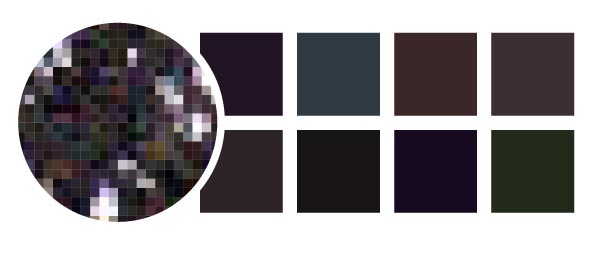
Not everything needs to be pure black. There is black and there is ‘black’. This is more applicable if you are working with photography, illustration or texture and not a black as a block colour.
When working with either illustration or photography, for example, it is common for me to add tones that will either warm or cool my black colour. Black is rarely pure black in the real world. Consider whether any colour or surroundings in your image would be influenced but subtle tints. Black, not being total ‘black’ can be one of the easiest workarounds.
I have added an illustration below to show different tones and hues on a black background and colour to further illustrate my point.
Left to right – reference image below/
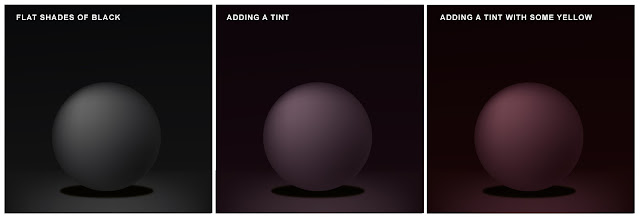
( Left ) Flat grey black
Notice that this image is devoid of colour. Presumably, this is only in ‘greyscale’ ( older illustration ), but this still has tone and depth. The colour of this, however, could be more of a gamble when printing based on past experience. These more monochromatic greys and blacks seem to be more prone to branding in Photoshop.
( Middle ) Added tint to black
The middle circle is black with a tint of red, which again could work well in a photo that has relevant colours or tones in the image to influence this type of black. I have added a paragraph below on how to add a hue in Photoshop.
( Right )Adding a couple of subtle colours
The tint added to the circle on the far right is closer to a deep red – reddish black, but perhaps something of this nature would be truer to the nature of artwork or photography being shown and displayed?
For argument’s sake, you could consider adding a slight tint of green or yellow to test and measure.
Test print what you create and gauge some of the warm hues. I have employed similar techniques again in attacking posterization in Photoshop.
Tip 2 ) Check Your Colours – Digital Black Colour in Photoshop
It is always wise to check your colours when working with print, generally, not only black! If your black is arriving with a murky, milky or dirty quality, check your colours by the number, not just by what you see on your screen in Adobe Illustrator or Photoshop.
To follow the first tip of adding a slight tint of colour can be all that is needed to remedy your dull black.
Take note of the CMYK | C=65% M=70% Y=66% K=85% for illustration purposes.
For those who would like to know, the ‘K’ is the black notice, and the black also has a lot of colouration. This is not a rich black or the sort of black used in editorial design for fonts by the way.
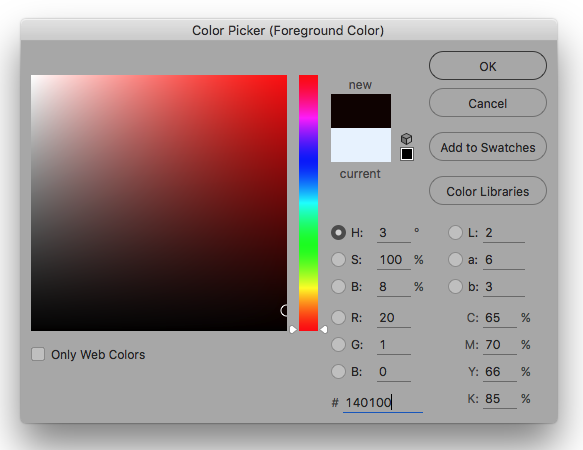
Tip 3 ) Breakdown – Avoid dull black in print by checking colours digitally
Before sending your artwork to print, check that your black isn’t the wrong sort of grey or black by either opening the window above or checking that black is represented correctly only on your computer screen. In applications such as Adobe Illustrator, certain preferences will allow you to see black colours in their ‘truer’ form. You can also enable the output as shown.
Tip 4 ) Test print your black design work
Save yourself the worry and heartache and consider running some homemade test prints first. Although a home print is not a substitute for a professional print run, it is better to try and discover any issues with your black colouration before seeing it on a 1000 or so copies of your print run.
Tip 5 ) How your colour black is displayed
** IMPORTANT** This can be a significant contributing factor as to why your black colour is coming out dull when printed. There are options in various graphics programs that can be misleading when working with black. There are options that will allow you to see your black in its truer form compared to what is being shown on your computer screen.
If your black is not coming out as expected, check that your ‘Appearance of Black’ in your applications preferences is set to display blacks as required. ( see screen grab below )
Here is an example taken from Adobe Illustrator showing how a more accurate representation of black can be shown on your screen.
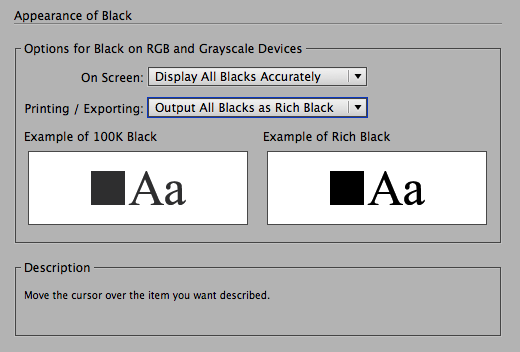
See the image above, notice how – onscreen – Display all blacks Accurately is set? This will help you to see how your black may come out in print. Allow yourself to see!
Tip 6 ) CMYK vs RGB vs GreyScale Printing
By default, most designers who were taught to work with 4 colour print were taught to work with CMYK. CMYK, in comparison to RGB can be seen as the poorer cousin colourwise! This is the profile you must work with most printers unless they state otherwise.
However, it is common practice for printers to work with CMYK and should follow suit with this unless stated otherwise.
RGB ( Red, Green, Blue ) is the 3 colour profile I tend to work with more now for digital and website design. RGB is also by far my favourite to work with, however, RGB is better suited to screens which can display millions of colours. You may notice that your vibrant colours and hues suddenly become dull and muted if you switch to CMYK towards the latter end of the design process. By default, RGB is best left to work with screens for final output for print. CMYK for print. Here is an example website design project where I have gone to town with RGB.
Greyscale, brace yourself for mono colours. However, this can work well for simple black and white line drawings with an absence of colour.
Tip 7 ) Work with your printer to avoid dull greys and blacks
It can pay to work closely with your printer in the first instance to avoid headaches and dull black colouration coming out in print. Ask your printer how they’d prefer to receive the artwork. Most professional brick-and-mortar printers will request that your file be supplied in CMYK and as PDF’s in the ideal world. Although that can only now be used as a guide and not a hard and fast rule.
Graphic Design Question: Why is my black print coming out dull grey and not black?
The reason that your black colour is coming out grey and not black as intended, could be that the colour is grey and not black! Certain options in your preferences in your graphics programs may be showing dark greys as black and misleading your eye.
To fix this, you will need to check that the preferences in your graphics application are enabling you to see all black colouration in its true form.
Another reason that your black is printing grey could be due to screen calibration and screen brightness.
Now less common, some of the worst screens for displaying black are TFT screens. As you can still get on some budget laptops, i would recommend rigging your laptop to a screen that enables better representation of colour and colour depth.
Although I have had to use TFT screens in a professional setting in the past, I would recommend using a screen which can show a better range and depth of colour – including black. TFT screens are awful for seeing colour in print.
Why is my black colour coming out dull when printed? Summary takeaway
The reason behind your dull black and almost grey colouring when printed could be down to a range of issues. Some of these issues and causes can extend beyond this list. It is a problem that needs a bit-by-bit approach to find out what is causing the problem in the first place.
I would check that you have your colours and preferences set correctly. Making something CMYK isn’t enough to avoid off-colouration when printing with black.
It is also worth being mindful that any web-based print of design software used for proofing can be problematic when trying to get true representation of your colour. These web programs and can deviate from typical standards used by professional printing companies.
These misrepresentations can include low-res proofs, misrepresentation of colour, and poor representation of bleed. What you see, isn’t always what you get.
Why is my black colour coming out dull when printed? Bonus Tips
- Take Notice of the colour warnings when you are in the colour picker window. This could save a lot of headaches later on.
- Let the printer do the legwork. Send your artwork to the printer and try to let them help you. A printer worth their salt will want to help you and have your return custom. To reinforce your expectations, send them a physical sample from your home printer – assuming you have a good-quality home printer.
- A HUE, if you are working on an image with a lot of dark areas, why not add a little hue / tint of colour? 20% cyan, for example or some magenta/red for a warmer image.
- Avoid working with 0, 0, 0, 100 K, as this is best reserved for font/text printing and can your work charcoal appearance. Use a ‘Rich black’ or ‘designers black’ instead. 20, 20, 20, 100 k for example.
- Avoid 100, 100, 100, 100, CMYK as this is reserved for crop marks and using this colour can drown the paper – no one wants drowned paper!
- Don’t be fooled. Your screen can be way out of sync with your printer. Do some tests first and see what results come from your printer. Even printing on your home printer cannot guarantee the finish you require when you send your work to print.
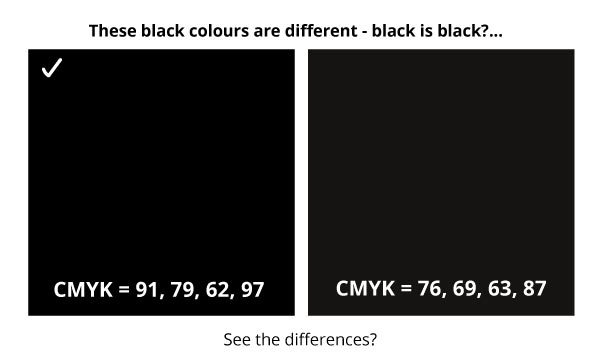
Why is my black colour coming out dull when printed – Other Related Topics: Design & Print
Interesting Internal links around design and design projects.
- How to fix broken textboxes in InDesign
- What is a graphic design process
- My graphic design process
- An information post around the design journey
- Example Aardman project
- Reducing banding in Photoshop
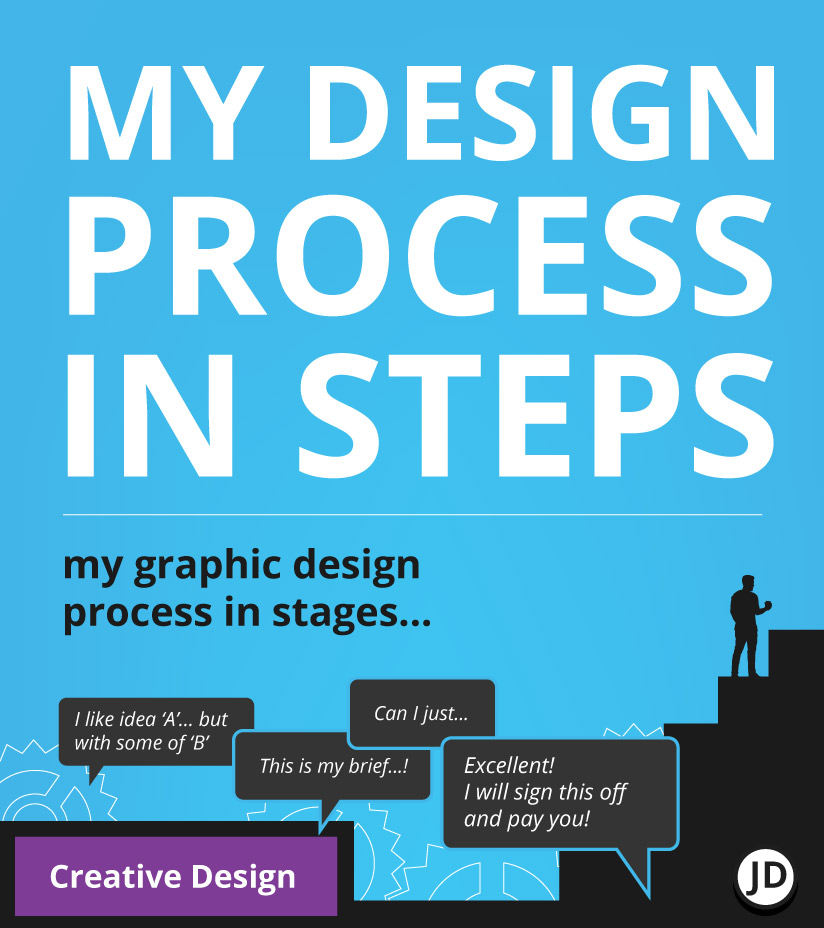
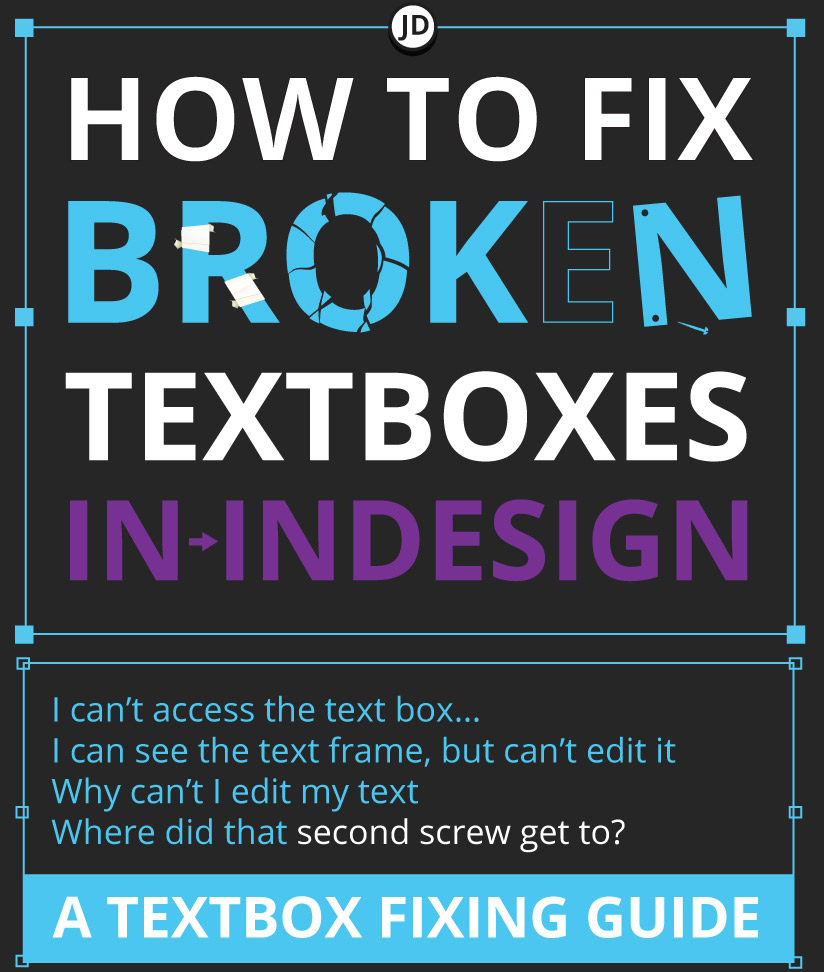
Need a hand with your board game design project?
Why is my black colour coming out dull when printed? – External websites :
https://www.jimmsdesign.co.uk/