How to edit text on your card artwork in Adobe Indesign! This short tutorial shows you how to make some quick and easy edits to the text in your card artwork in Indesign. This post also covers some general text frame editing.
Editing your playing cards should not be difficult if you know how, and have the right tools.
It should be noted that this article focuses purely on the card editing stages, and not the whole card creation process.
This is a general help article to edit text on your card artwork in Adobe Indesign. You don’t need to be an Indesign guru or know your way around data merge to follow this.
In addition to editing text frames in your cards, this post will also help if you cannot edit text in Indesign.
This tutorial is ideal for those that just want to jump and edit the text quickly and hit save. It’s short and sweet, quick and dirty – no fuss. Or however else you want to describe quick text edits for game cards. The same applies to editing text too.
Troubleshooting tips are at the end of this article if you are having difficulties selecting the text box for example.
Common Question | Ways of editing the card text in Adobe Indesign
It is quite common for me to hear “how do I edit text on the cards” after I have created the initial prototype for a client.
With the card artwork, it is often in my client’s interest to know how to edit the text themselves or assign somebody else to edit the text. This is especially true in the late stages of production or mass production for various reasons.
One being, I’m not a copywriter profession!

How to edit text in Indesign on your card artwork – put simply
In order to edit the text easily, open the document in Indesign ( if you’ve not done so already). Select the card face you want to edit, ( use the pages panel ) and change the text. You will then need to save your work or export it if you are intending on sending the work to print.
That is the simplified and short answer to editing the game card text in Indesign.

I cannot edit text in Indesign!
If you are finding that you cannot edit text in Indesign or you cannot edit the text on the cards. A few of the reasons could be either the text frame is locked, the layer is locked, or you need to override the master page template.
You can read more on editing your text frames in Indesign at the bottom of this post.
6 Steps to editing text in your card artwork In Adobe Indesign
1 ) Open up Indesign
Assuming that you already have Adobe Indesign installed, in order to edit the text you will need to have Adobe Indesign open.
If you don’t already have Adobe Indesign, you can download it. ( make sure to download from Adobe – DO NOT BUY OR DOWNLOAD from an unknown source )
Make sure that you have permission to install the software and that your computer has the technical requirements to run Adobe Indesign.
*Friendly Disclaimer | Adobe Indesign is not run or owned by myself. Indesign is part of the Adobe Creative Suite. I cannot take any responsibility for any loss or damage incurred should you download any 3rd party software or Adobe Indesign. Please take precautions!
Please check all the requirements from their official website before downloading. ( Adobe Creative Suite ) And make sure that you download the software from a safe source. Do not use any unauthorized 3rd party platforms when downloading InDesign. ( also based on past experience )
2 ) Open up the card artwork
You can either ‘Open’ the artwork from the ‘File’ drop-down menu in Indesign ( File, Open – Select artwork ) or you can open the artwork by ‘dragging and dropping’ the artwork onto the application icon from your desktop.
Or if you have your recent items window on view when you start up Indesign, open your document this way.
Tip – Don’t overwrite your original card artwork!
As a tip, I would strongly advise that you create 2 versions of your artwork and leave the original intact. If you edit the text, change something and save over the original artwork ( ruin it by accident ) you won’t have a way of back-stepping from this mistake.
Create another version! And avoid editing the original version. A piece of advice from past experience.
3 ) Navigating the card artwork for your game
Theoretically, you now have your card document open in Adobe Indesign. It will look something like this.

If you have used a template or a file such as the one shown in this article, then you should be able to scroll up and down through the cards. As you scroll up and down, you should see the back and front of your cards.
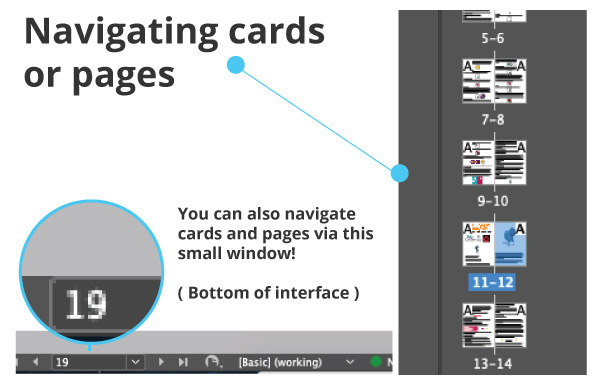
Or, as an alternative way of finding the card you need, go to window > pages. If this tool panel is not already open.
How to open and close Window/pages panel ( Adobe )
4 ) Select the card you wish to edit
You can either scroll up and down to go through the cards, which is okay for smaller decks, but not as efficient if you have a larger deck. Or if you have your ‘pages’ window open, you can double-click on these to jump to the card you want to edit. This is a faster and more effective method of navigating through your cards.
( Handy tip! Did you know you can see which page you are on at in the bottom of InDesign interface when you are editing the card you want to edit? The illustration above has a close-up of ’19’ to show this. )
5 ) Find the text box ( interacting with an Indesign text frame )
Assuming that you have now selected the card you wish to edit. Go to the text box ( as shown below ) click on it, and edit your text!

If something has gone awry, here are some simple steps to follow.
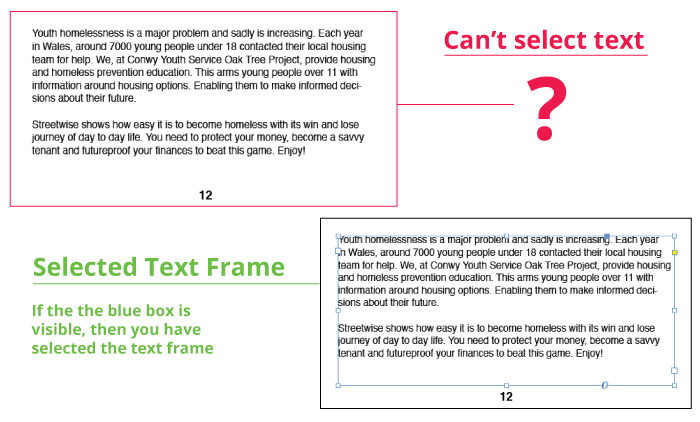
- ) Make sure that you have the ‘selection tool’ active.
- ) Go to the box or area you wish to edit.
- ) Double-click the text box.
- ) Find the word or sentence you wish to edit.
If you are having trouble being able to edit the text or some of the text, this bit of troubleshooting may help. Cannot edit text in indesign – help!
6 ) After you have edited the text
Now that you know how to edit one text box and all has gone smoothly, you can edit any basic text box in these card files.
Once you are happy with your work and your edits just make sure to save your work. You can save your work by going to file ‘Save’ or ‘Save As’. Or by pressing CTRL+S ( Apple + S ).
7 Bonus Step ) Exporting your file for print
It should be noted that this process is a bit more nuanced and may require more experience and skill in saving your work correctly. It can be easy for somebody inexperienced ( or with experience! ) to run into difficulties when setting files up for print.
Remember, when doing this that you are shouldering the responsibility for all the print production for your cards. If you would like somebody to share the burden feel free to get in touch or read more here. Card game design.
- ‘Export’ your file as a PDF’
- Remember to Select all pages if you wish to save/export all pages for print.
- Double-check that the images are above 300 DPI when exporting ( otherwise you will get a low-res file )
- Check that it is in CMYK
- Hit ‘Export’ and select a location
This is a simplified version of how to edit text on your card artwork in Adobe Indesign. The added end step also instructs how to save your work and export it for print.

Troubleshooting Game Card Editing in Indesign – cannot edit text in indesign!
When looking at how to edit text on your card artwork in Adobe Indesign, sometimes it is not as straightforward. There can be issues such as locked layers, master pages being selected, or even limitations with hardware.
Here are some troubleshooting steps for editing the text on your cards.
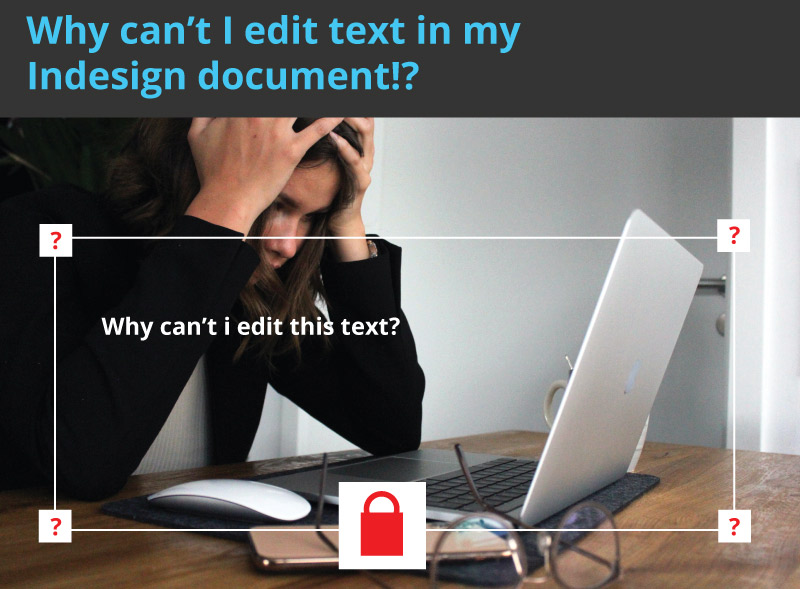
Why can’t I select the text box? I can’t edit my text frame!
This could be down to a couple of reasons as to why you can’t edit the text box in your file. Here are some of the potentially straightforward and obscure reasons as to why you may not be able to edit your text :-
You don’t have enough ram/processing power on your computer
If your computer is struggling to run Indesign properly, an odd quirk that can show up is an inability to edit or select text boxes.
Possible solutions:
1 ) Turn off other programs such as Outlook, Your Web Browser, and other non-essential applications to see if this loosens up some grunt for Indesign. Remember to only close nonessential programs
2 ) Change the view to low-res draft mode. This can also make InDesign less taxing on your computer.
3 ) If you have tried all of the above. With a minimal amount of applications still running to allow more resources to go to indesign, close Indesign and re-open it to see if this does the trick.
The object is accidentally locked
There could be a couple of reasons as to why you can’t edit the text in your Indesign document. And, fortunately, the fix for this can be as simple as unlocking your text frame to get it working again.
Here are a couple of ways to check if you have a locked object. Unlocking text frame solutions in Indesign:
– The Object has been manually locked! This is a simple case of unlocking the object. To make sure the object isn’t locked go to > top menu > and check the drop-down for the Object – Unlock all on spread. Here is an image showing the menu option.
( Here is some more accurate information from Adobe on where to find this exactly – unlocking objects )
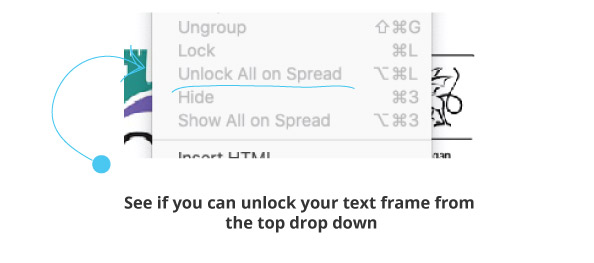
– Your text frame is on a locked layer. Alternatively, your text frame could be on a ‘Locked Layer’. On your ‘layers tab’ in the interface window, check to make sure the editable text layer ‘is not locked’. ( With a padlock on )

– You are editing the wrong layer. If you cannot edit your text, it can be as easy as having the wrong layer selected. And, having the layer you want edit locked. Make sure you have your correct layer selected and that you are unlocking the correct layer!
You are trying to edit a master template
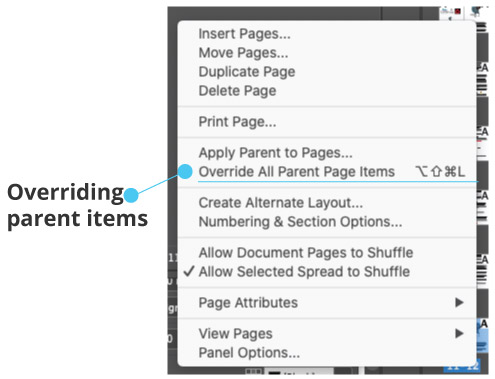
Another potential reason that you may not be able to edit the text is that you are trying edit from A, or the Master Page. A way to check is to:-
- Select the card ( page )
- Right click
- And “Override Master Page Properties”
*Just remember not to override and edit the Actual Master template. This may otherwise change the text or design on ‘all of the cards’ or pages. ( remember what I said about keeping a backup? Always, keep a back up file!)
You may find this post helpful in problem-solving textbox woes in indesign.

Thank you for reading and editing the text on your card artwork in Adobe Indesign
That is a share of my experience on how to both easily edit the text on any card artwork or card artwork template for your board game. And, how to edit the text in Indesign – when you cannot edit text in Indesign.
Hopefully, this post has saved some time, money, and headache. Feel free to share this post if you feel it is helpful.
If you would like help in designing a card game or creating some illustrations for your game please get in touch.
Final bit of advice on how to edit text on your card artwork in Adobe Indesign
My final bit of advice on editing your text on your card artwork would be to hire a professional if you are doing this as a DIY thing for your business. Or at least find somebody that knows their way around Adobe Indesign, how to save it etc.
Although I appreciate that budgets can’t always make this a viable option it is still potentially the better option.
Getting somebody that is experienced can save headaches later on.
Other helpful design posts
- Project | London Pub Crawl
- Project | Dino Break
- Vector Illustration post
- How to design a kiosk in steps
- Marketing – Creating a newsletter in steps
- Digital drawing on a computer
External Websites Around Creating games
- UK card game printers
- How much does it cost to make an RPG game / book?
- UK Fulfilment companies ( List )
Freelance Design services for cards games – Copyright Jimmsdesign.co.uk
