Simple techniques to reduce ‘banding’ ( Posterization ) in Photoshop ( *updated )
Posterization or ‘banding’ as it is known in Photoshop is a bane to many graphic design professionals or those working in print.
However, ‘banding’ is not limited to just print.
Banding, or posterization can also occur with screen-based imagery but it tends to be more pronounced and commonplace with print-based media in my experience. There is nothing more frustrating than seeing your lush and smooth gradient onscreen only when printed to see the same artwork with segmented bands across your gradient.
Over the years as a professional in-house designer, I have come across banding on more than one occasion. One of the worst culprits for showing banding is when working with greyscale or black. It was a challenge that used to drive me up the wall.
After much trial and error, here is a quick overview of some simple techniques I used to employ to reduce banding in Photoshop.
Some of the simplest techniques to reduce banding or posterization in Photoshop is by either applying ‘noise’ to your brush ( in your brush settings F5 ) or creating a separate ‘noise’ layer and overlaying this on top of a gradient layer to disguise the banding. This will give the illusion of smoother better blended artwork and remove the ‘stepping’ from your gradient. These techniques for handling banding can work especially well when working with mono-colour gradients such as black and white. There are also other tricks I have used in conjunction with this method written below.
“It often took various attempts to get it correct before sending it to print so don’t become too disheartened if your first try isn’t quite on par with what you expect.“
Simple techniques to reduce ‘banding’ | how I handled it
I often ran into banding situations when creating super smooth blends with colour.
It often took various attempts to get it correct before sending it to print so don’t become too disheartened if your first try isn’t quite on par with what you expect.
*Simple tip! If you have a local home printer or high-quality photographic inject printer, use this to test and measure your artwork.
I found these methods I have written below to make a world of difference when it came to creating a prototype or print production. All these methods I have actively used when working in Photoshop.
Some may call these hacks, others tricks but I like to regard them as ‘techniques’ for fixing a problem in print.
You may need to try various levels and settings, brushes and overlays to cure your banding problems. One solution may be enough, but you may wish to employ more than one if you are struggling to get the result you want.
Here is a detailed overview of some of the simple techniques I used to reduce banding.
Simple techniques to reduce ‘banding’ ( Posterization ) in Photoshop – tricks
Before jumping in with the simple tricks you can use. Let us start with the basics. Or if you can’t be bothered reading about banding and when it occurs, you can jump straight to the tricks and hacks for dealing with it.

Banding & Posterisation in Photoshop – When it occurs
If you don’t wish to read about when “banding” has occurred for me, feel free to jump to the next section.
The dreaded banding aka Posterization in Photoshop.
Drawing, digital painting, and creating renders in Photoshop have been a core part of my past and present career.
I have seen the issue of ‘banding’ arise over and over again, so have had to find techniques to better deal with it.
This issue rears its ugly head when it comes to working with radial and linear gradients and tones of black and grey inside Adobe Photoshop.
When working with black as part of the colour palette, I have witnessed these scenarios of when banding tends to happen :
- When rendering characters like Rufus the rat as ( black and grey ) ( illustrated below )
- When trying to gain soft curves of light-darker areas
- When light grey curves around to dark grey
- It was more common when working with black


Trick 1 ) ‘RGB?’
Controversial, I know. But when waging a battle to reduce ‘banding’ in Photoshop, any tool at your disposal can help.
RGB ‘can’ offer a greater degree of flexibility in the beginning when trying to wrestle with artwork to remove banding such as playing with filters or seeing how the art works on screen.
But remember, that once you tinker with filters and have done what you need to do with trying editing your artwork remember to turn your artwork back to CMYK if this for print. CMYK is a common colour format preferred by most UK printers.
Sadly though, CMYK can…
1 ) Offer a more candid look at your colours at the end of the process.
2 ) Make your colours look like a sadder version of RGB.
‘tangent alert’ Using RGB in the early stages is my preferred method for some projects, not all. It depends on the project.
“Isn’t this madness? You won’t see the genuine colours of your artwork!”
Well unless, your screen is calibrated exactly and you’re using pantones, guaranteeing what you see on the screen to print can be tricky anyway. Besides, I work across both mediums of screen and print, hence working with either CMYK or RGB ( digital )
Trick 2 ) Think of the ‘Bits’
I have tested this method in Adobe Photoshop CS5 and CC with similar results from version to version of Adobe Photoshop. There has been some improvement when working to problem-solve banding.
64-bit – 32-bit – 16-Bit RGB to CMYK
The difference has shown to be marginal but still of noteworthy impact when trying to reduce banding in Adobe Photoshop.
Although the steps are unnoticeable between 8-bit, and 16-bit at reducing banding, this can be enough to tame mild banding.
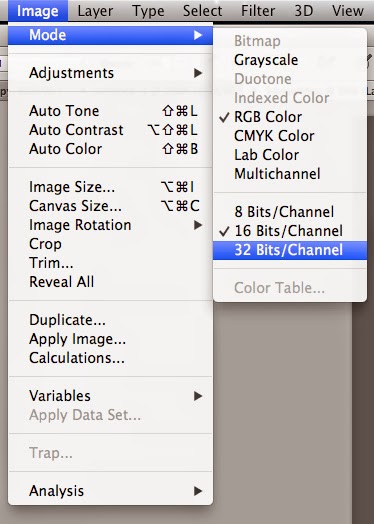
However, at 32-bit, the latter offered tighter rings and hues around the banding and showed to reduce some of the posterization in Photoshop – 32 bit helped the bands to better blend and higher still should only improve upon this further.
Below is a screenshot from the menu option in Photoshop, when with banding.
*Note : Also the colour profile listed below is on an iMac. This is by no means a significant contribution to the final outcome with reducing banding but may be worth noting in case you are reading this as a Windows PC. Although, I am of the opinion that this should make no difference whether on a Mac or PC. But your screen type might.
Trick 3 : ‘Ultimate Trick’ – Brush & Noise
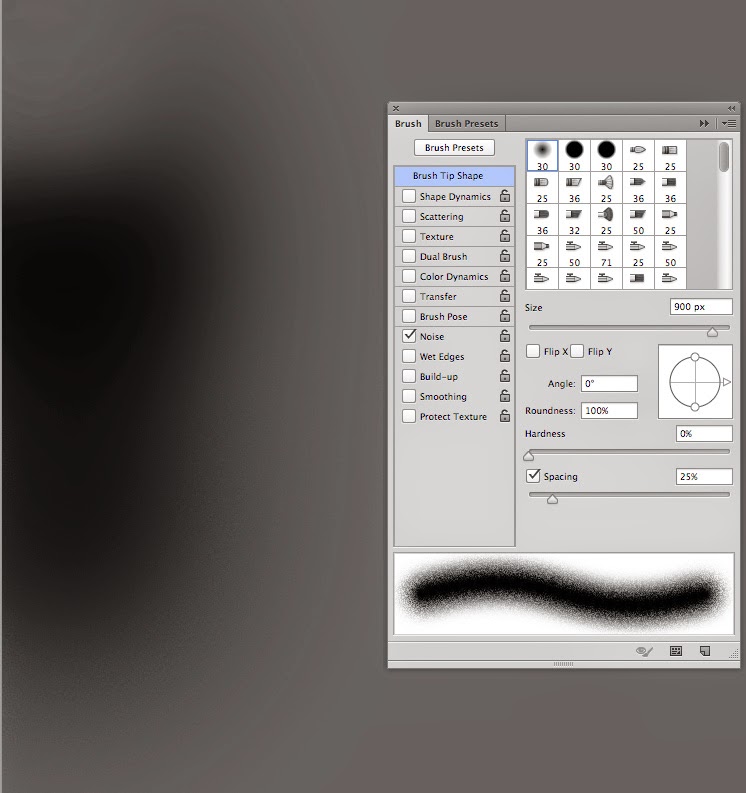
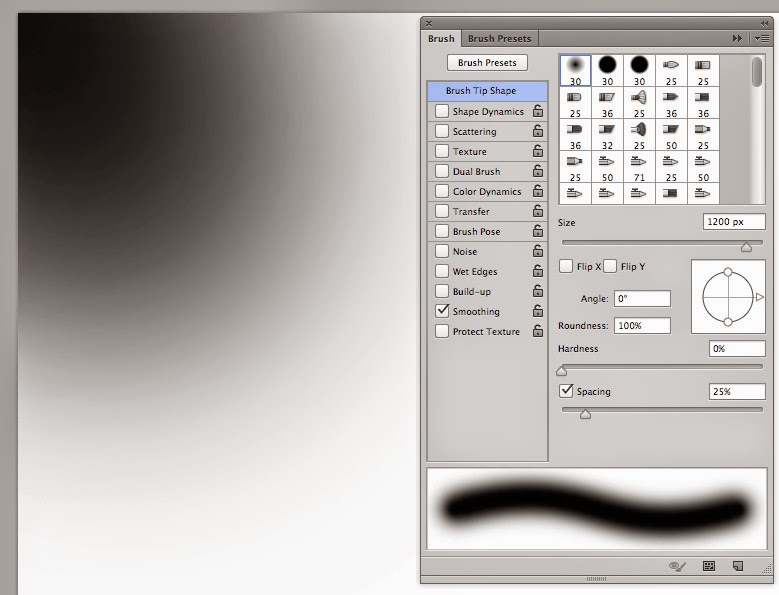
Assuming that you are running into this issue whilst using a soft-edged brush tool in Photoshop, I would advise turning the ‘noise’ on under the brush panel ( as shown throughout – press F5 to bring this window up)
With noise ticked in the ‘brush setting window’ this helps in the blending steps with greys as shown below.
Based on my experience, this improved the overall smoothness and graduation of the tones from light to dark regardless of bit mode or any other trick and hack for beating banding. Texture can help with the blending, and noise can help with texture. You can also dabble with the filters if you are using large radials (That would be a different article ).
Example
As you can see below, the black brush at the top has rings that appear like tide marks, (banding). The blend below has far fewer rings as I had the ‘noise’ ticked on my brush. The speckled effect will be less obvious once you take your artwork to print. And shouldn’t look grainy.
But, be mindful not to be overzealous with noise. You may need some trial and error to get the balance right and run some text prints for good measure.
Example of Noise and brush in action

Trick 4 ) Big to small – experiment with scale
Another trick for tightening banding is by shrinking/scaling down your completed artwork, illustration, or photo.
This works well if you use some of the tricks above to blend and tighten any remaining bands before shrinking your work to hide evidence of banding.
Do this.
When you have applied the ‘noise’ to help blend your artwork, then shrink the image to hide some of the messier details.
This is method not only disguises banding when painting or retouching but also gives the appearance of tighter line work and detail in both photography and illustration. This is a principle I have adapted since being taught this trick in college.
In principle, all you need to do is the following.
Start with your artwork at 100%, and then scale the artwork down to 75%.
If you intend to use this technique, do remember to factor this into the sizing of your artwork with a 25% drop in size!
Eg, if you want your artwork to be 150 cm wide for argument’s sake, consider starting at 200 cm to scale down. Or if you want something to be 750mm wide, start at 1000 mm.
Or if you want to 75 px wide start at 100 px.
In other words, knock a 1/4 quarter of the size but remember to factor in scale back at the end. If you don’t, you may end up with an image that is too small.
- Step 1 piece of art = 100%
- Step 2 scale art to = 75%
In theory, nothing is stopping you from playing with lesser scale-backs and scale-downs.
How can this work with hiding banding?
When you print the document some of the details and blemishes are hidden away from the naked eye.
This approach can also hide some of the rings in banding. With an added element of noise, you can combine this to scrub out the bands
Otherwise your hard could look like a dirty spill stain!
Simple techniques to reduce ‘banding’, the final tip
Using a combination of the above has helped me to kick banding into touch. My favourite by far is my experience with noise without going over the top with artwork to make it look fizzy.
You may also find this post interesting :- working the black in print. Or how to edit the text in a card game.
Simple techniques to reduce ‘banding’ – Credentials
My name is Jimm ( Jim ) and I am designer with over 14 + years of experience. I have had to deal the banding. My old college course and grit and experience is what has helped me to deal with banding.
