Help with Graphic Design, Games & Photoshop – here we come! This post has consolidated some of my more popular and useful posts to help you with your design creations, games & Photoshop. There are many other posts but I can link everything single thing here.
A bit of handy chatter!
help with Graphic Design, Games & Photoshop
Creating something new or trying to find inspiration can be a bit tricky – I know, I have been there and I can imagine that this will be something that will continue to come about in life as a creative Designer & Developer.
When I try to create a post, I try to write something that will both be helpful, relevant and useful to the reader, this blog, after all, is more than just a diary – its a resource for sharing my experience and offer help.
So here goes, useful links to help you with design, games, and photoshop
Photoshop & Drawing
This is something that I intend to expand upon in the future. As of this date here are some of my links for drawing and Photoshop.
The posts above cover tried and tested methods for speedy shortcuts and how to draw with a Wacom Tablet for your computer and digital drawing.
Board Games Tips / Design
These posts cover some very useful tips and ideas for a board game or party game. If you are toiling over some decisions of what to do and how to go about selling your game, hopefully, these will offer some insights.
In these links below cover some handy tips for creating video games, Apps, unity and STEM/e-learning games. It should also be noted that these are portfolio pieces that have been created by me in the past.
Thank you for reading this little repository of useful posts to help with Graphic Design, Games & Photoshop. If you feel it could be of use to you or wish to share on social media then please feel free to do so.
Useful posts to help with Graphic Design, Games & Photoshop
Creating a cool game is one thing, making a game that sells is another. This post covers how to sell your board game and make money in easy to follow stages. As an acknowledgment of my skills and experience, I have co-created successful party games in the past.
The Commercial Director’s informed games commercial success in figures. This was also fairly recent as from 2017 onwards.
The games that I was involved in creating earned £200k in revenue – nothing to sniff at and this post will share that information.
Intro –Monetising your game after creating it
Your number 1 priority should be making a great game that people can play and enjoy – don’t deviate from this principle. Making a halfhearted job and ‘just shipping’ it will backfire in the board gaming community.
If you want to sell your game in the future, make a good game!– don’t cheat your audience into buying a terrible product.
Creating the game – approach
My
approach to creating a game was a bit different from many I feel. it
didn’t come from an insatiable need to express my artistic desire or
tell a narrative that will revolutionise the world.
The
game as created based on a ‘ready’ market that didn’t need educating
on what the game was.
We based our concept on a pre-existing model and try to improve upon it – it wasn’t left to chance and gut feeling when developing the game and all of its expansions. The actions were deliberate and researched before the game was created.
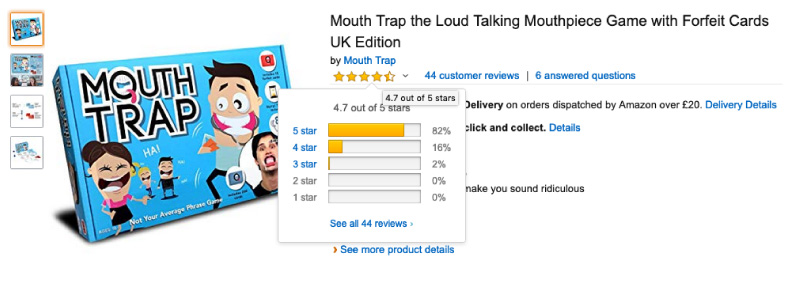
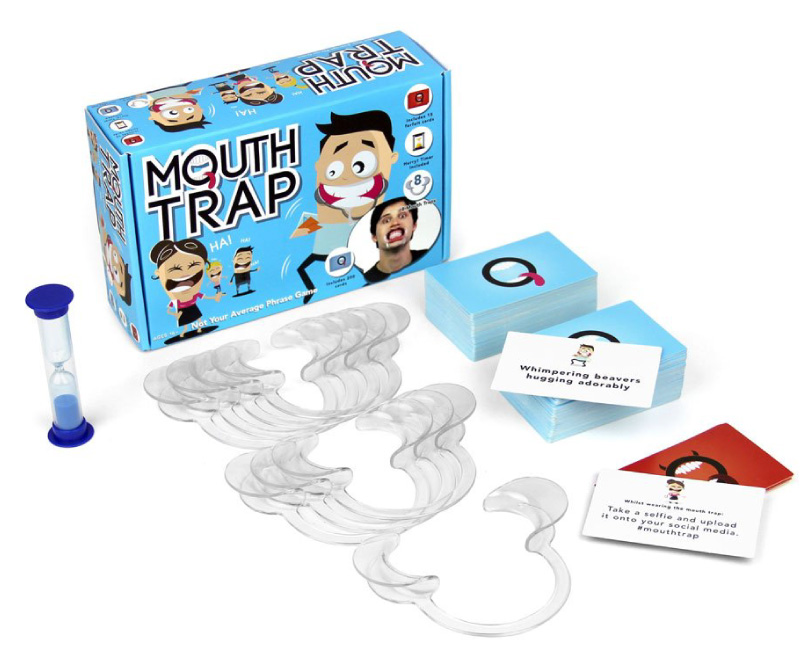
You have a look at one of the early editions here. Which takes you to Amazon, or you can get the general idea from this image.
We wanted to create a game people would enjoy!
We created a UK version of the game that filled a gap – it started as an idea and evolved it something that was bigger and more potent over time and became its an entity that could stand on its own 2 feet.
3 main approaches to selling your game
Moving on, here is a quick overview of how to make money from your game.
1) Sell it retailers or individual shops
2) Pitch it to games publisher or distributer
3) Use a crowdfunding platform such as Kickstarter or IndieGoGo
How to sell your game and make money through publisher/distributor and earn over | 200k
I was involved in creating a party game that earned over 200k in turn over in one year and over 100 k (give or take) in subsequent years.
Selling your game directly to a publisher or game distributor can bare large financial fruit. An advantage of getting your game in front of a large game distribution company is that they can sell your game in large quantities too. They have the channels, marketing, catalogues, and contacts. – You may, or may not!
So how do you get your game in their inventory?
You pitch to them
How to pitch your game to a seller and make money – wholesale
In order to look the professional, your game will need to look the part – eg be ready to ship, be affordable to buy and come with any marketing so you can to prove the game exists.
Don’t leave to much to the imagination, look as ready as you can be.
In order to pitch your game to the correct people, it will come down to knowing the right people. A previous colleague of mine used various methods to find the correct contacts, here are 2 I can recall worked well:
1) Finding them on LinkedIn
2) By going to shows and arranging meetings.
Pitching a game to a large distributor isn’t easy, but things with the best rewards rarely are!
My role in the process of winning such business (in addition to product creation) was to create pitch boards with renders and mock-ups of the games. These were often followed up with marketing PDF’s for buyers at the companies skim through.
I will let you in on a little something else also, should you get in with a successful game
Upsell your game to move toward a 200k gaol
So, you have a proven track record with a distributor, you have sold the game and now what do you do?
We gave them more – although there was a challenge here, we didn’t have more to give – initially anyway.
At this stage, we conceptualised prototypes of expansion packs and extra games and then pitched the “Final game” to the distributor via ‘mock-ups’ on a pitch board which may have still be in the concept stages.
*The games weren’t manufactured until an order was placed.
I won’t lie to you, this can be a risky way of creating a product. You should try your utmost to get a batch or set of prototypes ready to get around this risky approach.
These pitches and subsequent pitches which were driven by the commercial success were won with what was said and what was shown on the boards. At the best of times, a prototype of the game was made.
How to sell your game – use pitch artwork, This is an illustration down to the box and shadow.
So, that is the power of the pitch – don’t underestimate it and considering the potency of your game and whether it can be scaled.
Did that party game really earn 200k?
I think for the first run of the Family Edition of the game, from one single order – it was approximately 200k turn over in orders, and $150K in profits according to the Commercial Director. And more additions of the game were created.
So, yes – 200K then even more over the years. As it was it was being sold in other countries and snowballed.
How to sell your board game and make money | shop & retailer
As part of your strategy to either grow your wealth or hit a 200k target (or any number), you should consider selling your game direct to a large retailer. As above, the process of winning the business and selling your game to high street stores such as WH Smiths in the UK you should explore the tactics of pitching and trying to win business.
For the sake of clarity, I will discuss the steps in order to sell your game to a high-street store and what was involved in the process.
Make sure you have your game ready. The more you have it together, the better this will be for you when you try to pitch your game
Dot your I’s and Cross your T’s – in other words make sure you have all conformity, barcodes and product information ready.
Is the product ready to be shipped? – fulfilment. Retailers like it to be straight forward and not have to worry about getting and unprofessional product etc. Have a warehouse or fulfilment centre ready to meet demand if the retailer places an order?
Build Trust – Retailers don’t want to take foolish risks. If there is an indication of an existing market or you have sold games before, consider putting this in your proposal.
Packaging – in retail, the packaging is more important than you may realise. The box art and how it looks on a retail shelf is incredibly important to a retailer and to the person buying the product. You need to make your product stand and look appealing. Its the box that may sell the game in the end.
It could also be worth noting that if you are yet to make or manufacture your box but have the artwork to utilise the visuals to create a planogram. This will help sell the dream and make your game look a little more real to the retailers.
These are some of the keys points I have been involved in when both collaborating and creating a proposal to a retailer.
This point was, in addition to the method of selling your game to the distributer a large contribution to it’s a financial success.
How to Kickstart your game and earn over 200k – if only knew.
Kickstarter template graphics
Although, I have yet to be involved in creating a successful Kickstarter that sells 1000’s of unit most of my experience comes with working with retailers.
Companies have earned millions on Kickstarter
A website such as Stonemaier games covers lots of hints and tips on how to create a Kickstarter and make a success of it. If you have a moment you should take the time to read some of the articles.
I would also like to mention the games companies that made Bears VS Babies and Throw Throw Burrito, both of these board games were hugely successful on Kickstarter before going onto nailing it in retail. I have seen these games in Waterstones, John Lewis, WH Smiths & others in passing.
Both of the games had a huge fan base and used Kickstarter to its maximum potential. They used Kickstarter for what it does best – to validate a product and get ready for the next big step.
That next big step… conquer retail.
If you are intending on launching a Kickstarter anytime soon …. don’t launch unless you have a crowd waiting to place an order and buy your game!
Your
crowd is crucial to a game’s success on the likes of Kickstarter. No
crowd? Probably no crowdfunding either.
If you want to hit the bigger numbers get all of you marketing up to scratch first and then roll it out. If you are struggling there is no shame in canceling your campaign and moving it to another day.
Kickstarter is a great way of getting your product validated and tested before going to retail. I have written a post here on how to design a Kickstarter page.
How to sell your board game and make money – summary
I hope this post was useful and offers some insight into selling your game to the big retailers and distributors. As mentioned above, the large sum of money was earned through selling to a retailer and distributors.
If you would like to know a bit more about the making of the party game, you can view the post here and read at your leisure. This post discussed more of the design stages as opposed to the money aspect of the game creation.
Selling your game – my credentials.
I am a designer with 10 years’ experience and I have been involved in creating party and card games! Whoop whoop, if you would like to know a bit more about my services you can read more about my freelance card game design and get in touch.
Thank you for reading how to sell your board game and make money, if it was useful feel free to share.
To create a digital STEM or E-learning game ‘app’ you will need to make a plan, download software to construct the game and have access to or own software to create the artwork and ‘assets’ for the game. This post covers all of the details on how to create a STEM game or application in a step by step process from software suggestions, to hints and tips.
Caption from E-learning game
The steps I used to create an E-learning / STEM game.
This post covers the
steps and stages I undertook to create a STEM game or what was then
an E-Learning game that could be played on a computer, be it either
an iMac or PC.
I would like to mention now that I am not a teacher or a STEM specialist. I took what was a principle and applied it to my game design for a major project. This article focuses more on the creation of the application itself, opposed the focus of STEM subject matter itself. If you wish to read more specifically on the subject of STEM you can find out more here : source
Why Create an E-learning (STEM) Game?
Before STEM was a term I had heard of, I wanted to create an application that was both entertaining and educational for young children. Games or gaming has a bad rap for being mindless and many are (I do like a mindless shooter as much as the next person). I was also a fan of the classic puzzlers growing up such as Monkey Island and Fate of Atlantis.
I wanted to create a
fun purposeful experience through the medium of gaming that will help
children.
And…
When the project was
assigned to create a big experience I wanted to create a game that
would utilise some of my existing skills as a young designer and
illustrator (as a student) and create a product that I would be proud
of. I wanted the E-learning game to have engaging puzzles and
characters that would pull the children in and compel them to explore
through the levels. They also had a mission, they needed to save a
friend.
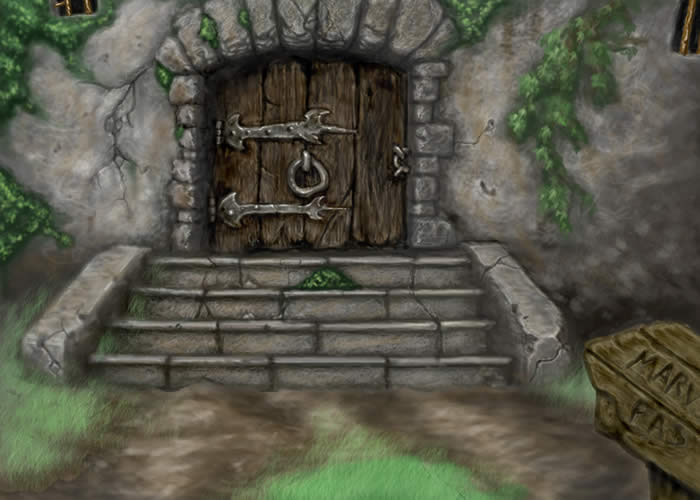
Crooked Castle for E-learning
About this E-learning game – Blossom Tree
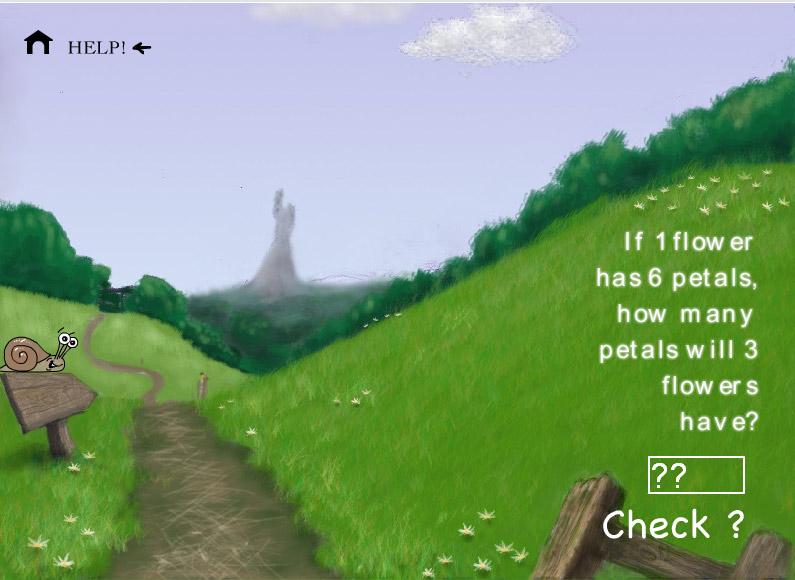
The game was aimed towards children aged 7 +. As the player progresses through the game, they would have to answer questions of varying difficulty until they arrive at the final stage and save their friend. There were 2 main paths that had 2 types of questions.
Path 1 = Sums
Path 2 = Spelling
It should be noted that you can pick any of the core STEM subjects for your own project.
Both paths converge at
the end to logic and problem-solving questions which broke format
from traditional ‘yes” and ‘no’ English and maths.
Blank background for level
The steps used to create the E-learning game whilst adopting STEM
After studying design
this was my first venture into developing websites, apps and 2D games
in Adobe Flash. From the start, I planned the project from the look
and feel to how it would play. I also made a level randomiser but the
concept ran into technical difficulties late into the game
development – get into your “white boxing people” please. It is
such a valuable stage for the process. I have mentioned in detail
below what “White boxing” is.
1 ) The idea for the E-learning Game
Sounds obvious, but the
idea was an important step. I had a vision and idea for what I wanted
the game o achieve and how it may look! After developing a viable
idea I set about doing some research online into “pedagogy” and
how it could be applied to the design of my e-learning game.
2 ) Game Objectives – “The Mission”
So you have an idea,
now what do you want it to achieve? You will need to consider the age
range for your game, whether it will be for all educational subjects
or will it just 1. If this going to be for free? Etc. As a teacher or
somebody looking to make a STEM game grab a piece of paper or open
word and start jotting down what you would like your application to
do for the world.
3 ) Planning your STEM / e-learning game
Great, so you have
established what you want your game to achieve and what will happen
in the game. I approached a more narrative approach to my game which
lent itself well to word challenges and maths questions. If you are
making a Science themed game maybe you could have a lab and you need
to find the secret ingredient for a concoction? Of you have
calculated sums and outwit an evil computer! The ideas are endless.
Start to the application – you game, how many levels, how many
characters, sound, animations, and try to do a rough cutting list of
what will need to be created. This may change as time goes along.
* note: the more ideas you have the longer it will take finish
Level map for game
4 ) Your Game Project Timeline
If this is your first
venture into creating a game project it’s tricky to gauge how long it
will take to create a fully-fledged game. If you are building it all
yourself – and learning all of yourself it could be a steep old
slope = a lot of time. None the less, in order to get your STEM game
live you need to set up milestones. I would advise breaking your
milestone down into smaller steps if not for timekeeping, then for
your own morale.
So, with your idea
ready and your research finished and plan set to be into motion. Now
is the time to roll up your sleeves and start building. The next set
of steps covers the more technical steps for getting started.
Technical steps on “how to create your STEM game”
The game that you see displayed was created by me in Adobe Flash (See product here). To create this game, I had learned how to code in a language called “Action Script”. Action Script is what made the nuts and bolts of the game tick, from the scene transitions to the answers boxes checking to see if the question is right or wrong. I have attempted to break down the process of making your game.
1) What gaming program should I use? Select a program to start making your game
Example of game engines you could use for your STEM project
Stencyl (great for beginners with no programming knowledge)
Stencyl is great for complete coding novices. The coding system works similar in principle to Lego Bricks, where you can stack and click together the functions and activities in your game. I have attached an example of what you can do in Stencyl. Or if you would like to, you can navigate to the post here and get an idea of how it works – (Stencyl post, custom cursor) Although Stencyl is good and has merits it has many limitations in my opinion. It should also be noted, that this engine is 2D only.
Unity Software (great for someone with some coding skills, create powerful games)
Unity software is everywhere and with large developer communities constantly improving the assets and the software but, be warned – it can have a steeper learning curve if you are wanting to create e-learning or STEM games this is truly a powerful piece of kit. One great advantage is that Unity comes with LOTS of tutorials, assets and game templates to bump up your game into completion.
Adobe Animate (Used to be king of the game makers, still good but not the most powerful)
The E-learning / Stem game shown throughout this post was created in what was known as Flash. Flash, now Adobe Animate has somewhat fallen out of favour with powerful programs such as Unity bumping it out of top position and accessibility issues for Smartphones driving in the wedge.
It’s a misconception that you can’t use Animate anymore to create rich-media applications – it’s not true. You can still create phone apps, HTML 5, animations, video indents, and games!
2) ‘White Box’ your game first
White boxing is
single-handedly one of the best modern techniques I have been taught
in recent years as it can save so much time. When I say ‘white box’
its a case of roughing out functionality and lose the form of your
game. Worry about the function and how the game plays first and use
place holder graphics in the early stages of development.
One terrible mistake I
have made in the past with utilising time is to create artwork for a
component (part) of a game that will not work and you end up having
to junk not only the component but the artwork/animation also.
Rough it, test it, play it and then make it beautiful!
3) Find a game Artist or Designer
A very important step
for your STEM Learning game is creating artwork that will be visually
appealing to children (and adults) when they interact with your
awesome puzzles. I tried to make the artwork for my game appealing to
a younger audience, to keep them engaged in the topic. You can either
create the visuals yourself, hire an artist (link) or look for free
and open-source artwork and make a Frankenstein monster of moving
stock graphics! (yes, a pinch of sarcasm)
4) Test, test again and assess – then develop your game further
Test your game on players that have never heard of it or played it. Although, I have to confess that I had trouble finding young testers and the youngest I could go to was 9 years old. Watch how people play your game and take notes on what you can improve. This is a valuable step, more so if this is being created for commercial purposes.
5) Publish your STEM application / E-learning game
You’ve done it! Depending on the size of your game, you have spent a year, 6 months, 2 weeks and you have published the application ready to go out to your classroom. You have created a game with a purpose that will hopefully help with learning and STEM development. – Well, in theory, you have made it, now you need to put it into practice.
How “I” created my STEM / E-learning game
I have outlined how you can create a STEM or E-learning game based on my experience and playtesting. I have attached a few conceptual details and visuals of the original game – Called “Blossom Tree” which was my first major foray into interaction and game design at the University of Cumbria.
Static visual for field
I wanted the game to feel warm, friendly and filled with the freshness or being the outside, you never know – the artwork my spur children to go play outside, maybe build a den. You may also notice in the background there is a twisted silhouette of a castle. That is the final destination for the player.
E-learning game spoiler alert!
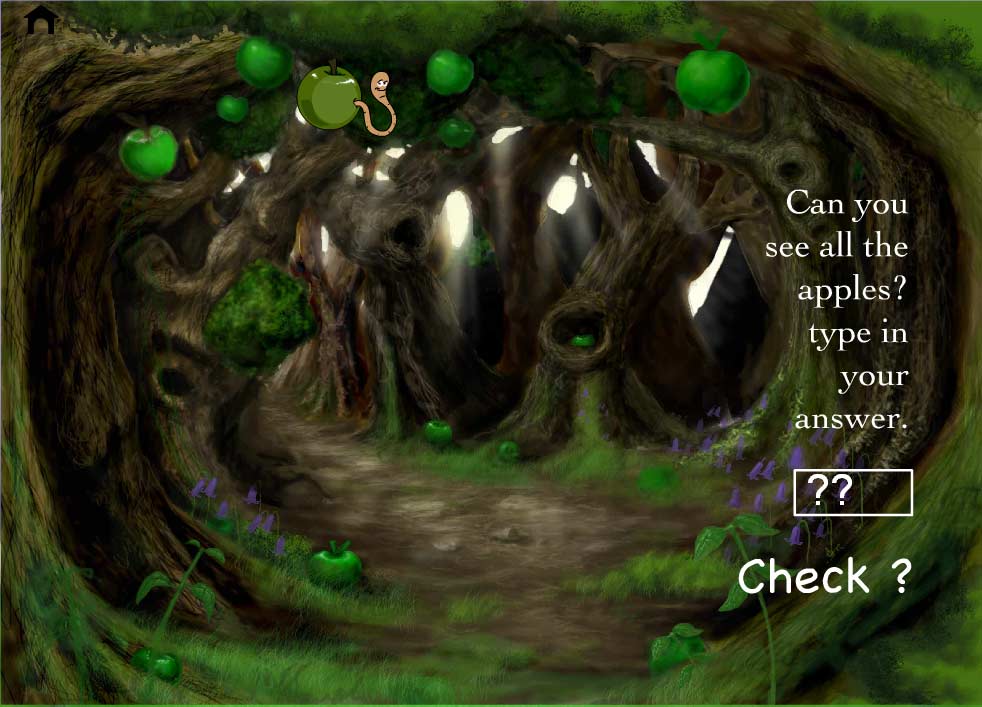
(Wilber Worm)
Speed rounds and classroom chalkboard.
Speed Round from e-learning game. (Do you reckon children will know what a blackboard is 20 years? Probably not. Castle level Background – getting near the end of the game.Dungeon
Looking back
I feel I may have constructed this game slightly ahead of its time. This game was created as part of a final major project whilst studying at the Cumbria Institute of the Arts in my final year of study. This would have pre-dated the surge in the smartphone and the tablet technology and well before the surge in digital downloading platforms such as Steam, Google Play, Apple Store, PS4 network etc.
This e-learning game
was created to be a web application or CD ROM .exe. The platforms for
downloading such games weren’t as prevalent then, whether they
existed at all. The commercial standpoint if I was to create this
game again I do a lot of things differently.
things I would do differently, for my STEM / E-learning game
If I was to remake this game I would add so much more interaction into the game, maybe some quicklimes scenes, a bit more movement and generally make feel a little less static, but hey, this was my first ever go at making something like this. I look at many aspects of the project – especially on the design side of things and hiss through my teeth or feel my toes curl as some of the aesthetics but still proud to this day to hear this from around the corner.
“This is F*****g ace!”
in a Cumbrian accent. And that was directed at what I had learned, what I had created and I had hoped would be an of a benefit to a few.
The take way on how to create a STEM game application
I hope my project and
how to post has motivated you and given some insight on how to create
a STEM application or learning game. The process of creating a game
such as this can be incredibly rewarding. It can also be a big
undertaking and if you need any help or have any questions. Well, you
know where I am.
If the found this post on “how to create a stem game application” useful please share. It could be helpful for those looking to create an educational game or something for friends and family.
Cool email marketing
ideas: this post displays some of the visuals that were used to win
business, convert leads and maybe give someone a little smile! These
email designs all copyrighted and cannot be used for commercial
purposes. By all means, feel free to use these designs for ideas and
inspiration.
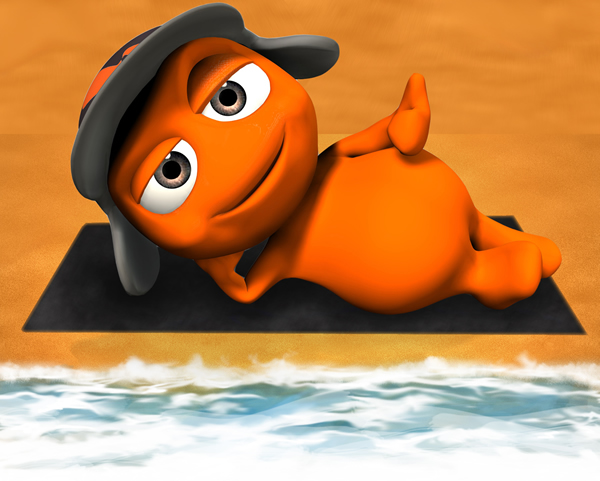
Summer Promotion Header
This is part of an
older campaign in which the 3D character was posed and laid flat onto
a beach towel – yes he has cheesiness that was created to get a
small smile and an eye roll. The character is a symbol of the company
personalty, a mascot that was both happy and fun.
There he is cheesing his way off you screen!
This header was created
to be an eye-catching piece to pull the viewer into the campaign.
This header helped to set the scene of a summer promotion and
products that went along with it. The character is 3D render overlaid
into some texture created in Photoshop. The textures were created by
me.
Science Cup – General product campaign
branded Email campaign
This email template became the standard HTML format for many email campaigns with an opening title that could be read before the reader needed to press the “download images” button. The focus image is placed at the top of the email campaign in the hope of catching the attention of the reader quickly. Many of the email campaigns were heavily branded also moving on from static width campaigns to responsive email marketing.
Idesign 3 4 2
This was part of a
much, much larger marketing campaign to promote a product in which
you could create your own smartphone case. The colouring, and the
theme were a continuation of the existing branding for the product
range with the punk pink and black tech feel which emulated the
packaging. In addition to the look of the campaign, additional
visuals and elements were added, such as the creative typography and
the CTA’s buttons. All visual aspects of the campaign tried to not
only respect the branding and the marketing of the campaign but the
actively endorse it.
Branded email campaign design + PDF
As time went on,
subsequent campaigns were created to promote or sell the product.
Like the image below shows.
Additional email marketing campaign
There are other
campaigns in terms of look and feel but many have a similar brand
look and feel. As time evolved I created campaigns that were not only
visual but easier to template and change the characteristics and
contents. This proved to be invaluable for tight deadlines.
Cool e-mail campaign ideas
Thank you for reading
this post about my email campaign design. You can either contact me
directly for more information or you slap me for drafting up the
Satzuma man lying down on a beach towel. Either way, feel free to say
hello.
Thank you for reading,
if you like this you may want to know more about …
Hello, this post covers the steps, thoughts, and processes that went into creating a novelty flash drive. These flash drives have graced the shelves of Boots, Tesco’s and other international high-street retailers and to think, it all started as a happy accident (almost).
Stage 1 – The product concept
The initial drawings
and images weren’t created to be flash drives – they were going to
be characters as part of a marketing theme that would feature on
email signatures, brochures, trade stands, and other collateral –
not flash drives.
Hello!
These darker characters
were created to be the opposite of the Satzuma Man which was a
glowing orange character which looks like a happy marshmallow. He was
the ‘goody’ so to speak.
Rufus 1,2,3!
As time evolved, so did
the roles and priorities of the characters. It was discussed that
these characters should be turned into something else, why not a
product?
Not the first attempt at creating a product
This wasn’t the first
time at making a novelty product – I should be ashamed to say that
the first ever character to be created was the Satzuma Man… as
Elvis. He looked more like Carlton Banks from the Fresh Prince and he
was a pretty terrible version at that. I’m happy to say that this
design is lost to eternity, never to grace your screens.
The Original Character Art – Pre-Production
The Flash drive models
were based on my designs and illustrations. Although, if I was to be
brutally honest… I was never keen on the stuck-on googly-eyes. It
added a bit of humour but made the product feel a cheap-looking in my
opinion.
Notice the early
“Rufus” was a bit more moronic looking and mean? This was because
he was supposed to be a villain to the Satzuma Man, you weren’t
supposed to like the gormless rodent that meddled with the products
and machines in the gadget factory! As time went on, more love was
given to Rufus both commercially and conceptually and he became the
“goody” with this, his features softened and he became cute –
for a factory rodent.
Early Rufus Rat Design
Hello Melvin – Product Concept
Stage 2) 3D Modelling
Once I created the 2d
designs of the characters, the brief and reference images were sent
to a factory to start creating the prototype. The rat and the dog was
made up in a 3D program which was then sent back to us for approval.
After this, the factory got down to creating the tooling.
Stage 3 ) The Product
It’s alive! Once the
factory had made and completed the prototypes based on my
specifications. The product was then produced in bulk, packaged and
shipped out to the large high-street retailers. Melvin, Rufus and the
flash housing are all copyright Satzuma LTD.
This website uses cookies to improve your experience. We'll assume you're ok with this, but you can opt-out if you wish. Cookie settingsACCEPT
Privacy & Cookies Policy
Privacy Overview
This website uses cookies to improve your experience while you navigate through the website. Out of these cookies, the cookies that are categorized as necessary are stored on your browser as they are essential for the working of basic functionalities of the website. We also use third-party cookies that help us analyze and understand how you use this website. These cookies will be stored in your browser only with your consent. You also have the option to opt-out of these cookies. But opting out of some of these cookies may have an effect on your browsing experience.
Necessary cookies are absolutely essential for the website to function properly. This category only includes cookies that ensures basic functionalities and security features of the website. These cookies do not store any personal information.
Any cookies that may not be particularly necessary for the website to function and is used specifically to collect user personal data via analytics, ads, other embedded contents are termed as non-necessary cookies. It is mandatory to procure user consent prior to running these cookies on your website.