How to fix broken text boxes in Indesign! Do not despair friend! This list of troubleshooting solutions offers a range of fixes, mends, and workarounds when editing text boxes in Indesign. Be it for card games, rulebooks or any other type of editorial design project that uses text boxes.
Whether you are a professional editor, a design tinkerer, or a new Indesign user! This list may have the solution you need to fix your Indesign woes.
Each answer has also been written in easy-to-follow, bite-sized chunks.
To fix your editorial woes in Indesign, you may need to investigate whether certain elements are locked or if there is structure and ordering issues in the document. Or is it a cluster of problems preventing you from editing your text.
How to fix broken text boxes in Indesign
Short and to the point. This article focuses solely on the ‘editing’, fixing and troubleshooting of text boxes problems in Indesign.
For those who have come to this post from my ‘how to edit the text on your card artwork‘, this article may be perfect for helping you to navigate your Indesign headache!
Here are some problems and solutions I have written up from using Indesign over the years while editing cards and various editorial projects.
Jump Menu: How to fix broken text boxes in Indesign
- ) Finding the problem with the textbox in Indesign ( general )
- ) Frozen, laggy, or partially unresponsive textboxes in Indesign
- ) Unlocking your textbox in Indesign
- ) The text box is on a locked layer
- ) Stop trying to edit the master page!
- ) The text box is behind or underneath something else
- ) Amend your layer stack
- ) Too much text for the text frame
Section 1 – Identifying the problem with the textbox
Section 2 – Locking issue
Section 3 – Non-locking issues

Why can’t I edit text frames in Indesign? Identifying the issue
There can be a variety of reasons as to why you can’t edit the text in your Indesign document, whether it be for editing card artwork or text for a rulebook.
One of the best ways to tackle the problem of why you can’t edit the text in your document is to adopt a piece-by-piece approach to finding out why!
This may seem overwhelming at first, but don’t be put off! Using a systematic and step-by-step approach to fix your text box will hopefully have you editing text before long. Ultimately, it does come down to what is causing the issue.
How to fix your broken, locked, or hidden text frame in your Indesign document. Most common causes:-
- The text box or text frame may be locked
- The text box is on a locked layer
- A master page may be preventing you from editing your text
- Your text box is behind or underneath something else
- The layer stack needs adjusting
- There is too much text for the text frame
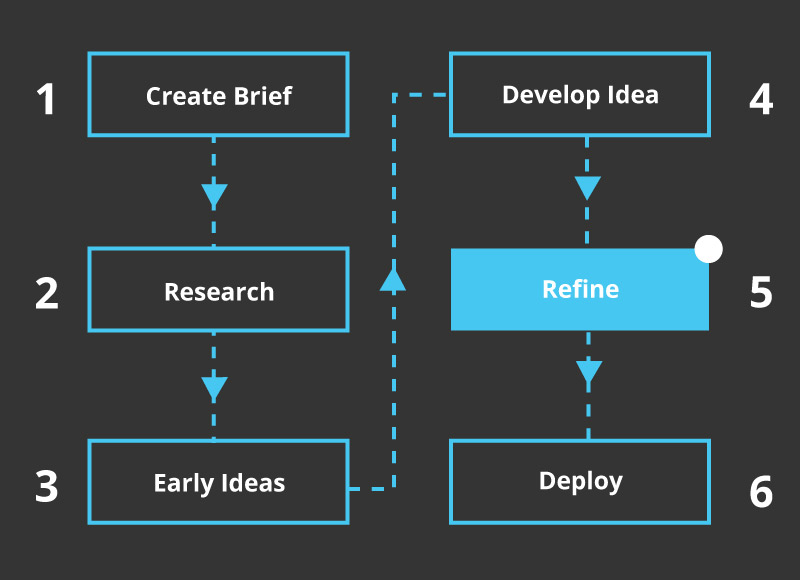
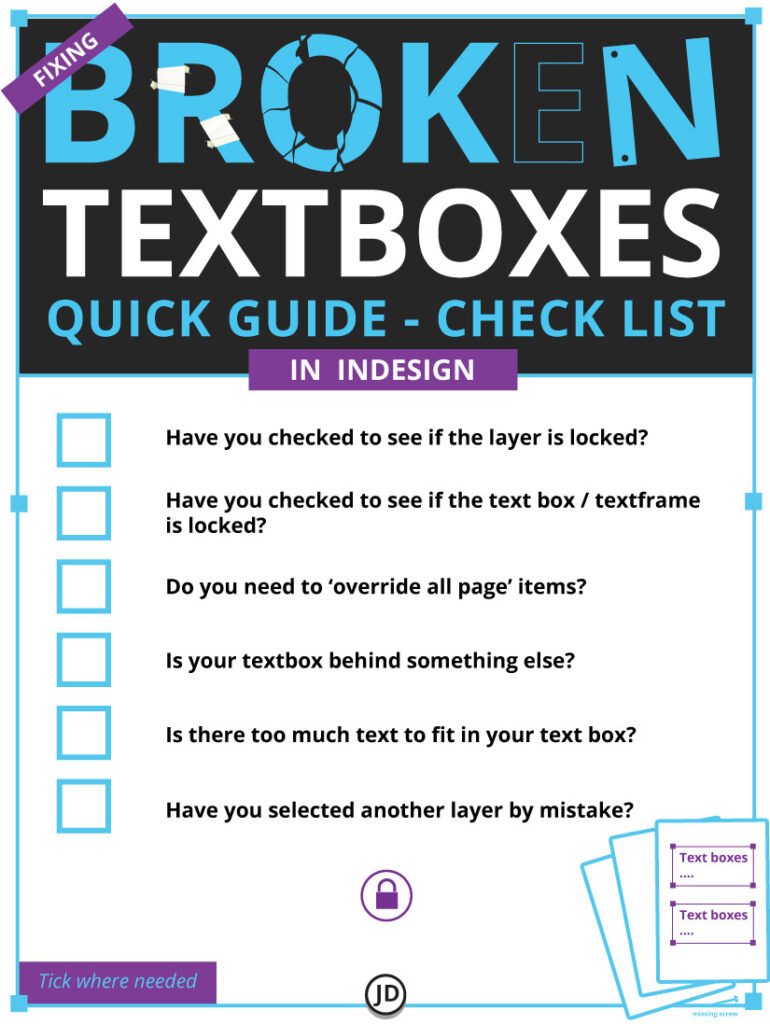
Diagnosing Broken Text Boxes Causes In Indesign – Checklist
When investigating how to fix broken text boxes in Indesign, the process of elimination can be a great way to help you problem-solve. Use this checklist to see what could be causing the issue and then decide what action needs to be taken to fix the text box.
This checklist graphic is free to save to your desktop for future reference.
Core Issue & Frustration Number 1 – Why Can’t I Edit A Text Box In Indesign!?
I covered this question in a previous post ( editing card artwork ). For the sake of clarity, I have built upon that answer in this post in detail.
Some of the most likely reasons you cannot edit your text box in Indesign, is because the ‘text frame’ is either locked, the layer is locked, or you are trying to edit a page that is locked inside a master page template. Your textbox issue can also arise from a mixture of reasons mentioned prior, which can compound the problem further and make it trickier to diagnose and resolve.
When diagnosing the root cause of your text box problems in Indesign, avoid doing so by damaging your project if possible.
Working destructively as you investigate the cause of your textbox problems may resolve one problem but cause others in the process.
Examples of working destructively in Indesign
Damaging or ruining the master template page
If it is one text box you are trying to fix and edit on ‘one page’, don’t edit and ruin the master page to fix it! Doing so can make changes across all pages based on that master page. Take care when editing master pages.
Pulling everything out of the way to repair your text box
This is akin to metaphorical open heart surgery on your Indesign project. Sometimes, it is required, but try to avoid this approach if possible.
Working destructively, as mentioned above, should only be treated as a last resort instead of as a first action! Working in this way can cause more headaches and problems than the initial fix required for your text box.
Tip – When trying to resolve an issue such as to why you can’t edit a text box. It is always wise to work on a ‘child version’ or a copy of your document – especially if it was created by somebody else. This will keep the original intact in case you need to come back to it.
Why has the text box frozen while editing it?
A ‘frozen’ text box or an unresponsive text frame in Indesign can be caused by reasons inside or outside the program.
If the text box has ‘frozen’ or is only semi-responsive. This could be caused by hardware, software, or by the limitations of your computer. In short, Indesign doesn’t have enough resources to function correctly. Speaking as a Mac and PC user, this can cause lagging, freezing and ‘jittery’ behaviour in Indesign.
Here is a detailed breakdown of what can cause this unresponsiveness in Indesign :-
- Your computer isn’t powerful enough to run Indesign
- You have an old computer
- Software updates may be required
- Graphic card issues
- Program conflicts
- Strange compatibility issues
- Not enough RAM
There could be a whole host of other technical and processing power issues causing the text box freeze. It may be best to speak to an IT professional to see if they can help. If this is not an option, please read on.
Buying new hardware, may not be a valid option for now… but this may not be the end of the road for a temporary fix.
These are inexpensive quick-fix solutions I have used when handling unresponsive or frozen text boxes in Indesign.
1 ) Fixing & Freezing Text Box – Freeing Ram / Processing Power
If it is a performance issue that is impacting Indesign, consider closing unnecessary applications to free RAM and processing power.
Based on my experience as a designer, I have found that closing processor-hungry programs can drastically increase the performance of other graphics-intense programs on an iMac,
For optimal performance, I will occasionally ‘only’ have Indesign running to allow all resources to pool into the program. Especially for bigger projects.
2 ) Fixing Freezing Indesign Text Boxes –The Browser Conflict
I would struggle to tell you the exact reason as to why this causes issues – that is a question for an IT professional. Browsers such as Firefox can cause conflicts with Indesign and other Creative Cloud applications when running on my older iMac. ( eg also causing my Wacom to freeze and stop working in Illustrator.)
A resolve I have found works for me when working on card games in Indesign: close my web browser – Firefox.
While Firefox is open, this can cause lagging or latency in Indesign. The best solution I have found is to close the web browser in the background for the duration of working in Adobe Indesign. Drastic and annoying, maybe, but needs must!
*I would love to know why this causes conflicts with Indesign and other Adobe Creative Cloud programs; sadly, I have no idea why!
Part 2 – Fixing Text Frames Due To Locking – How to fix broken text boxes in Indesign
This section offers an in-depth breakdown of locking and unlocking particular elements of your Indesign document, specifically textboxes.
Locked ‘anything’ in Indesign can be some of the most frustrating and banal editorial headaches. Thankfully, as it is commonplace and the fixes can be relatively straightforward!

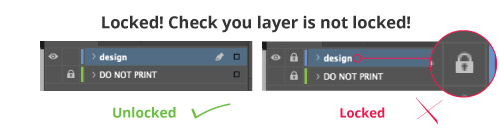
Textbox could be on a ‘locked layer’ – How to unlock layers
You can’t edit anything on a ‘locked’ layer in Indesign, including text frame / textboxes if they are on that locked layer!
Text frames placed on ‘locked layers’ must be unlocked to be edited.

If your layer is locked, this can be resolved by the following:-
- In the ‘layers tab’ on your interface window. Check that the padlock is set from ‘on’ to ‘off. ‘
The ‘open’ or ‘closed’ padlock icon in your layers window represents whether that layer is locked or unlocked. ( See illustration below. )
Press the padlock on the corresponding layer to unlock it. Be mindful not to unlock something that should remain locked.
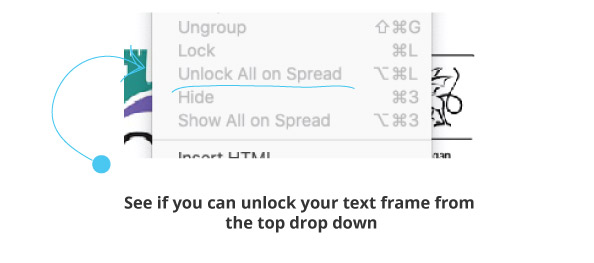
Your Text Frame Itself Could Be Locked – Unlock The Text Frame
The text frame itself could be locked. If this is the case, you will need to unlock it!
The solution to unlocking the text frame in your Indesign document can be relatively simple:
Go to –
- Top menu ( top bar of your Indesign interface )
- Check the drop-down for the ‘Object’
- Select ‘Unlock all on spread’
If this was the reason as to why you couldn’t edit your text frame or select it, unlocking all of the spread may resolve the issue.
If this does not fix your issue, consider the options below.
Part 3 – Fixing Your Text Box in Indesign – Other ‘Non-Locking’ Issues
If your text box headaches are not due to locked text frames or locked layers, another culprit is likely at play.
Below are more troubleshooting solutions for mending your text boxes in Indesign, whether you are working on game card artwork, a rule book, or something else. These are alternative fixes.
Jump menu to other Indesign text box fixes :
- The Master Page is blocking text edits
- Fixing half the text that had gone missing from the text box
- The text box could be behind something else
You may need to ‘override’ the master page properties to access your textbox
You have checked whether or not your layer is locked, and it appears to be unlocked.
A potential culprit could be the ‘master page. ‘ The master page acts as the template and ‘rule maker’ for all pages in your document, from the position of your text boxes to titles to various other elements. Editorial designers can create multiple master pages if they are working with 3 or 4 types of pages.
Master pages are a great time-saving measure for large projects and are superb for making your desired pages or cards adhere to a consistent set of guidelines. But, if you are unfamiliar with them, they can seem to be an object of annoyance and obstruction.
There is a simple solution to edit the page or card without damaging the ‘master page. ‘

Try the following:-
- Select the card or page from your pages panel ( all items are treated as a page in Indesign )
- Right-click the page
- Then select “Override Master Page Properties” as illustrated below
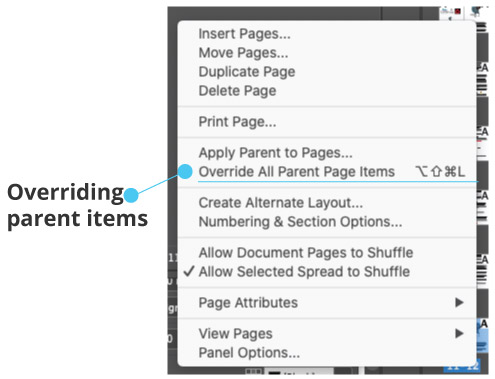
*Do not override and edit the ‘actual’ Master Template unless you intend for those changes to be applied to all pages of cards that are based on that master page. It can be easy to ruin your project if you do not practice care!
Make sure to keep a backup of your project.
Making changes to the ‘master page’ ( master card ) will carry that change across all your pages or cards. Make sure to override only the page you want to edit and NOT THE MASTER PAGE! Unless that is your intention.
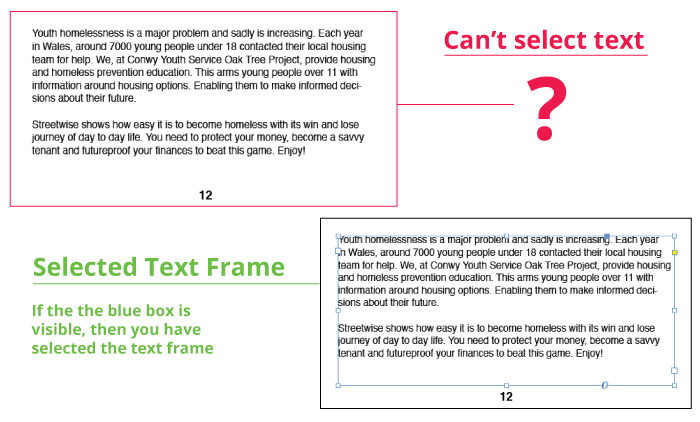
Half of the text is missing from the text frame, and now there is a little red square in the corner in Indesign!
If there is a little red square found at the bottom of your text frame, this is saying that not all of your text can fit in that single frame size. To remedy this in Indesign, there are a couple of fixes.
Your copy ( text ) needs to overflow into another text box, or that original text box needs to increase in size. This will allow more room for the text to show.
You can also consider scaling down the size of your font to allow all the text to fit.
Alternatively, you can reduce the amount of copy to fit into the text box in Indesign. However, this may not be a popular option when working with editors!
A final solution is to select that ‘little red box’ on the edge of your text frame and link it to another text frame! Allowing room for the hidden copy to flow into the second box. Doing so will show the rest of the missing text in the second text frame you have just linked to.
Keep in mind that this is more applicable if you are working on a project such as a rulebook; this may not be applicable to certain projects, such as editing cards for a game.
My text frame in Indesign is unlocked but appears stuck behind something ( It’s behind you! )
This can be an annoying and somewhat frustrating problem to have when trying to fix your text boxes. A simple case that your text frame in question is behind another object!
There is an object in front of your text box, be it another empty text box or an image frame. This prevents you from editing your primary text box properly. ( a design mess! )
There are a few simple ways to diagnose and remedy this problem.
If you can select other items in your Indesign document, be it card artwork, other text frames or images, this would infer that the project is still in working order.
If you can’t select any items on that particular page or card artwork, it could be the case that ‘all the items are locked. ‘
Alternatively, the page or card in question may need to break away from the master page by overriding the master page properties.
Lastly, if you can select other items on the page but can’t select a particular text frame you wish to edit, it could be the following :-
- That textfame is locked
- *The text frame is behind another object
- The layers need reordering so that your text frame sits at the top/front of your layers
To reach your text frame in Indesign, you need to adjust the layer on which it is positioned or unlock the text frame itself.
*Or move the text frame to the front of your pile.
‘Is‘ your text frame behind something else?
Moving the object that blocks your textbox to the front or back is a simple fix. But, at first if it appears that nothing appears to be moving. Consider this:-
- 1 – Investigate whether your text frame is locked
- 2 – Check that your text box is not under a layer ( this differs from being behind an object on the same layer ).
- 3 – Check that it is not locked in some other manner
If you think your object is potentially stuck on a layer or underneath another layer, read the following.

How to fix a text box stuck behind something in Indesign – solution
If your text frame or text box is placed ‘under’ another layer, this can be a reason as to why it appears stuck behind something else.
Solution: Consider reordering your layers so that the layer with the text box is at the front of the stack. Re-ordering the layers may enable you to edit your textame or textbox without further conflict or issue.
Having your layers stacked incorrectly can prevent you from editing what you need to due to the object in question being beneath another layer. The layer in front of your text box may also have editable content, which further exacerbates the problem of not being able to edit your text.
You can adjust your layers manually via the layers window by moving the layer that the text box is on up and down the stack.
How to fix a text box if it is behind an object on the same layer in Indesign
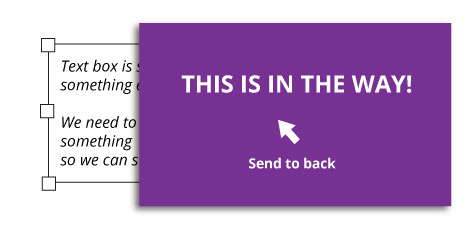
If you keep selecting an object that appears to be in the way or on the top of your textbox, consider moving the offending object towards the back. ( and shout at it for good measure to vent your rage! You may, however, have to say sorry to colleagues.)
Simple fix.
You can change the arrangement of objects by right-clicking and selecting ‘arrange’ from the menu. Then select either ‘send to back’ or ‘send backward’.
Play with the object arrangement until the text frame is exposed and accessible.
Try sending the obstructing object to the back, exposing the text box you are trying to edit.
Bonus Tip – crude yet effective hack – digging for your textbox!
A last resort. If all else fails when trying to fix an arrangement textbox issue in your Indesign project, a somewhat destructive investigation of your textbox may help identify the issue.
In essence, this resembles digging your textbox or text frame out from the rest of the page content so that you may identify and fix the issue. But this method comes with consequences.
Tecniques: Move the offending object or objects that are obstructing your text box to one side for the short term. You can always move these off your card artwork or rulebook for safekeeping. It may be wise to take a screen grab so you can remember where everything has been placed.
If your textbox is stuck behind another text box or image frame in Indesign, this may help in identifying the issue.
*This method will only work if something is blocking your text frame and it’s not as a result of the text frame being locked. This is also a destructive way of problem-solving.
If you can now select the text box, this signals a few things to you:
- You can select the text box and move it – it’s probably not locked or on a locked layer.
- If you can move the textbox around, this would infer the issue resides either in the layers or the object is behind something.
If it is the latter, experiment with ‘layer order’ or ‘object arrangement’ by sending the object blocking your text box to the back. Or investigate the layer order.
Hopefully, the solutions above will help you fix your broken or dysfunctional text boxes in Indesign. If you have found this post helpful, feel free to share and save it to our faves for future reference.
Here is the list of contents you can cross-reference again while you are troubleshooting the issues:-
Jump Menu: How to fix broken text boxes in Indesign
- ) Finding the problem with the textbox in Indesign ( general )
- ) Frozen, laggy, or partially unresponsive textboxes in Indesign
- ) Unlocking your textbox in Indesign
- ) The text box is on a locked layer
- ) Stop trying to edit the master page!
- ) The text box is behind or underneath something else
- ) Amend your layer stack
- ) Too much text for the text frame
Section 1 – Identifying the problem with the textbox
Section 2 – Locking issue
Section 3 – Non-locking issues
** Reference – In this post, ‘text box’ and ‘text frame’ are 2 of the same thing in this document for clarity. ( Fixing broken text boxes in indesign )
Helpful related links when working on game cards, rules, or Indesign in general – How to fix broken text boxes in Indesign
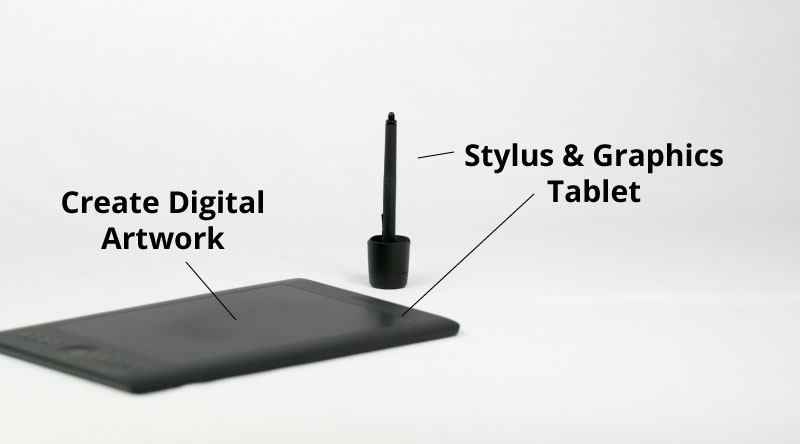
- A no-fuss approach to editing text on card game artwork
- How to reduce banding in Photoshop
- How we made a successful retail game in former employment
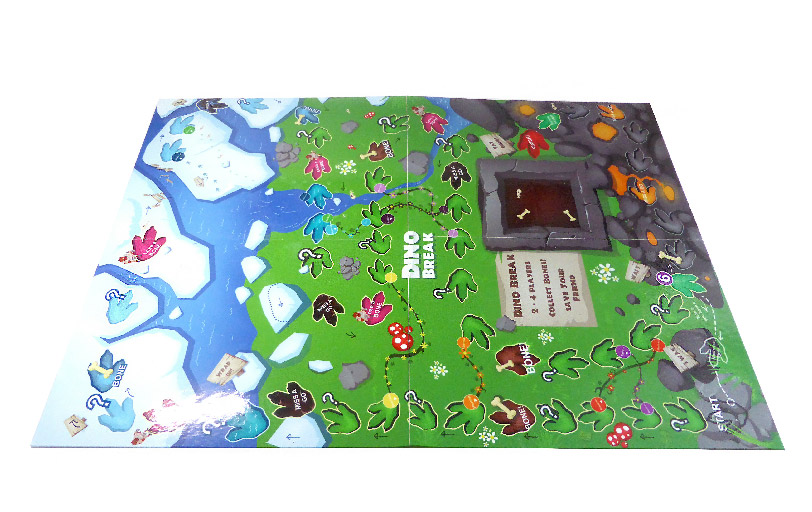
- Case study – making a board game prototype
- Case study 2 – Working on Aardman project
- Creating a Snakes and Ladders game
3rd party websites
- Website dedicated to board game hobbies and making games – Dragon Bone Games
- Board game design services UK
Need a hand with your board game design project?

Thank you for reading ‘how to fix broken text boxes in Indesign.’ By the way… did you find that missing screw? Jimmsdesign