How to make a simple custom Photoshop brush! Made easy. ( Updated )
Ever wanted to make your own Photoshop brush but never knew how? Fear not my design friend! This little tutorial will have you making your custom brushes in no time! ( hopefully ).
I have used these exact methods for various illustration and design projects over the years.
How to make a simple custom Photoshop brush – Answer Overview
An easy method to make a custom Photoshop brush is to either create your own shape or source a shape first. Once you have created your own shape by working with Black against White, you can use that selection to define a new custom brush. In short, you will need to make a selection around your shape and then “define brush preset” – this will then become your new brush.
You can use this method to make a wide selection of brush shapes, be it weave, denim, pencil, or any texture you can imagine.
Also, consider when making your custom Photoshop brush, how you would like it to flow and whether there are soft or hard edges. There is a wide variety of options you can experiment with when creating a custom brush in Photoshop.
How to make an easy Photoshop brush in 5 simple steps
Step 1 – Create The Brush Document
Photoshop Brush
1 ) Open Photoshop and create a new document – 300 x 300 px and 72 DPI for good measure, make sure the background is set to white. It should be noted that you can make this document larger or smaller but I tend to prefer working at a smaller scale.
If you prefer, you can copy the image above for free.
Step 2 – Draw Your Brush
2 ) Working in black and white (Shortcut ‘D’ for black and white), draw your brush shape in black in your new document.
Remember your brush shape needs to be dark /black when you come to creating your brush. For the sake of this tutorial, I have made mine a solid brush. See the black ‘blob’ above on the white background. That is the new brush being painted onto the new document in preparation.
Step 3 – Select Your Shape
3 ) Either by using the marquee tool or Apple + ‘a’ to select all (CTRL + A for windows) select your shape that is to become your brush. If the selection is active, you will see the ‘marching ants’ in Photoshop. If you have made your selection in preparation for the next stage, proceed to the next step!
Step 4 – Use Shape To Define a Brush
4 ) Go Edit > scroll down to ‘Define Brush Preset’ and click on it!
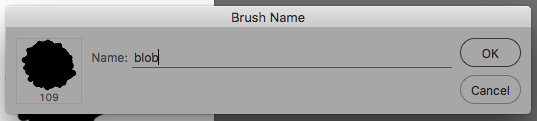
Step 5 – Name The Photoshop Brush
5 ) Label your brush, I called this one ‘blob’. Congratulations… it’s a blob!
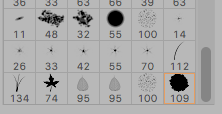
Your new brush in the palette
Well done, you should now have designed your very own custom brush and saved it to your Brush library.
If you press F5 to look at your brush palette, you will see the brush you have just made at the bottom of your library. Why not open a new document and test out your newly created Photoshop tool, make ink splats, and draw faces.
This is just to set you on the path of making more awesome brushes.
Thank you for reading, if you would like some help with a project in Photoshop you can always drop me a line! Freelance Photoshopper!
How to fix broken text boxes in Indesign! Do not despair friend! This list of troubleshooting solutions offers a range of fixes, mends, and workarounds when editing text boxes in Indesign. Be it for card games, rulebooks or any other type of editorial design project that uses text boxes.
Whether you are a professional editor, a design tinkerer, or a new Indesign user! This list may have the solution you need to fix your Indesign woes.
Each answer has also been written in easy-to-follow, bite-sized chunks.
To fix your editorial woes in Indesign, you may need to investigate whether certain elements are locked or if there is structure and ordering issues in the document. Or is it a cluster of problems preventing you from editing your text.
How to fix broken text boxes in Indesign
Short and to the point. This article focuses solely on the ‘editing’, fixing and troubleshooting of text boxes problems in Indesign.
For those who have come to this post from my ‘how to edit the text on your card artwork‘, this article may be perfect for helping you to navigate your Indesign headache!
Here are some problems and solutions I have written up from using Indesign over the years while editing cards and various editorial projects.
Jump Menu: How to fix broken text boxes in Indesign
One of the best ways to tackle the problem of why you can’t edit the text in your document is to adopt a piece-by-piece approach to finding out why!
This may seem overwhelming at first, but don’t be put off! Using a systematic and step-by-step approach to fix your text box will hopefully have you editing text before long. Ultimately, it does come down to what is causing the issue.
How to fix your broken, locked, or hidden text frame in your Indesign document. Most common causes:-
The text box or text frame may be locked
The text box is on a locked layer
A master page may be preventing you from editing your text
Your text box is behind or underneath something else
The layer stack needs adjusting
There is too much text for the text frame
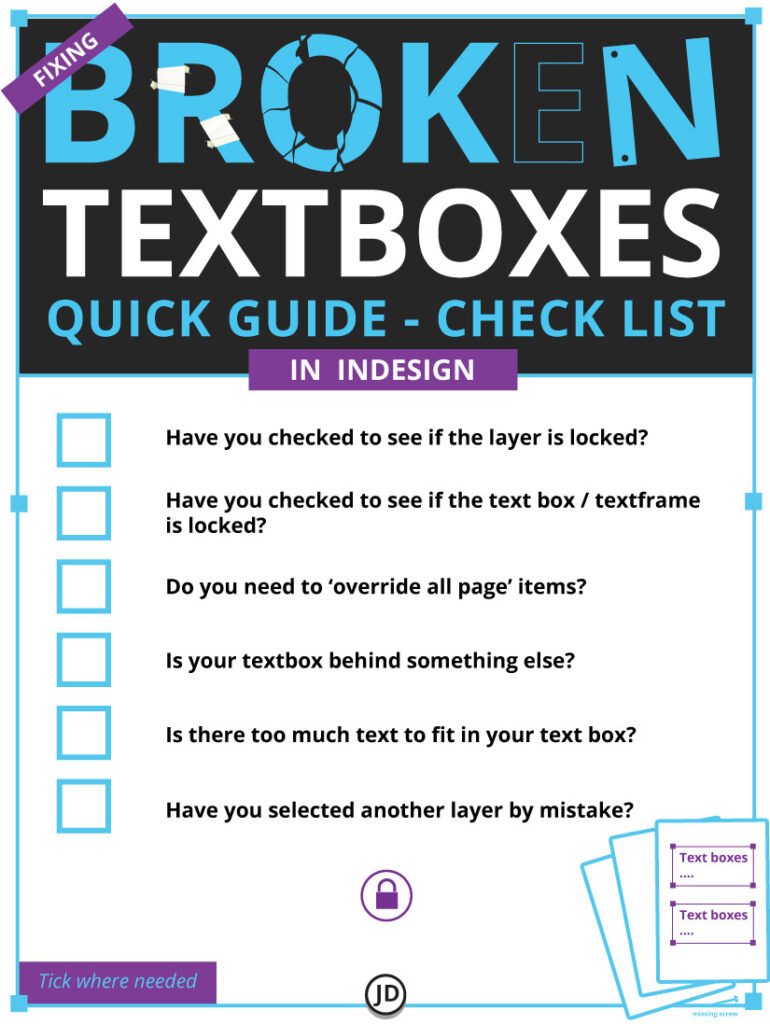
Diagnosing Broken Text Boxes Causes In Indesign – Checklist
When investigating how to fix broken text boxes in Indesign, the process of elimination can be a great way to help you problem-solve. Use this checklist to see what could be causing the issue and then decide what action needs to be taken to fix the text box.
This checklist graphic is free to save to your desktop for future reference.
Core Issue & Frustration Number 1 – Why Can’t I Edit A Text Box In Indesign!?
I covered this question in a previous post ( editing card artwork ). For the sake of clarity, I have built upon that answer in this post in detail.
Some of the most likely reasons you cannot edit your text box in Indesign, is because the ‘text frame’ is either locked, the layer is locked, or you are trying to edit a page that is locked inside a master page template. Your textbox issue can also arise from a mixture of reasons mentioned prior, which can compound the problem further and make it trickier to diagnose and resolve.
When diagnosing the root cause of your text box problems in Indesign, avoid doing so by damaging your project if possible.
Working destructively as you investigate the cause of your textbox problems may resolve one problem but cause others in the process.
Examples of working destructively in Indesign
Damaging or ruining the master template page
If it is one text box you are trying to fix and edit on ‘one page’, don’t edit and ruin the master page to fix it! Doing so can make changes across all pages based on that master page. Take care when editing master pages.
Pulling everything out of the way to repair your text box
This is akin to metaphorical open heart surgery on your Indesign project. Sometimes, it is required, but try to avoid this approach if possible.
Working destructively, as mentioned above, should only be treated as a last resort instead of as a first action! Working in this way can cause more headaches and problems than the initial fix required for your text box.
Tip – When trying to resolve an issue such as to why you can’t edit a text box. It is always wise to work on a ‘child version’ or a copy of your document – especially if it was created by somebody else. This will keep the original intact in case you need to come back to it.
Why has the text box frozen while editing it?
A ‘frozen’ text box or an unresponsive text frame in Indesign can be caused by reasons inside or outside the program.
If the text box has ‘frozen’ or is only semi-responsive. This could be caused by hardware, software, or by the limitations of your computer. In short, Indesign doesn’t have enough resources to function correctly. Speaking as a Mac and PC user, this can cause lagging, freezing and ‘jittery’ behaviour in Indesign.
Here is a detailed breakdown of what can cause this unresponsiveness in Indesign :-
Your computer isn’t powerful enough to run Indesign
You have an old computer
Software updates may be required
Graphic card issues
Program conflicts
Strange compatibility issues
Not enough RAM
There could be a whole host of other technical and processing power issues causing the text box freeze. It may be best to speak to an IT professional to see if they can help. If this is not an option, please read on.
Buying new hardware, may not be a valid option for now… but this may not be the end of the road for a temporary fix.
These are inexpensive quick-fix solutions I have used when handling unresponsive or frozen text boxes in Indesign.
1 ) Fixing & Freezing Text Box – Freeing Ram / Processing Power
If it is a performance issue that is impacting Indesign, consider closing unnecessary applications to free RAM and processing power.
Based on my experience as a designer, I have found that closing processor-hungry programs can drastically increase the performance of other graphics-intense programs on an iMac,
For optimal performance, I will occasionally ‘only’ have Indesign running to allow all resources to pool into the program. Especially for bigger projects.
2 ) Fixing Freezing Indesign Text Boxes –The Browser Conflict
I would struggle to tell you the exact reason as to why this causes issues – that is a question for an IT professional. Browsers such as Firefox can cause conflicts with Indesign and other Creative Cloud applications when running on my older iMac. ( eg also causing my Wacom to freeze and stop working in Illustrator.)
A resolve I have found works for me when working on card games in Indesign: close my web browser – Firefox.
While Firefox is open, this can cause lagging or latency in Indesign. The best solution I have found is to close the web browser in the background for the duration of working in Adobe Indesign. Drastic and annoying, maybe, but needs must!
*I would love to know why this causes conflicts with Indesign and other Adobe Creative Cloud programs; sadly, I have no idea why!
Part 2 – Fixing Text Frames Due To Locking – How to fix broken text boxes in Indesign
This section offers an in-depth breakdown of locking and unlocking particular elements of your Indesign document, specifically textboxes.
Locked ‘anything’ in Indesign can be some of the most frustrating and banal editorial headaches. Thankfully, as it is commonplace and the fixes can be relatively straightforward!
Textbox could be on a ‘locked layer’ – How to unlock layers
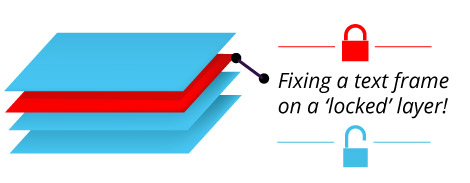
You can’t edit anything on a ‘locked’ layer in Indesign, including text frame / textboxes if they are on that locked layer!
Text frames placed on ‘locked layers’ must be unlocked to be edited.
If your layer is locked, this can be resolved by the following:-
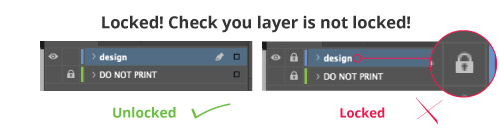
In the ‘layers tab’ on your interface window. Check that the padlock is set from ‘on’ to ‘off. ‘
The ‘open’ or ‘closed’ padlock icon in your layers window represents whether that layer is locked or unlocked. ( See illustration below. )
Press the padlock on the corresponding layer to unlock it. Be mindful not to unlock something that should remain locked.
Your Text Frame Itself Could Be Locked – Unlock The Text Frame
The text frame itself could be locked. If this is the case, you will need to unlock it!
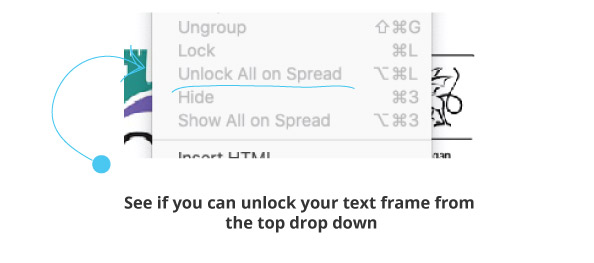
The solution to unlocking the text frame in your Indesign document can be relatively simple:
Go to –
Top menu ( top bar of your Indesign interface )
Check the drop-down for the ‘Object’
Select ‘Unlock all on spread’
If this was the reason as to why you couldn’t edit your text frame or select it, unlocking all of the spread may resolve the issue.
If this does not fix your issue, consider the options below.
Part 3 – Fixing Your Text Box in Indesign – Other ‘Non-Locking’ Issues
If your text box headaches are not due to locked text frames or locked layers, another culprit is likely at play.
Below are more troubleshooting solutions for mending your text boxes in Indesign, whether you are working on game card artwork, a rule book, or something else. These are alternative fixes.
Fixing half the text that had gone missing from the text box
The text box could be behind something else
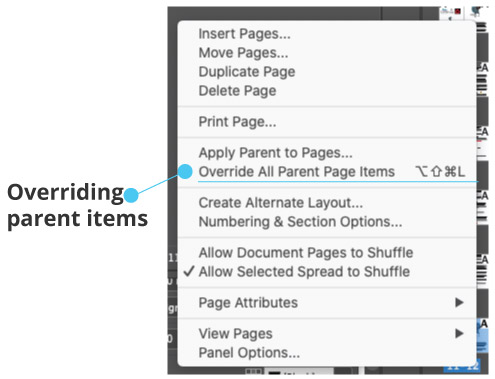
You may need to ‘override’ the master page properties to access your textbox
You have checked whether or not your layer is locked, and it appears to be unlocked.
A potential culprit could be the ‘master page. ‘ The master page acts as the template and ‘rule maker’ for all pages in your document, from the position of your text boxes to titles to various other elements. Editorial designers can create multiple master pages if they are working with 3 or 4 types of pages.
Master pages are a great time-saving measure for large projects and are superb for making your desired pages or cards adhere to a consistent set of guidelines. But, if you are unfamiliar with them, they can seem to be an object of annoyance and obstruction.
There is a simple solution to edit the page or card without damaging the ‘master page. ‘
Try the following:-
Select the card or page from your pages panel ( all items are treated as a page in Indesign )
Right-click the page
Then select “Override Master Page Properties” as illustrated below
*Do not override and edit the ‘actual’ Master Template unless you intend for those changes to be applied to all pages of cards that are based on that master page. It can be easy to ruin your project if you do not practice care!
Make sure to keep a backup of your project. Making changes to the ‘master page’ ( master card ) will carry that change across all your pages or cards. Make sure to override only the page you want to edit and NOT THE MASTER PAGE! Unless that is your intention.
Half of the text is missing from the text frame, and now there is a little red square in the corner in Indesign!
If there is a little red square found at the bottom of your text frame, this is saying that not all of your text can fit in that single frame size. To remedy this in Indesign, there are a couple of fixes.
Your copy ( text ) needs to overflow into another text box, or that original text box needs to increase in size. This will allow more room for the text to show.
You can also consider scaling down the size of your font to allow all the text to fit.
Alternatively, you can reduce the amount of copy to fit into the text box in Indesign. However, this may not be a popular option when working with editors!
A final solution is to select that ‘little red box’ on the edge of your text frame and link it to another text frame! Allowing room for the hidden copy to flow into the second box. Doing so will show the rest of the missing text in the second text frame you have just linked to.
Keep in mind that this is more applicable if you are working on a project such as a rulebook; this may not be applicable to certain projects, such as editing cards for a game.
My text frame in Indesign is unlocked but appears stuck behind something ( It’s behind you! )
This can be an annoying and somewhat frustrating problem to have when trying to fix your text boxes. A simple case that your text frame in question is behind another object!
There is an object in front of your text box, be it another empty text box or an image frame. This prevents you from editing your primary text box properly. ( a design mess! )
There are a few simple ways to diagnose and remedy this problem.
If you can select other items in your Indesign document, be it card artwork, other text frames or images, this would infer that the project is still in working order.
If you can’t select any items on that particular page or card artwork, it could be the case that ‘all the items are locked. ‘
Alternatively, the page or card in question may need to break away from the master page by overriding the master page properties.
Lastly, if you can select other items on the page but can’t select a particular text frame you wish to edit, it could be the following :-
That textfame is locked
*The text frame is behind another object
The layers need reordering so that your text frame sits at the top/front of your layers
To reach your text frame in Indesign, you need to adjust the layer on which it is positioned or unlock the text frame itself.
*Or move the text frame to the front of your pile.
‘Is‘ your text frame behind something else?
Moving the object that blocks your textbox to the front or back is a simple fix. But, at first if it appears that nothing appears to be moving. Consider this:-
2 – Check that your text box is not under a layer ( this differs from being behind an object on the same layer ).
3 – Check that it is not locked in some other manner
If you think your object is potentially stuck on a layer or underneath another layer, read the following.
How to fix a text box stuck behind something in Indesign – solution
If your text frame or text box is placed ‘under’ another layer, this can be a reason as to why it appears stuck behind something else.
Solution: Consider reordering your layers so that the layer with the text box is at the front of the stack. Re-ordering the layers may enable you to edit your textame or textbox without further conflict or issue.
Having your layers stacked incorrectly can prevent you from editing what you need to due to the object in question being beneath another layer. The layer in front of your text box may also have editable content, which further exacerbates the problem of not being able to edit your text.
You can adjust your layers manually via the layers window by moving the layer that the text box is on up and down the stack.
How to fix a text box if it is behind an object on the same layer in Indesign
If you keep selecting an object that appears to be in the way or on the top of your textbox, consider moving the offending object towards the back. ( and shout at it for good measure to vent your rage! You may, however, have to say sorry to colleagues.)
Simple fix.
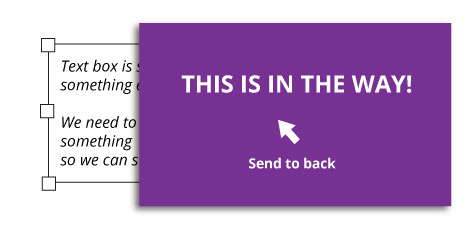
You can change the arrangement of objects by right-clicking and selecting ‘arrange’ from the menu. Then select either ‘send to back’ or ‘send backward’.
Play with the object arrangement until the text frame is exposed and accessible.
Try sending the obstructing object to the back, exposing the text box you are trying to edit.
Bonus Tip – crude yet effective hack – digging for your textbox!
A last resort. If all else fails when trying to fix an arrangement textbox issue in your Indesign project, a somewhat destructive investigation of your textbox may help identify the issue.
In essence, this resembles digging your textbox or text frame out from the rest of the page content so that you may identify and fix the issue. But this method comes with consequences.
Tecniques: Move the offending object or objects that are obstructing your text box to one side for the short term. You can always move these off your card artwork or rulebook for safekeeping. It may be wise to take a screen grab so you can remember where everything has been placed.
If your textbox is stuck behind another text box or image frame in Indesign, this may help in identifying the issue.
*This method will only work if something is blocking your text frame and it’s not as a result of the text frame being locked.This is also a destructive way of problem-solving.
If you can now select the text box, this signals a few things to you:
You can select the text box and move it – it’s probably not locked or on a locked layer.
If you can move the textbox around, this would infer the issue resides either in the layers or the object is behind something.
If it is the latter, experiment with ‘layer order’ or ‘object arrangement’ by sending the object blocking your text box to the back. Or investigate the layer order.
Hopefully, the solutions above will help you fix your broken or dysfunctional text boxes in Indesign. If you have found this post helpful, feel free to share and save it to our faves for future reference.
Here is the list of contents you can cross-reference again while you are troubleshooting the issues:-
Jump Menu: How to fix broken text boxes in Indesign
** Reference – In this post, ‘text box’ and ‘text frame’ are 2 of the same thing in this document for clarity. ( Fixing broken text boxes in indesign )
Helpful related links when working on game cards, rules, or Indesign in general – How to fix broken text boxes in Indesign
During lockdown, a client commissioned me to create the visual design and hard copy prototype of their dice game. This post shares all of my processes and stages used to help create the packaging mockup, as well as some of the details involved in creating a prototype physical game.
To share the journey, let us begin with what the game was supposed to be!
“ I wanted the would be buyer to feel excited by what they see. Enough so that they may even take the game to the till to buy!”
What is ‘Eager Elephants’?
Based on the initial instructions that were supplied to me by the client, ‘Eager Elephants’ was a dice game directed toward children and families. Although only in its earliest stages, the game was to be a reasonable size for a shelf, educational, and fun.
The hard copy prototype was to take that idea closer to reality.
It was a dice game that encouraged children to think creatively and problem-solve. But I must confess, I was not involved in creating the game mechanics – the rules are now hazy.
What Is a Prototype Sample Game? ( Alpha Prototype )
In this case, the ‘prototype sample game’ was the first draft sample to stress test how the game played and looked in real life.
This copy also offered a detailed look into what the final packaging may appear. This was not the beta sample or pre-release sample.
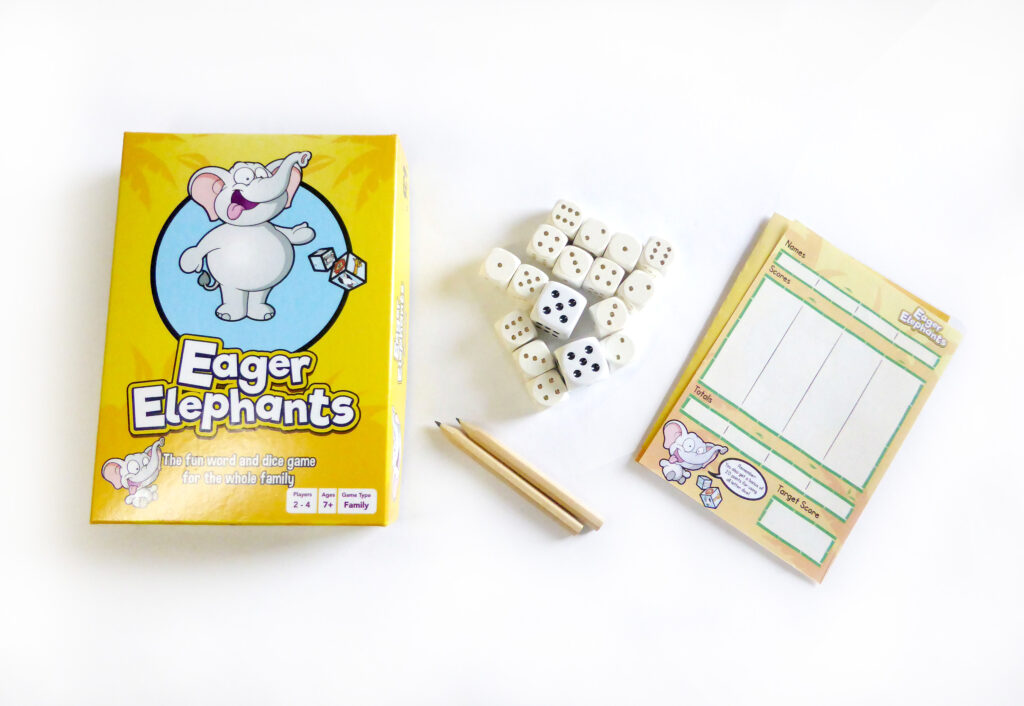
This alpha prototype was an early production copy. Below is a photograph of the sample product.
Here is more on my part in the project.
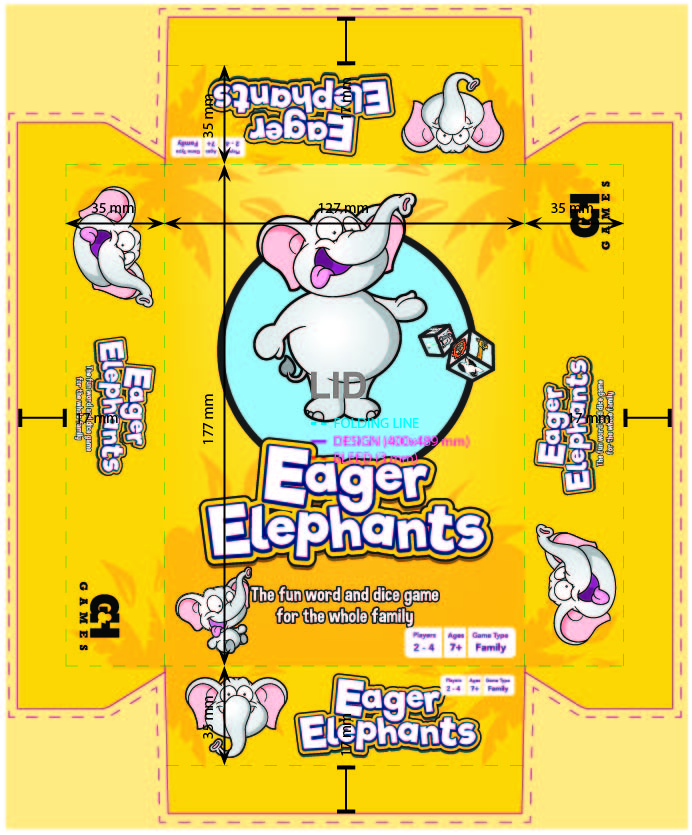
Creating the Box Lid & Cover Design – Graphic Design
One of my main roles in this project was to create the cover artwork for the box lid.
The cover artwork needed to set the tone for a game and excite those who picked the game up.
The design needed to appeal to an audience: Young Children, Mums, Dads and Families.
With that in mind, I tried to imagine the would-be customer handling the game on the shelf.
Prototype Sample Game | Cover artwork
What was the game about?
Who is this game for?
Would my children, grandkids, or whomever be excited by this game?
With some of those base questions, I then considered ‘the how’.
Although this was only an early sample, I still had the idea in my mind that this would become a real game. When handling the game, I wanted the potential buyer to feel excited by the game and potentially purchase this from my client. This is exactly how I would want to think about this game.
When designing a piece of packaging or cover artwork, I try to put myself in the shoes of the client. When working on a design project, I try to avoid pressing my tastes onto a piece of design, this can cloud a customer’s first approach to a project. Ultimately, it will be the end customer and purchaser that will be the product.
Not me, not the client, the customer.
I wanted the would-be buyers to feel excited by what they saw. Enough so that they may even take the game to the till to buy!
*I was not involved in creating elephant illustrations FYI.
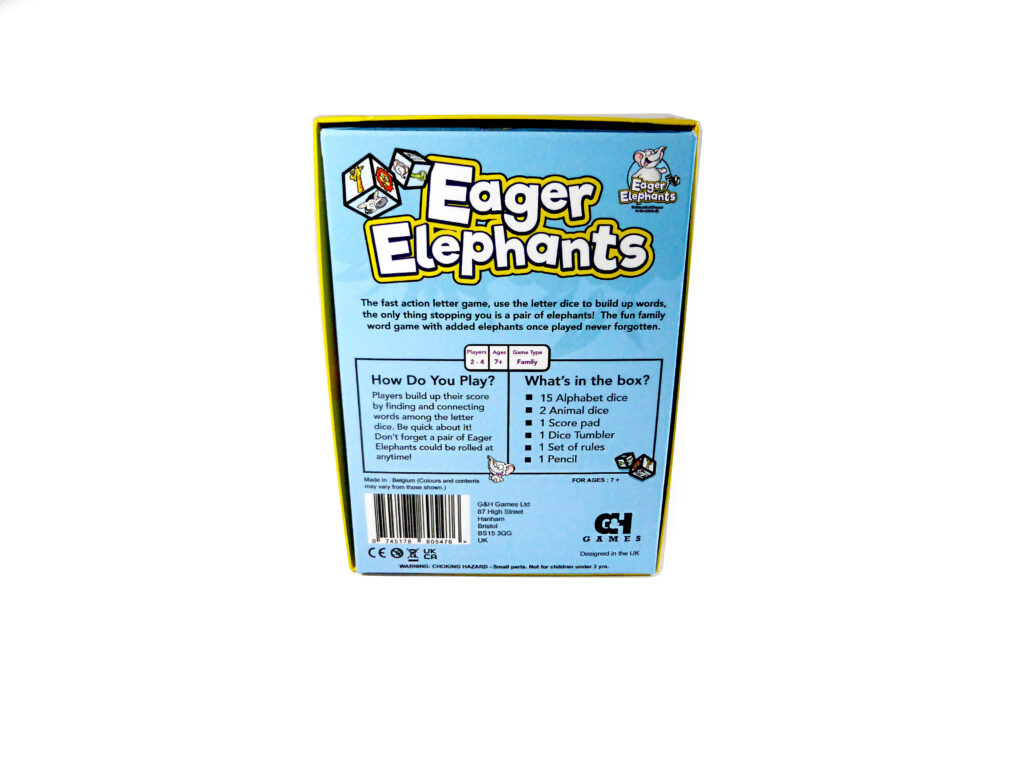
Creating the Box Bottom / Back For the Prototype
Purely aesthetic, I wanted to create a contrast in colour that complemented the already bright yellow on the box. In this example, I used a blue.
Soft on the eyes and a great background colour, it still made it easy for any customer to pick up the box and scan the content that was written on the back.
The contents, bar code, and conformity were designed by me in such a way as to make it the box easier to navigate and find useful information.
As with the top. I worked with pre-existing cutter guides.
Graphic Design For The Rules & Scoresheet
If truth be told, my part in creating a scoresheet was considerably lighter than the rest of the project. Much of the score sheet had already been considered, I just added the finishing touches helped in getting it printed, and added that final sugar coating.
Helping The Client To Get The Prototype Sample Manufactured
Another key stage for this assignment was for me act as both the guide and intermediary for getting the prototype manufactured. A daunting process, even for those with experience!
After I had run through the stages and processes with the client, I set about getting the artwork print-ready.
Once the core aesthetic was complete, this is what followed:-
Getting Prototype Sample Game Ready For Print
Finalising artwork
Colour-proofing and checking artwork
Working closely with the manufacturer and adhering to their rules and guides
Making sure the artwork is positioned correctly within the dielines and templates
Packaging design assets and sending this to print
After the prototype was manufactured the sample was sent directly to me to quality check the product before passing it across to the client. After this sample is checked by myself and notes taken, I will then send the product to the client. I also retained a sample for future reference
For clarity, I want to be clear on what stages and processes I wasn’t involved in this project. Please read below.
I didn’t work on the elephant drawings
Although I am an illustrator, as well as a designer. I did not create the elephant illustrations. These were supplied before I got to work on the graphic design. The credits are mentioned on the packaging box.
Game mechanics
I have been commissioned to come up with game mechanics on previous projects, but this was not the case for this project. I was commissioned to create the visual design, packaging, and sample of this project.
If you are interested in seeing how I have been involved in working in-game mechanics in the past, this post may be of interest. Testing game mechanics.
As in the creative process used by professional Graphic Designers.
This is a common question I hear from both new and old clients. I have illustrated this article to educate and explain the basics of the ( a ) graphic design process.
Before providing a generalised overview of ‘what a graphic design process’ is, and how it works, I wanted to dispel some common misconceptions about the graphic design process and discipline as a whole.
Conceptual graphic design does, or should have a process.
Graphic design isn’t just about making things look pretty. It needs style and substance. It should have an objective.
Good or relevant graphic design does not manifest from thin air.
Commercial graphic design is different from just ‘pure art’ and expression.
Graphic design existed long before the Adobe Creative Suite.
Those are some points I wanted to raise and resolve before going into the details of how a Graphic Design process works for many designers in a commercial setting.
So…
What is a Graphic Design Process? ( Short Answer )
A graphic design process is a series of steps Graphic Designers use to create visual content. This content can come in the form of logos, advertorial, online media, and print collateral. The design process will typically run in stages, often starting with the project brief and objective, the creation of ideas, through to development of the final artwork.
The design process is not only great for managing the workflow and adhering to a design brief in an efficient manner. It is also a great way for both the client and designer to explore the possibilities and potential outcomes of the design journey.
As part of the process, It is common for experienced Graphic Designers to assess a brief, plan a course of action for the design, and execute what needs to be created. While also keeping an open line of communication.
It is common for some Senior Designers ( and some Junior designers ) to openly discuss their design aims so that objectives set by a client, team lead, or managers.
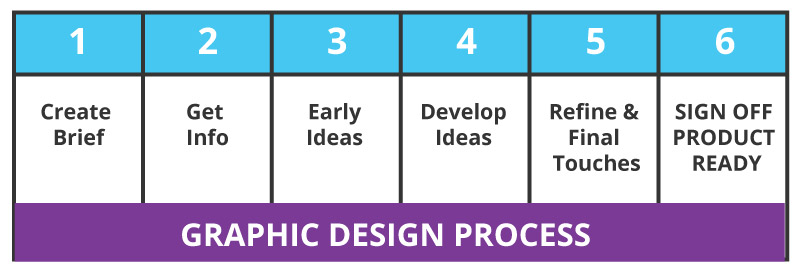
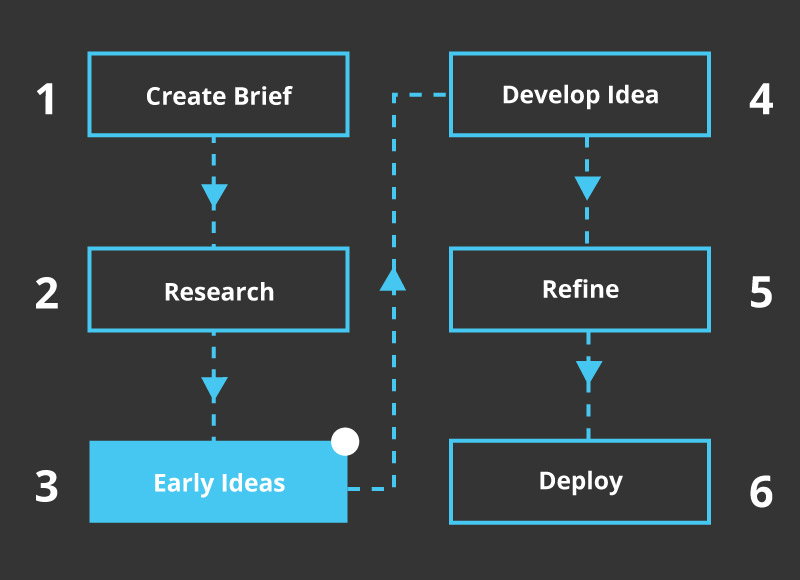
As a breakdown, these steps may resemble the following – depending from designer to designer.
That is, of course, a simplification of how a graphic design process works as a commutative approach across the industry. Each company is different, as is each designer and sub-discipline with ‘design’. As well as Graphic Design.
My bias and perspective on the design process
Before going into the details of my design process in steps, I felt it responsible to mention to you as a reader, I work and have worked in graphic design.
Before becoming a ‘Freelance Designer’, I worked in-house at a company for over 8 ¾ years. During this time I had the opportunity to work on a broad variety of graphic design projects both online and offline. I learned a lot. I could have cried sometimes too!
My skills, my processes, and my steps had a significant influence on my previous employers. Not only just on creating the final design but in the processes that lead to that final design. This post is not about my skills and experiences, that is what CVs and about pages can be used for.
What is a Graphic Design Process? | The Caveats
1 ) Not all graphic designers work in the same way.
2 ) Some designers are at different points in their careers.
3 ) Some Graphic designers have worked in different sectors and industries.
4 ) It is quite likely that you will meet multi-discipline designers who may have a mish-mash of the process illustrated in this post.
All and more of the factors above can influence how a designer works. Please keep this in mind.
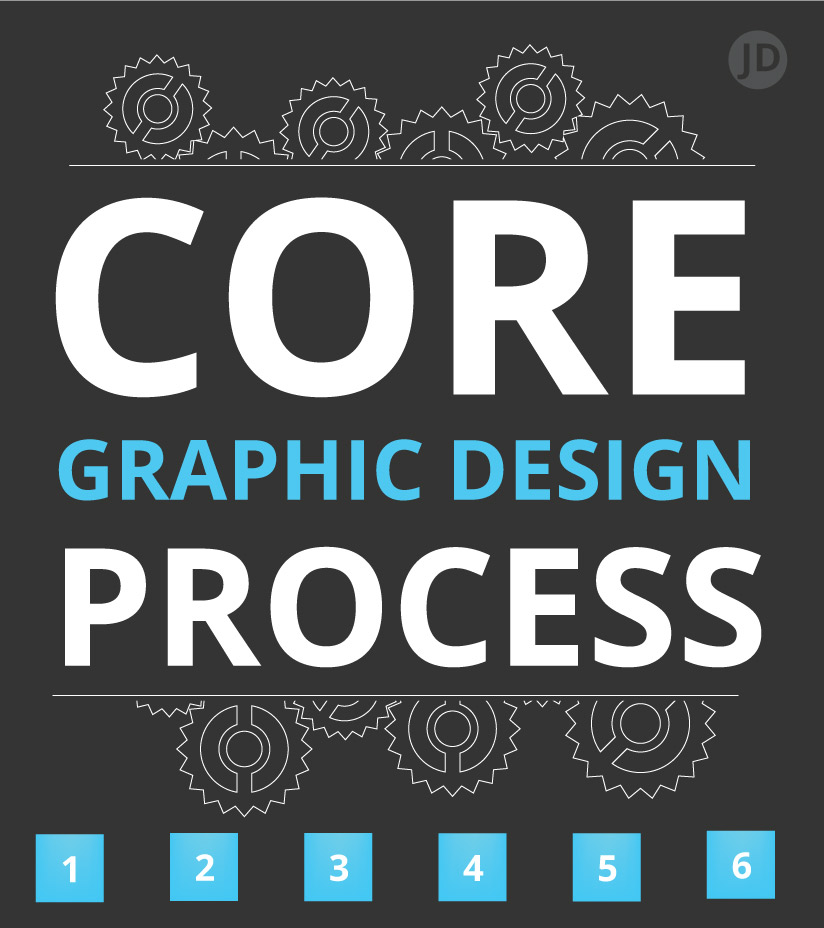
Graphic Design Process Diagram | Illustrated Explanation
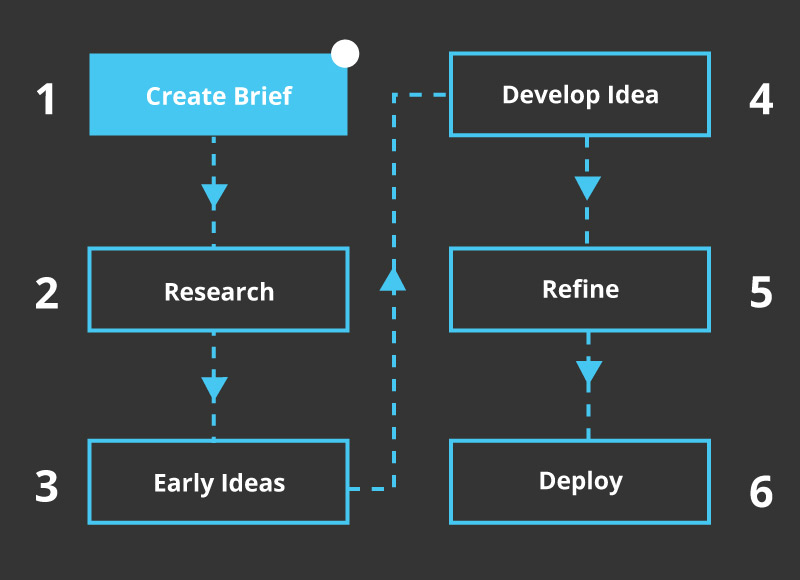
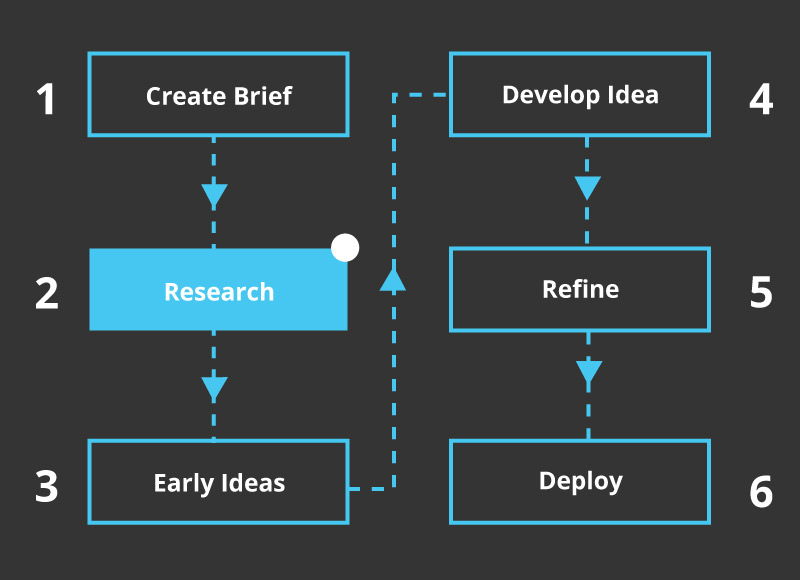
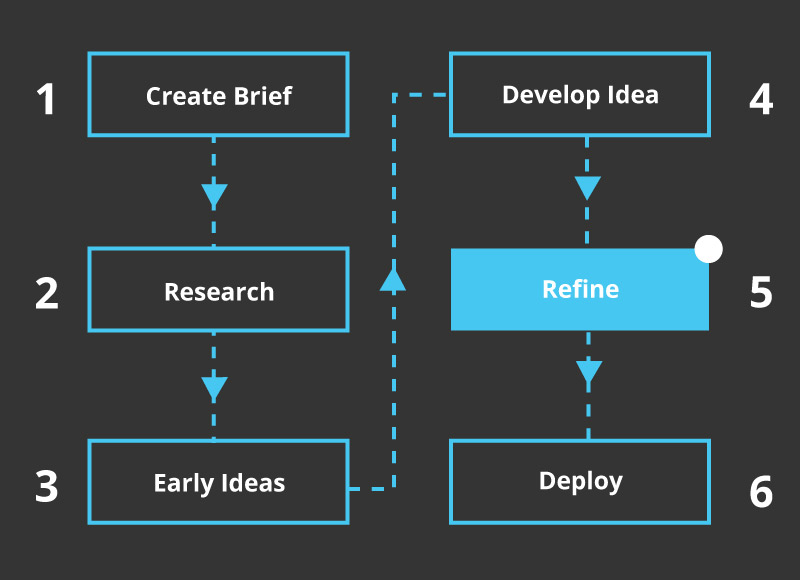
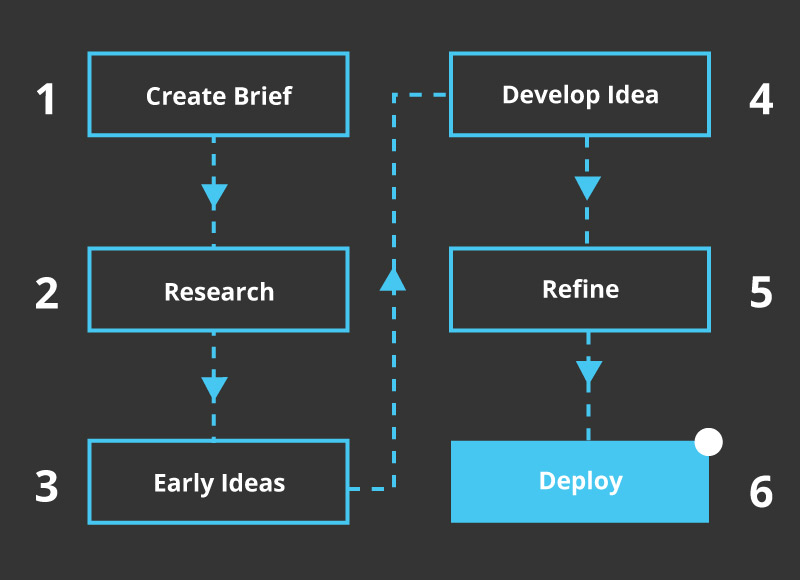
Below is a simplified diagram of the graphic design process used by many Graphic Designers, including myself. Although this is a simplified version of the core workflow and processes, it does offer a simple overview of the whole design process employed by many graphic designers.
Graphic Design Process Steps – Overview
This is a breakdown of the design process and core stages. Each paragraph explains each step in detail and allows you to read and re-read certain stages at your leisure.
Stage 1 ) The Graphic Design Brief
The ‘brief’ is a crucial part of a design project, be it in Graphic Design or any similar field. The design brief is an opportunity to establish core goals and objectives for a project – normally set out by a client or business owner.
You can also imagine the ‘brief’ as setting a mission. This mission is given to a designer so they know what the aim of the project is. Without one, the end objective of what a design needs to achieve is left to costly guessing and piecemeal assembly of what needs to happen.
A design brief is very important. You shouldn’t work without one.
How can you or a designer find a solution when neither party can establish what the problem is?
Or… what the aim of the project is?
It is also harder to plan a budget for a project without one.
It is best to establish a clear brief as early as possible. This will save time, headache, and money for both designers and those setting a project.
What happens if you work without a design brief?
Without a brief – especially a written and mutually agreed one, proper communication between the designer and the person setting the brief is more likely to fail. This lack of clarity can also lead to the disintegration of a working relationship, poor budget control, and potential and unnecessary resentment between both parties.
Make sure to create a brief.
A brief can act as a mutual ‘project map’ to establish what, when, and how a design project needs to be fulfilled.
As for myself, I will often refer back to a brief or a “specification and agreement” to see what I’m working towards with the client. It could be regarded as a loose recipe to follow also for want of a better analogy.
1.1 Quickfire Tips For Constructing a Basic Design Brief
When creating a design brief for a graphic design project, try to consider some of the following :
Who?
What?
Why?
These are all things I consider when working on a design project.
When creating a brief you may wish to consider formats, mediums, and any restrictions or limitations that may impact the project. It is better to give detailed thought at the beginning, rather than part way through.
The “Who, What, and Why” can act as a great starting point and framework for creating a brief. If you can establish the who, what and why. Designers such as myself can establish the how and the details – it can help us better solve problems or avoid them altogether.
However, it is not also uncommon for me to collaborate and consult a client and the, who, what and why. It can be this that helps to craft a brief and point the client in the right direction.
Graphic designers don’t know your business!
The majority of designers, most likely, won’t understand your business as much as you do, especially if working on short-term freelance project.
When constructing your brief, it is better to assume that a new designer, or a designer you haven’t worked with previously, knows absolutely nothing about your business. From here, write all that is relevant to share with the designer in translating your initial thoughts into a well-rounded, well-described brief, with a clear direction.
Stage 2 ) Collecting Information & Research | An Important Stage In The Graphic Design Process
When looking at the stages and steps to a graphic design process, collecting together information, data, files, images, and text are all important aspects of the creative process. Especially when exploring new ideas.
The degree to which research is carried out for a graphic design can vary from project to project, but there are common patterns that are adhered to by many designers.
The preliminary research can be carried out by the client, designer, or both parties. In this stage, it can be a case of collating together: photos, data, logos, or anything that is useful in aiding the designer to create a compelling piece of visual design.
*Designers: When working with clients, encourage them to share research or at least mention that time will need to be set aside for research projects, this is something I do. I have listed some examples of what may be collected together for graphic design research.
2.1 ) Collecting Information
Collecting information together for a design project may consist of the following:-
Data
Photography
Fonts
Logos
Things can inspire
Plans
Initial copy or ‘text’ is a common requirement for design projects. As a designer, I tend to request this as early as possible so I can plan the space around and accommodate the word volume. This can apply to books, webpages, and many other mediums that require written words for the project.
It is quite common for a designer to also be aware that a certain amount of editorial changes are likely to arise later in the project and allow for wriggle room. It is still best practice to have as much of the word count calculated sooner rather than later.
Images and photography may also be sourced or collected together in the early stages of the design process, along with logos and brand guidelines.
2.2 ) Graphic Design Research
Research, or ‘design research’ is an important stage when it comes to the design process. Research can help form, inspire and guide the overall direction of a project.
For large or medium-sized projects, research is a vital tool in not only greasing the design wheels of your project but in helping to form a better more polished product. I am a big advocate for good research across various mediums, design being a key one.
Here are some examples of what the design research stage may consist of, noting that the criteria can vary from project to project and designer to designer.
What design research may consist of :
Studying competition.
Searching areas such as Pinterest, magazines of similar platforms for certain ideas.
Checking what types of design will appeal to your target market.
Looking for any relevant or inspirational criteria that can impact your final design.
Avoiding accidental copyright infringement.
Considering what courses of action will serve the project.
These are just some examples of what the design research phase may include.
Some freelance designers may prefer that the client does the majority of the research before contact. This can leave the designer to focus solely on the creative aspects of a project. I am of split opinions.
On one hand, I like to know that the client has at least carried out some basic research for their own product and business before speaking to me.
On the other hand, I also like to add to the research and build upon what the client has already found the further steer the course of a project, I tend to tweak and steer this from brief to brief.
Research Examples | Core Design Process
With the links below, I have pointed to where you can read more on case studies and research I used for some projects.
Here are a couple of links that may be of interest :
“On the other hand, designers have to be realistic. People change their minds.”
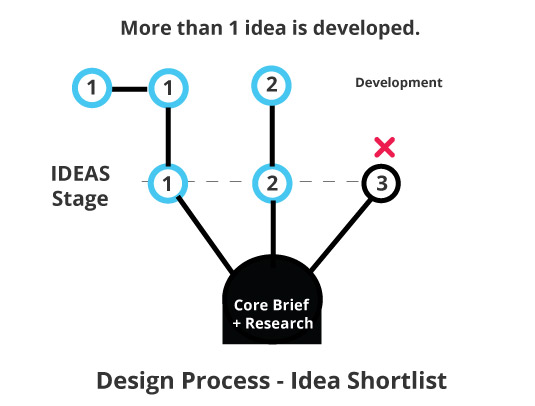
It is common practice for graphic designers, especially those of a more conceptual vein, to come up with an idea or a selection of ideas early in a project. However, strictly speaking, this is not a default practice for all designers.
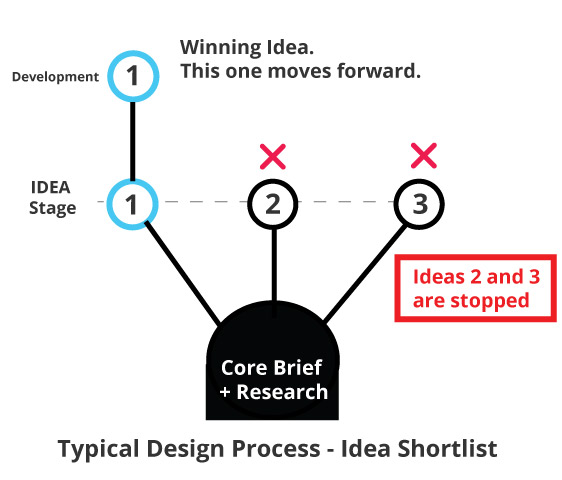
Some designers may only work with one idea and revise this single idea as opposed to working with a variety of ideas and short-listing the strongest.
Depending on fees, time, and requirements, design ideas (ideation), can vary drastically in quality and finish. Each designer may only create a short selection of ideas and others may create a broader selection of ideas to illustrate intent and potential avenues a project can take.
In the earliest stages of ideas creation or ‘ideation’, what is presented may be little more than a rough drawing or digital sketch to illustrate what will be created.
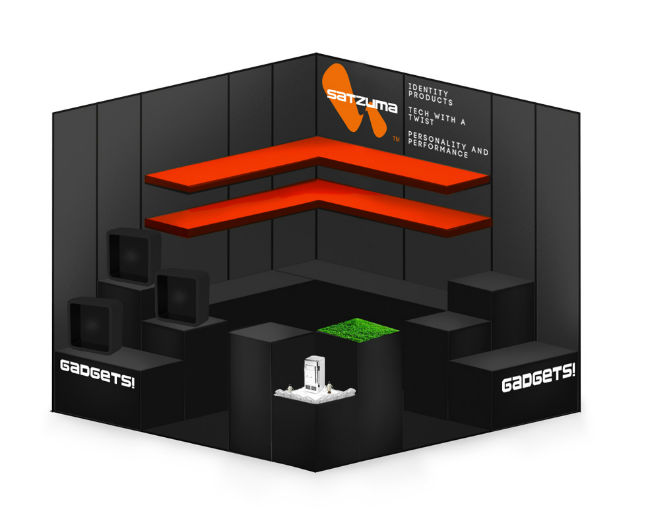
Speaking for myself, I will often use this stage to discuss what has been created and why I have made the choices I have made. Here is an example idea.
Each designer is different, and our tools and methods may differ. But as a generalisation, design ideation may be presented in the following formats :-
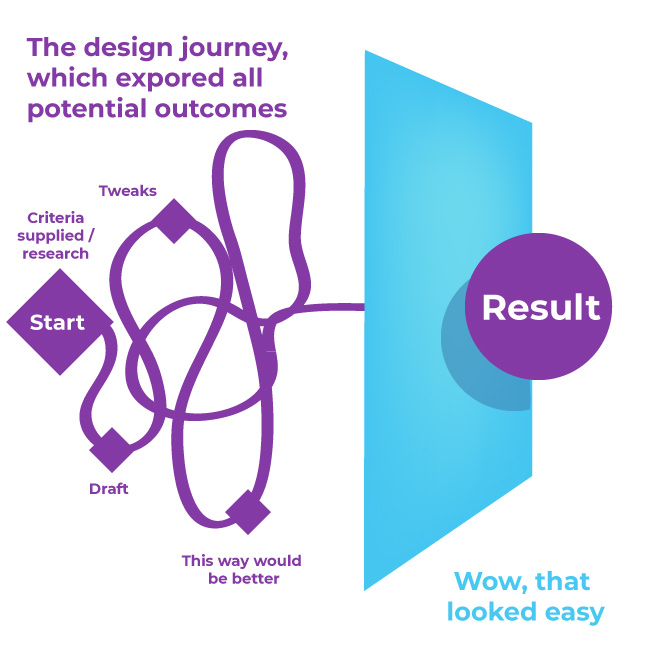
The idea and the idea development stage can blur when it comes to developing a design.
To illustrate this flow – here is an image from another blog post – Design Journey.
For many conceptual-based graphic designers, the idea stage is a core stage in the design process. As a conceptual design. Here are to projects and case studies that may further illustrate how a project may go.
( Important ) The Ideation Stage May Need To Be Revisited
*There is no guarantee that the original ‘proof of concept’ from the selection of ideas will become the final product. Although costly, time-consuming and frustrating, it is not uncommon that a designer will need to backtrack to this pivotal stage once a project is near completion. I have on occasion had to do this on graphic design projects.
List of reasons as to why a graphic designer may need to revisit the ideas stage:
Executive discussion outside of design influences has come into play
Senior management wants to revisit or change course
An idea isn’t as good as originally hoped
New criteria and information have come into play that weren’t known before
Fussy clients
Too many people have differing opinions on a project
Weak project planning or thought given to the brief in the first place
A better idea came along
These are just some of the reasons why a designer may need to return to the proverbial drawing board.
Whoever said design was easy needs to actually work in design, or at least share their secrets to make it easier for them.
Revisiting or needing to backtrack to the ideas stage of a design project is sometimes required – there is no way to avoid it. However, it is best avoided for the sake of the client and the designer. Budget restrictions and time constraints can lead to rows between both parties if, for example, the culprit is a poorly written brief or the disregard for the sign-off stages.
On the other hand, designers have to be realistic. People change their minds.
If the design journey was a straight line, both the designer’s and the client’s lives would be a lot easier. Many internal and external forces will require a designer to revisit other ideas, even if the first choice was put into play.
Do all graphic designers create a range of ideas? ( Ideation )
No, not all graphic designers will create a range of ideas for your brief. As mentioned above, it will vary from designer to designer and from skill level to skill level. Not all graphic designers are conceptual designers. Some graphic designers will have certain leanings towards ‘creative artworking’ , marketing, etc.
It is beneficial to discuss with a graphic designer before embarking on a project. Ask about their process and methods. Make sure there is a clear brief between the designer and the client.
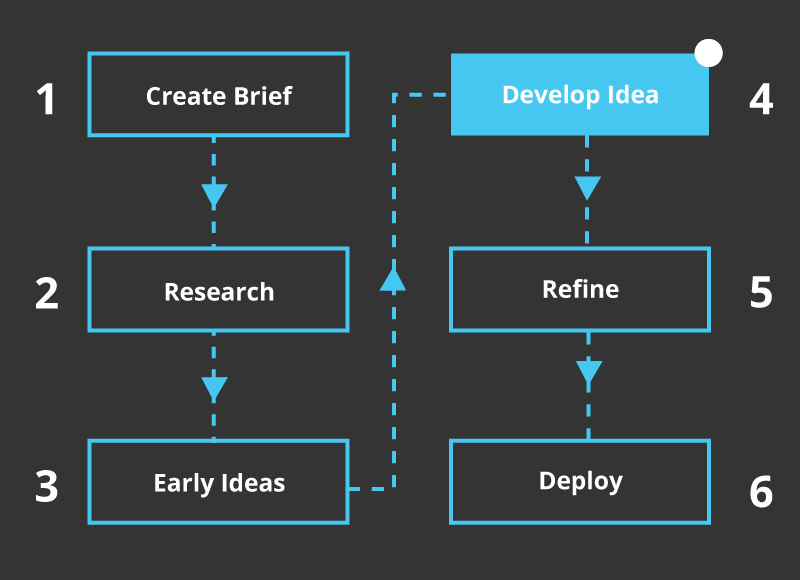
Stage 4 ) Development Stages | Graphic Design Process
How this stage translates in reality will vary from designer to designer. But as a general rule – it will work accordingly.
Once both the designer and client ( or clients ) have shortlisted the preferred design idea or ideas, this will then lead to that idea being developed. Being ‘developed’, or ‘developed further’ may consist of the following actions:-
Polishing the aspects of the design
Building upon the visuals to establish the viability of a concept
Moving the design to a delivery-ready stage
In layman’s terms, the development stages translate to the spit and polish applied to the shortlisted idea. The development stage can also be further proof of concept, in which an idea is built further.
Speaking for myself, this is the stage where I straighten up text, remove burs, tweak compositions, and add the final ingredients to get a design over that proverbial line.
The later development stages are when a design moves towards completion. Be it a piece of print media or as a digital project.
Common Situations That Arise In The ‘Development’ Stages
From my own experience, the development stage is the part of the process in which an idea is stress-tested against the brief.
It not uncommon for senior managers, CEOs, business owners and anybody else in between to have additional opinions on overall design direction – some relevant, some not. This is the reality of working with humans on a design brief.
Project requirements change. What was initially established as the winning idea, does not strictly translate to what was hoped when it comes to Graphic Design. Project scope can change, and external influences can derail the path of your project – there are many various factors when it comes to design.
Even in the development stages, I have had situations in which 2 of the same idea ( colour change for example ) have been created side by side.
Imagine A Development Tree ( illustration )
Design development can be one of the heftiest stages of design. I wanted to illustrate the development flow for the mid-to-late stages of a graphic design project.
This is a scenario.
A favourite idea has been selected. This idea has been polished and presented before the ultimate decision-makers. They like the design, however, somebody wants to see the same layout but on a different background. You have run with the same idea and made some minor changes. A sub-version of a main version – sound complicated?
A single idea has been selected. This idea will make up the trunk of the flow and energy to design.
From this single idea – the trunk of a tree – a single branch or node will stem.
On some projects, as is the case with experimenting with some minor variation of core ideas. 1 or 2 twigs will stem.
These ‘Twigs’ may be little more than a colour variation, or position change. Or some minor experimentation alignment.
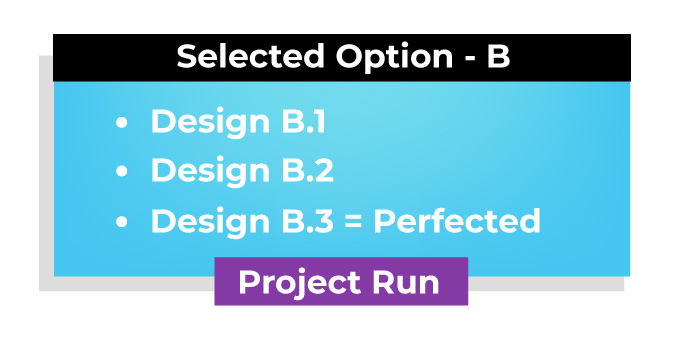
Development Versions
Or to further illustrate, as a tested method I have used in the past. It makes look like so:
Version 3.1
Version 3.2
Version 3.3
Or it could also look like this.
The number 3 could represent ‘Idea 3’ and the variant or version ‘1’ and 2, and 3. And so on. It is similar to version releases.
3.0 = The main version
3.1 = May equate to almost the exact same look, perhaps a text change
3.2 = Still much the same as 3, only that the text and, text colour were changed to a lesser degree
4.1 ) How to communicate with designers regarding project development
Communication is an integral part of graphic design.
The very nature of graphic design is visual ‘communication’ and open dialogue is a must to ensure that the project is the best that it can be.
Communication should not stop with the end visuals.
Not being able to keep an open and frequent line of communication between the designer and client ( or manager ) allows more room for errors, misunderstanding, and needless time wasting which could have been easily averted with conversation. I am a big advocate for working as close with a client as possible as emails alone can miss those ‘water cooler’ moments.
Communication is important from start to finish, not only in the development stages but throughout.
Typically, communication in the development stages of a project will take the form of feedback on what has already been created by the graphic designer. A client will offer a point of view as will a designer. ( hopefully ).
Communication and feedback may come in this form :
Exchanges between emails
Phone calls
Video meetings
In-person meetings
Platforms in which you can message your team
And SMS – And Whatsapp ( both of which are my least favourite lines of communication when it comes to design )
4.2 ) Design Feedback
“ Can I just ask…”
“ This is will be quick…”
When an idea has been chosen and developed, it is at this latter stage that a client, client or team member will offer further feedback with regard to a design. And, if you are a designer reading this, it is a stage in which you brace yourself.
Once the feedback has been communicated to a graphic designer, they will then respond and act accordingly to that feedback.
This feedback to the designer may resemble the following :
Make some minor tweaks and adjustments
Listening the what the client has to say and offer polite help and advice in return
Refining the design
Preparing for completion
Or potentially going back to the conceptual stages
( Or crying )
Stage 5 ) Core Design Steps – Refine Design
Refining the design typically entails polishing ‘the developed’ artwork to completion. A project will be at a level of final draft in which the artwork is ‘near ready’ to be sent to the client, production or print. This is the latter stage of a project.
Refining a design can involve minor tweaks, minor changes, or the very last touches to the design and a once-over from the person giving a sign-off.
It is common for me to hear some of the following types of phrases at this stage ( paraphrased ) :
The final stage of the process – the Sign off. This phase may seem self-explanatory, but for the sake of completeness, I will elaborate.
The ‘Sign Off’ can refer to the stage in which a head of a team ‘signs off’ a final design or interim stage of a project. This may be a verbal or written formal declaration that what is being presented, is the artwork to be passed to the next stage.
In this instance, the ‘sign off’ on the final artwork – completion.
The ‘Sign off’ in the design process may take the form of the client saying that they are happy with what they have seen and wish to sign off the whole, or part of the project.
When at this stage, It is also wise for the client to assess their artwork closely before agreeing to sign off any design work. When artwork has already been sent to print as a PDF, it can be costly or sometimes impossible to remedy any mistakes once a project has been printed. Any mistakes need to be remedied with hacks and workarounds.
This is not strictly speaking as rigid as digital design, as projects tend to be easier to remedy and amend but this is still not a guarantee.
The Graphic Design Process | What Are ‘Deliverables’?
What are deliverables in design?
Speaking in terms of graphic design, the deliverables are the complete assets and artwork made by the designer. All completed artwork, files, and supporting documents are often referred to as ‘deliverables’ or final artwork. The completed artwork and supporting items are often handed to the client or owner when a project has been marked as complete or signed off.
This is how the deliverables may come into play at the end of the graphic design process.
Once a graphic design project has been signed off or marked as complete, it is common for the graphic designers to send the final print-ready artwork to other the new owners of the artwork.
Or if working internally the designer may package the artwork into a PDF and this is passed to another department for validation and QC for being shipped or sent to print.
* It should be noted however that companies do have their own ways of validating and signing off projects, do keep this in mind.
6 .1) Scenario 1 | Design Process | What Is a Freelance Design Project Sign-Off?
‘Sign off, marked as complete, green-lighted’ or any other similar terminology can all be markers to signal the end of a project. When working with a client on a design project, I will ask the client to sign off on the final artwork before sending the final versions across.
This is a rough example of how a Freelance project process may flow towards the later stages of a project :
Client sees work
Requires small changes
These changes are then sent to a client
The client then sends across their approval, assuming that they do approve of what they see
Project is either sent to print or packaged up and passed to a client or both
6.2 ) Scenario 2 | Design Process | Internal Design Team Sign-off
As above, ‘Sign off’, ‘marked has complete’, ‘green-lighted’ or any other similar terminology can all be markers to signal the completion of a graphic design project.
A key difference based on my experience from working in-house design positions, ‘a sign-off sheet’ or an Excel spreadsheet may be used to mark off the stages or parts of a project that have been completed.
There are often more people with internal teams when it comes to the sign-off in-house who will want to see or understand the status of a project.
What is a Graphic Design Process – Conclusion
A graphic design process or workflow is a process or system in which a piece of graphic design or visual communication is created following a sequence of important steps. These steps will often include research, collection of data and information, ideation, development of an idea, and the delivery of that idea in print or digital form.
This process is what follows as the end result of what was assigned in a brief.
This post has been written to answer how to get into the board game design industry and what you can do to potentially get through those elusive hidden board game industry doors.
Getting into the board game industry is both simple yet difficult. When you know how and where to look, it Is simple.
When you do not know where to begin, getting into the board game industry is difficult, or at least finding the hidden doors is hard.
Boardgame design is experiencing a creative renaissance and there is no better time to join this growing fun and creative business. Nobody could blame you for wanting to work for a board game company at this time.
Getting involved in the industry is fun, creative, and rewarding!
What does it really mean to be In the board game industry?
Many board game designers are individuals and small teams with board game design being their passion. Their companies and side projects may run secondary to another main source of income.
In other words, their board game companies are paid hobbies that may bring them additional income and fulfilment.
These are all people who have got into the industry and make up for a large portion of the creators behind board games and the creative board game development.
Many of these smaller independent games design companies might be friends, partners, husband and wife teams etc which make up the board game ‘in’ crowd.
To get into the board game design industry, these smaller teams started to create games for the love of making games and published their own.
The smaller studios and tabletop game developers often grow their companies from a side passion to something that can earn money and allow them to continue to make board games.
Of how to get into the board game design industry and get involved with the big publisher to sell your game – that’s a battle in itself and are 2 very different doors into the industry.
Details below, if you are looking at working in the tabletop gaming industry, want to work for a game publisher or sell your game, idea or product then this helpful post is for you.
how to get into the board game design industry and work with smaller publishers and designers
If you are just starting out, looking to change career, or launch a passion project you can start creating your board game now.
There is no harm in starting small on a hobby project and working your way up to the bigger companies later if that is what you want to do.
There is also no shame in working with smaller companies and staying with little studios. By being part of a small team or going solo, you can get hands on experience with game design and development on many levels and in many “departments”.
As with various creative roles in the smaller outfits, it is a great way of being shown the ropes when you are part of a small unit.
But, even getting involved with smaller studios can be a challenge if you don’t want to go solo or you are just starting out.
Here are some tips on how to get into the board game industry and work with smaller developers and publishers.
Steps on how to get involved with (smaller businesses) in the board games industry
1 ) Have an interest in board games! This should be a given, but if you want to create some games, great! If you just want to make quick money, consider other careers.
2 ) Start creating games. Make it all about the game and the enjoyment of creating games. If you are stuck for ideas consider making a personal game project with a pencil and paper. You can make a fan game to, like this website shows – how to create a HeroQuest style game.
3 ) Take an interest in other games that have been created. Ideas rarely come from nowhere! Show interest in what types of games you like to play.
4 ) Sign up to board game forums and become an active member
5 ) Hang around with board game creators! You can attend various meetups and casual board game events
6 ) Network work extensively
That list of steps is a simplified way of what you can do to get into the tabletop gaming business and work with the smaller studios and independent makers.
There are many ways of accessing the industry and at varying levels.
And to be involved – is to be involved!
Enjoy games and meet people that also enjoy creating games, make connections In the gaming field.
how to access the board game industry and sell your game (small scale)
If you want to get serious and commercialise your game, meeting the right people is both important to this goal and challenging.
But how do you make these all-important contacts?
It is a case of where to be and where to look.
The most simple first step to making some initial contact in the industry is by going onto forums, looking at board game directories, and seeing what companies you find on Google.
This is the most straightforward, but in my opinion – not the most effective solution for making contacts in the board game industry.
Meeting face-to-face and showing what you can do is better. You can build up a rapport and discuss board games there and then. Be it at a show or a networking event.
So ‘where’ to meet these contacts and get into the board game design industry.
Get involved with the board game industry by attending shows and conventions
One of the best ways of getting involved with the board game industry is by showing up to conventions and shows and saying “hi”. Go to the boardgame stands, say hello and talk about your passion and see where it may lead!
Going to conventions and shows will also broaden your view on the industry as a whole. You get to meet companies that focus on party games, board games for the family, adult games, card games, poker games, RPG’s, science fiction, fantasy, games for young children!
There are too many to list.
Going to shows is a big way to build those all-important contacts.
Another way of getting into the industry, is through self-proclamation!
Self-publish your board game! “I am a board game developer”
I am a board game designer! Therefore, I am part of the board game industry!.
Another way to get into the board game design industry is by creating your own games and products. You may have already created your own game or aspire to create a game. By actually creating a game or products around gaming you can say –
“You are part of the board game industry”
To what capacity? That can be left to interpretation.
Creating a game and building a board game design career
The main focus of this article is on how to get into the board game design industry and creating your own games is early access to this.
I do not wish to deviate too much into the intricacies of creating a board game in this article. Creating board games is a skill in itself that deserves more than just a few sentences.
You can read more on creating a retail-ready game here if you want to focus on board game creation and selling your own products.
If you would like help with creating your game, you may also wish to look at the board game design services page or get in touch via my contact form.
Creating your first game or board game product is a great way of getting into board game creation. You can learn a lot from even just making a prototype. You can either pitch your prototype to a company or look at selling it yourself.
Getting involved with the big board game publishers (selling to and working with)
Getting into the board game design industry is challenge number 1. Eg create a game or fan game) and show what you can do. Set up a business.
But.
Working ‘with’ or ‘in’ the BIG board game companies is a separate challenge in itself, and tough inner circle to break into.
Because it is hard to get into, it certainly doesn’t mean that it isn’t worth it. Especially from a financial or publicity standpoint.
Here are few listed benefits as to why getting your board game into a larger board game can help your and your board game development career.
The benefits of getting your game in with a big company (selling your game)
Larger market penetration and industry coverage. The larger board game companies – publishers and distributors are more likely to have the retail and business channels to sell more copies of your board game in higher volumes. They might be good to approach after you have also (potentially) created a Kickstarter, if crowdfunding is a path you take.
Great marketing for your board game. At first, getting your name out there can be a huge advantage for the future and for growing your board game design business.
More revenue – Having more revenue isn’t the same as having a higher margin (making more money per individual unit) The the big retailers are likely to shift larger volumes of your game than just you on your own.
More on the example below.
Selling your game through a larger board game company vs do it yourself – rough example
Although “do it yourself” is a great way of getting into the board game industry, you will have to out a lot of energy into multiple avenues of the business. As opposed to the bigger business may be able to sell your game in larger volumes.
Do it yourself method
You sell 100 units, throw all of your time and energy into distribution and logistics – earn £3 (profit) unit for example per game. You take away £300
Selling your game through a large publisher or distributor (getting involved with the companies)
As an example, you sell 10,000 units through a board game publisher or distribution company and earn £2 per unit. (rough example – NEVER a guarantee)
Per unit, that is less.…
The publishers will take a larger cut – BUT – you earn £2 x 10,000 = £20,000. The bigger companies have access and possibly bigger selling power.
Not only will you be more likely to sell higher volumes through a board game distributor or publisher. It will allow you to focus more on board game development and design. If that is what you want to do.
To get involved with the large publishers can be difficult if you are starting out in your career. The next section focuses on how to get into the board game design industry and work with the big board game companies.
“The easier you make it for the businesses to sell your game and increase ‘their’ revenue. The easier you will make it for yourself.”
How to get your board game into the big companies, publishers and retailers
If you are board game designer and developer or an aspiring creator! You may have ambitions to get your game into the big publishers and distributors.
As with any businesses, and contrary to popular belief, most companies and buyers are risk-averse. If working with you and your game proves to be a potential risk with weak financial returns, they won’t sell your game.
To get involved with the big companies in the board game industry, make your game retail-ready and full or promise.
The easier you make it for the businesses to sell your game and increase ‘their’ revenue. The easier you will make it for yourself.
In other words, earn more revenue for them and earn more revenue yourself.
Getting yourself and your board game ready for retail
In order to get into the board game industry, I have written a couple of design-focused entrepreneurial tips that will help you in creating a game for retail in mind.
Creating your game and playing it is one thing but creating game that gets the attention of the bigger businesses is another.
* it should be noted that reading posts and saying “is that all” it takes is not the best mindset to start on. Creating games and creating games ready to be sold is a big time consuming effort and can be a labour of love many.
Tick boxing alone, will not guarantee the success of a game. Use your initiative, use critical thinking, and be prepared to try and try again to crack that industry!
How to work for a board game company (in house, freelance)
To work for a board game company you need to prove that you can work in a relevant field in the board game industry and also work as part of a team!
There are various skills, roles and departments for budding games designers to consider :
To answer “how to work for a board game company“, be it freelance, contract, or in-house, you should consider working on skills that will lend itself to the game company you wish to work for or with.
As with the list of skills and roles above, this is a glance at some or the roles and departments available that you can work in. If you wish to work in a more permanent position at a company or a board game publisher you should network and look on job boards to find the ideal position for you.
You may also need to be prepared to move location for most jobs if you wish to work in-house.
What is the ‘best’ way of getting work in the board game industry?
There isn’t a single and clear cut path of how to get into the board game industry, each journey and career will be unique to the individual.
To choose which is the best way, as based on opinion, experience, and observations on how to get into the board games business. I would say the following are some of the best and most prominent ways of getting into the tabletop gaming industry.
1) Have a passion for tabletop games or/and creating games
2) Meet the right people for your game niche and share passion, knowledge, and skills with games and creating games.
3) Attend trade shows and make contacts. Network with other board game creators * ( personnel and favourite/ best method)
4) Look on jobs boards in the creative industries and dedicated board game communities. Facebook and Board game geek
5) ‘Niche’ on a certain skills and keep scouring the communities equipped with a portfolio or examples of what you can do!
6 ) And above all else – the best way on getting into the board games is to keep trying if you are passionate about board games!
“We found these contacts mostly through trade shows and events.“
How to get into board game design industry | A firsthand account
I wanted to discuss my first-hand account of how I became involved in the board game industry and how you may find my story interesting or helpful in your creative journey!
I was involved In creating a party game at my previous job. It was created as part of “Product Development – innovation engine” which was a weekly process that was rolled out from 2016.
I and the team at the time realised that a game might be popular. It was inspired by something a colleague had seen on TV. I was sceptical initially but I was won around. (good job!)
We spent a few months designing and developing a party game.
The game was a commercial success and we went on to develop more products and expansion at the request of a large board game retailer. This opened a very wide door to more investment.
From there other retailers also requested the game. It grew in popularity in the UK.
We found these contacts mostly through trade shows and events. They were a mixture of board game distribution companies, smaller retailers, and high-street shops.
That was my first-hand experience in working commercially in board games and 1 first-hand example of how to get into the board games industry.
Off my own back.
I then started to find more contacts at conventions and shows. Many of the these people I networked with were a mixture of small independent game designers to larger-scale board game developers.
And to this day, I am always looking for ways of building new contacts and ways I can help independent board game developers create their game.
That was an (‘is’) part of my professional journey.
An example of how to start early – get your children to start making games!
This is an example of somebody that has the will and drive to create something they love! This person was undeterred by pessimism, cynicism, and the knowledge of money!
Just the want and the like of creating their own game. I think there is a lesson us adults we can learn here.
* For confidentially, I cannot mention in detail about the parties involved.
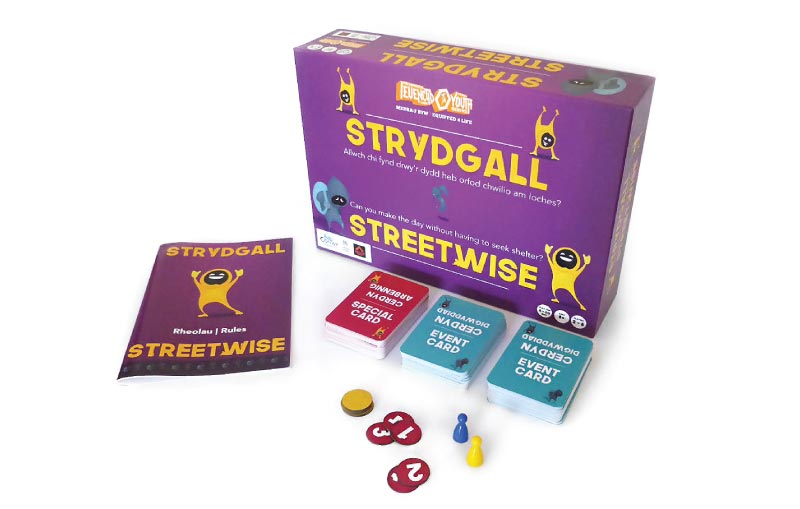
I wanted to draw your attention to this prototype by a budding game designer. ( my part was in the visual and creative design + getting it ready to look at )
The client started first by drawing a rough game on post-it notes and mapping out the game.
They had already playtested and worked out the mechanics before contacting me. They just wanted to figure out “how to make it”.
From the rough prototype. I came up with visuals, character vectors and ideas how it would look and what was going on.
I had the joy of designing the box art, the game cards, conceptualising and creating the dinosaurs, the caveman, tokens, and the board!
This is an example of what you can do if you decide to go down the self-publish route.
Having something physical to show looks both professional and that you are serious and passionate about the board game industry. This will be your early steps of how to get into the board game design industry
People are often tactile and like to look by touch also.
How to get into the board game design industry – The final answer
To consolidate and simplify the answer, there are a couple of main routes on how to work in the board games industry.
The main path is by making the right contacts at shows, conventions, and events – meeting the right people in senior positions at board game companies will put you at a strong advantage.
Another alternative way of getting into the board game industry is by creating and publishing your own game and making yourself part of the industry.
The final point for you to get into the industry is by looking at niche board game job boards or job boards in creative industries. Look on Facebook and Board Game Geek also
With many creative businesses – a big part of it is, who you know, what you can do.
Love (or like) what you do!
that is how you can get into the board game industry. Persistence, passion, and having a lot of good relevant business contacts in the business. And trial and error, luck and determination.
If you have found this post helpful, feel free to share. All the best in your board game creation career.
In your journey into getting into the Boardgame design business you may also find some of the following articles helpful.
Other helpful topics to help you get into the industry
The games and images in this article are all copyrighted, please do not use or distribute. Handy tips – how to get into the board game design industry and how to work for a board game company.
“NETWORK!”
This website uses cookies to improve your experience. We'll assume you're ok with this, but you can opt-out if you wish. Cookie settingsACCEPT
Privacy & Cookies Policy
Privacy Overview
This website uses cookies to improve your experience while you navigate through the website. Out of these cookies, the cookies that are categorized as necessary are stored on your browser as they are essential for the working of basic functionalities of the website. We also use third-party cookies that help us analyze and understand how you use this website. These cookies will be stored in your browser only with your consent. You also have the option to opt-out of these cookies. But opting out of some of these cookies may have an effect on your browsing experience.
Necessary cookies are absolutely essential for the website to function properly. This category only includes cookies that ensures basic functionalities and security features of the website. These cookies do not store any personal information.
Any cookies that may not be particularly necessary for the website to function and is used specifically to collect user personal data via analytics, ads, other embedded contents are termed as non-necessary cookies. It is mandatory to procure user consent prior to running these cookies on your website.